jp.ik MOVE S102 Скачать руководство пользователя страница 7

EN


USER GUIDE


7

BACK TO INDEX

5. CHARGING YOUR DEVICE

If you are charging the device for the first time, it will take around 4 to 5 hours 

to be fully charged.

To charge your device:
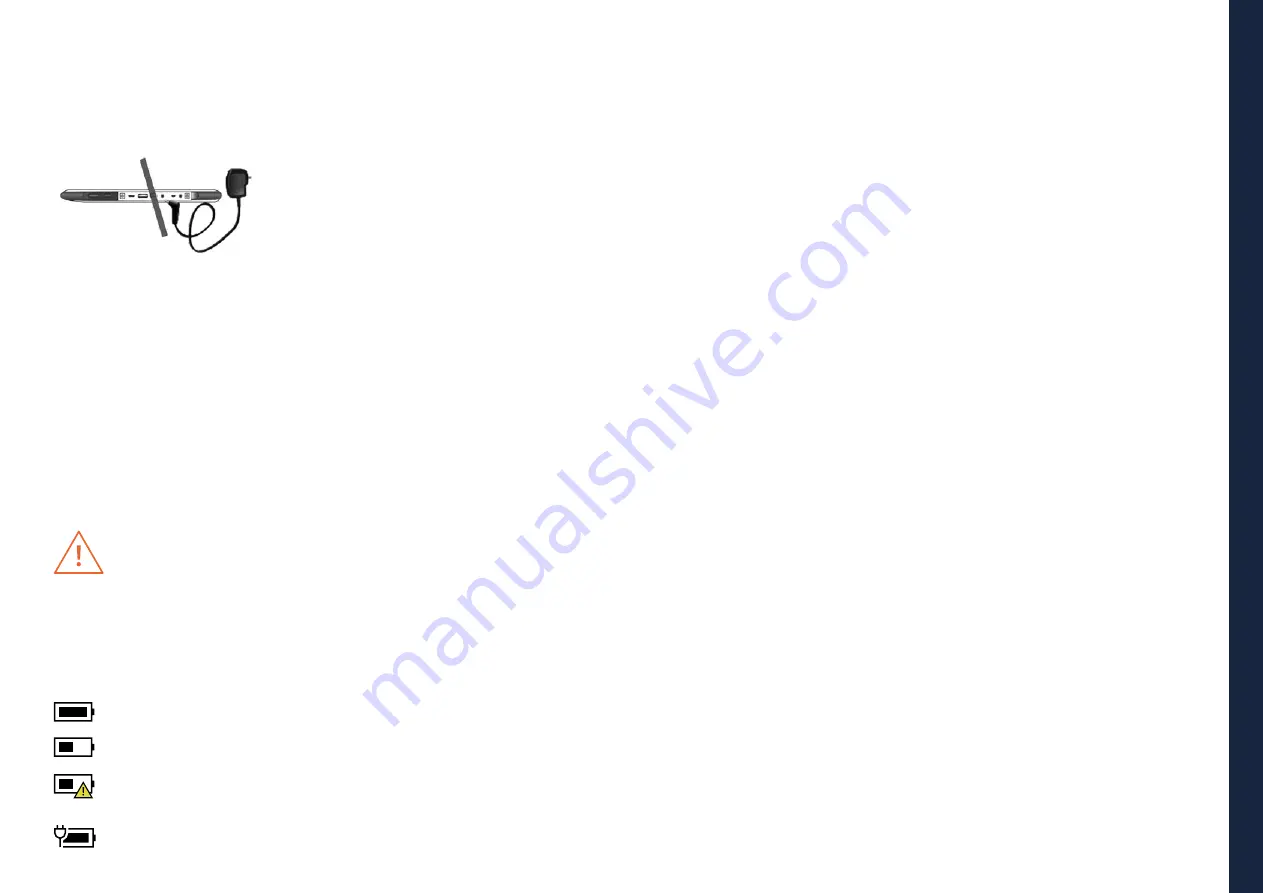
1.

 Plug the adapter into the USB Type-C, which you 

can find in the I/O cabinet as shown in the figure;

2.

 Plug the adapter into a wall-socket.

Note:

Plugging the adapter with a remaining battery capacity above 90%, might prevent

the equipment from reaching its full charge.

•  Connecting the charger improperly may cause damage to the device. Damages 

caused by misuse are not covered by the warranty.

•  The device can be used while it is charging, but the charging process may take longer.

•  It is normal for the device to become warm during charging for long periods of use.

•  Do not leave your device connected to the power supply once it is fully charged.

•  Once it is fully charged, unplug the charger from the device, and then unplug it 

from the electric supply. Use only accessories approved by jp.ik, like chargers, 

batteries, and cables. Unapproved chargers or cables can damage the device 

or the battery.

Only use the bundled power adapter. Unplug your device from the power supply 

once it is fully charged. These devices are not designed to be left connected to the 

power supply for long periods of time. Do not use the charger on other devices.

5.1 Battery charge status

To check the battery status, go to the battery status icon on the status bar. The 

following icons represent the battery status of our devices:

Battery is fully charged.

Battery is starting to drain.

Battery is about to completely drain, and you should stop using your 

device and charge it at once.

Battery is being charged.

5.2 Saving battery power

Our devices provide options that help you save battery power.

A battery is an expendable supply. Thus, when used over a long period, its capacity

is shortened. If the battery of your device is reduced to under a half of its initial

time, we recommend the purchase of a new battery.

When you don’t use the battery for a long time, you must store it after charging

(we recommend you to charge it at least until 30% or 40% of its capacity). This will

extend the battery life time of your device.

By customizing some options, you can use the device during longer periods of

time between charges:

•  Close unnecessary applications;

•  Deactivate the Bluetooth and the Wi-Fi connection if not needed - To turn off 

the Bluetooth, open the "Quick Settings" panel. Here either switch on Airplane 

mode to disable all wireless connections, or switch off Bluetooth and Wi-Fi to 

disable the features;

•  Deactivate auto-synchronization of applications like Gmail, Calendar, Contacts 

and other applications if not needed - To turn off the synchronization, open the 

Settings screen and click on the app you want to stop, for example, touch Google 

or the Email app, under Accounts category. Then, in the right corner, touch the 

menu button and select "Cancel sync" to suspend the auto-sync function;

•  Decrease the brightness of your display - To do so, open the Quick Settings 

Panel, locate the screen brightness icon and then drag the slider to the left to 

reduce screen brightness, or open "Android settings" and touch on "Display- 

Brightness level". Drag the slider to the left to reduce the screen brightness;

•  Turn off the screen when the device is temporarily not in use - Press the power 

button once to turn off the screen;

•  Power off your device when is not used for a while - To do that, press the power 

button until the Power off menu is displayed, then touch Power off;

•   Use of the GPS feature - Many apps work to pinpoint your location, thus 

consuming battery life. You can reduce the power consumption using the 

Battery Saving GPS mode, minimizing the number of reference points used 

to find your location. To enable this mode, head to "Settings" > "Location"> 

"Mode", and enable "Battery Saving".

Содержание MOVE S102

Страница 1: ...MOVES102 user guide manual del usuario manual do utilizador Learning everywhere EN ES PT...

Страница 2: ...ur device make sure you read the User Guide that explains how to operate the equipment This will ensure that you use your device safely and correctly This user guide is for reference only and it is su...

Страница 3: ...6 3 Sleep mode 6 4 Waking up 7 OPERATIONS 7 1 Basic touchscreen operations 7 2 Stylus operations 7 3 Onscreen keyboard 7 4 Dictionary 8 HOME AND SETTINGS 8 1 Home screens 8 2 Status bar 8 3 Screen se...

Страница 4: ...rily if the device is overheated Do not use your device in a hospital in an aircraft or in an automotive equipment as it can be interfered with by radio frequency Avoid using your device within a 15 c...

Страница 5: ...device or cause it to malfunction They may also result in a fire or cause the battery to explode When using unapproved accessories batteries or supplies user s safety is not guaranteed and is of his s...

Страница 6: ...INDEX 4 DEVICE OVERVIEW Front camera Power Lock Microphone Volume up down Input output cabinet Touchscreen Stylus holder Stylus Speaker Docking Port Micro HDMI port Headphone jack Micro SD card slot...

Страница 7: ...d its capacity is shortened If the battery of your device is reduced to under a half of its initial time we recommend the purchase of a new battery When you don t use the battery for a long time you m...

Страница 8: ...ower button briefly one time It is recommended to put your device in sleep mode when you want to move it 6 4 Waking up To wake up your device press the power button briefly one time 7 OPERATIONS 7 1 B...

Страница 9: ...language do the following Open Settings screen and touch Language input All the input methods are listed Locate the input method you are using and touch the settings icon Configure the language settin...

Страница 10: ...tions If you misspell a word the word is underlined with a red line Touch the misspelled word and a list of suggested corrections is displayed Touch the one that best matches your word The misspelled...

Страница 11: ...ettings app and you can find it in the All Apps screen To open the All Apps screen touch the All Apps icon which you can find in the Home screen 9 WIRELESS NETWORKS AND DEVICES Your device can connect...

Страница 12: ...uetooth button to ON Open the Settings screen and switch Bluetooth button to ON When enabled the Bluetooth icon is displayed on the system bar When you are not using Bluetooth turn it off to extend th...

Страница 13: ...t that plugs into the Micro USB port on your device and lets you connect devices to it that use standard USB connections The following USB devices are most likely supported but are not official Mouse...

Страница 14: ...tem is doing and what actions you performed before the problem occurred Provide detailed information to your service provider for quicker problem resolution For most problems follow these steps Restar...

Страница 15: ...elds recommended by international guidelines The guidelines were developed by an independent scientific organization ICNIRP and include a substantial safety margin designed to assure the safety of all...

Страница 16: ...usar su dispositivo aseg rese de leer el Manual del Usuario que explica c mo usar el dispositivo Esto garantizar que utilice su dispositivo de forma segura y correcta Este manual es solo para referen...

Страница 17: ...l piz 7 3 Teclado en pantalla 7 4 Diccionario 8 PANTALLA DE INICIO Y CONFIGURACIONES 8 1 Pantallas de Inicio 8 2 Barra de estado 8 3 Ajustes de pantalla 9 DISPOSITIVOS Y REDES INAL MBRICAS 9 1 Redes W...

Страница 18: ...ida til de su dispositivo No guarde el dispositivo en lugares muy calientes o fr os Se recomienda utilizar su equipo a temperaturas medias entre 5 C y 35 C No use su dispositivo si est sobrecalentado...

Страница 19: ...positivo puede calentarse Esto es normal y no deber a afectar la vida til ni el rendimiento del dispositivo Si la bater a se calienta m s de lo normal es posible que el cargador deje de cargarse Utili...

Страница 20: ...DISPOSITIVO C mara frontal Bloqueo de energ a Micr fono Subir bajar volumen Secci n de puertos I O Pantalla t ctil Soporte del l piz L piz Altavoces Puerto de acoplamiento Puerto micro HDMI Puerto de...

Страница 21: ...a agotarse La bater a est a punto de agotarse por completo y debe dejar de usar el equipo y cargarla de inmediato Se est cargando la bater a 5 2 Ahorro de energ a de la bater a Nuestros dispositivos b...

Страница 22: ...de apagado Toque el men para apagar la alimentaci n al tocar en cualquier otro lugar de la pantalla continuar usando el dispositivo Su dispositivo comenzar a apagarse solo 6 3 Modo de suspensi n Mien...

Страница 23: ...Abra la pantalla Configuraci n y toque Idioma y entrada Se enumeran todos los m todos de entrada Busque el m todo de entrada que est utilizando y toque el icono de configuraci n Configure los ajustes...

Страница 24: ...de correcciones sugeridas Toque el que mejor se ajuste a su palabra Se reemplaza la palabra mal escrita Tambi n puede crear su propio diccionario utilizando la funci n de diccionario personal Para ag...

Страница 25: ...se realiza mediante una aplicaci n llamada Configuraci n Esta es la aplicaci n para abrir la pantalla de Configuraci n Este es el cono de la aplicaci n Configuraci n y puede encontrarlo en la pantall...

Страница 26: ...CENDIDO Abra la pantalla Configuraci n y cambie el bot n Bluetooth a ENCENDIDO Cuando est habilitado el icono de Bluetooth se muestra en la barra del sistema Cuando no est usando Bluetooth ap guelo pa...

Страница 27: ...formas diferentes Un adaptador USB OTG es b sicamente un puerto USB hembra que se conecta al puerto Micro USB de su dispositivo y le permite conectar dispositivos que utilizan conexiones USB est ndar...

Страница 28: ...mento Pantalla de rotaci n autom tica no est bloqueado No sale sonido de mi dispositivo Si los auriculares est n conectados al dispositivo el altavoz se apaga autom ticamente Desconecte los auriculare...

Страница 29: ...el inicio del dispositivo lo que puede restaurar su dispositivo a la configuraci n predeterminada El dispositivo se calienta cuando se carga o funciona durante un per odo prolongado Es normal que el...

Страница 30: ...se debe a que por motivos de eficiencia del sistema y para minimizar la interferencia en la red la potencia operativa desudispositivosereduceautom ticamentecuandonosenecesitalapotenciam xima para la...

Страница 31: ...u equipamento certifique se de ler o Manual do Utilizador que explica como utilizar o equipamento Isso vai garantir que usa o seu dispositivo com seguran a e corretamente Este manual apenas para refer...

Страница 32: ...2 Opera es com caneta 7 3 Teclado no ecr 7 4 Dicion rio 8 ECR DE IN CIO E CONFIGURA ES 8 1 Ecr s de In cio 8 2 Barra de estado 8 3 Configura es de ecr 9 DISPOSITIVOS E REDES SEM FIOS 9 1 Redes WI FI...

Страница 33: ...xtremas podem danificar o equipamento e reduzir a capacidade de carregamento e a vida til do seu dispositivo N o guarde o dispositivo em locais muito quentes ou muito frios Recomenda se usar o seu equ...

Страница 34: ...danos ao dispositivo Qualquer dano causado por uso indevido n o coberto pela garantia Durante o carregamento o dispositivo pode aquecer Isso normal e n o deve afetar a vida til ou o desempenho do disp...

Страница 35: ...DO EQUIPAMENTO C mara frontal Bloqueio de energia Microfone Aumentar diminuir volume Portas I O Ecr t til Suporte da caneta Caneta Altifalantes Porta de encaixe Porta micro HDMI Entrada de auscultador...

Страница 36: ...a o para suspender a fun o de sincroniza o autom tica Reduzir o brilho do ecr para fazer isso abra o Painel de configura es r pidas localize o cone de brilho do ecr e arraste a barra deslizante para a...

Страница 37: ...fun es de suporte dependem da aplica o Toque duplo Pressione levemente duas vezes com o dedo para selecionar um item Pressione e mantenha Pressione e mantenha o dedo num item Isso exibe informa es de...

Страница 38: ...teclado na barra preta abaixo do teclado para abrir a caixa de di logo de sele o do m todo de entrada Toque no idioma desejado na caixa Editar texto Para editar o texto no ecr abra uma barra de menu...

Страница 39: ...quisa do GoogleTM Pesquise informa es na Internet 3 Todas as aplica es Um bot o de navega o Toque nele quando quiser abrir o ecr Todas as aplica es onde pode encontrar todas as aplica es instaladas no...

Страница 40: ...Alguns pontos de acesso s o abertos ao p blico mas outros implementam recursos de seguran a para limitar o acesso a grupos ou indiv duos espec ficos Conectar a uma rede Wi Fi Para estabelecer uma cone...

Страница 41: ...O ecr Bluetooth mostra o seu nome Bluetooth e uma lista de dispositivos dispon veis Al m disso um cone aparece no canto superior direito Este o cone do menu Toque para mostrar mais op es de configura...

Страница 42: ...Os seguintes dispositivos USB provavelmente s o compat veis mas n o s o oficiais Rato e teclados algumas teclas podem n o ser suportadas Leitores de cart o Suporta o formato FAT16 FAT32 Controladores...

Страница 43: ...s a es podem resultar em perda ou dano de dados Anote o que o sistema est a fazer e as a es tomadas antes de o problema ocorrer Forne a informa es detalhadas ao seu provedor de servi os para uma resol...

Страница 44: ...o carregamento Quando o carregamento estiver conclu do ele retornar sua temperatura normal Tamb m normal que o dispositivo aque a durante longos per odos de uso como assistir a um v deo ou jogar um jo...

Страница 45: ...orre porque por raz es de efici ncia do sistema e para minimizar a interfer ncia na rede a pot ncia operacional do seu dispositivo reduzida automaticamente quando a pot ncia m xima n o necess ria para...

Страница 46: ...u piensa Su opini n es importante para nosotros La encuesta debe tomar alrededor de 3 minutos para completar Sus respuestas son confidenciales y su identidad est protegida por la pol tica de privacida...

Страница 47: ......

Страница 48: ......

Страница 49: ......

Отзывы: