JOYSTEK BELL J1 Скачать руководство пользователя страница 3

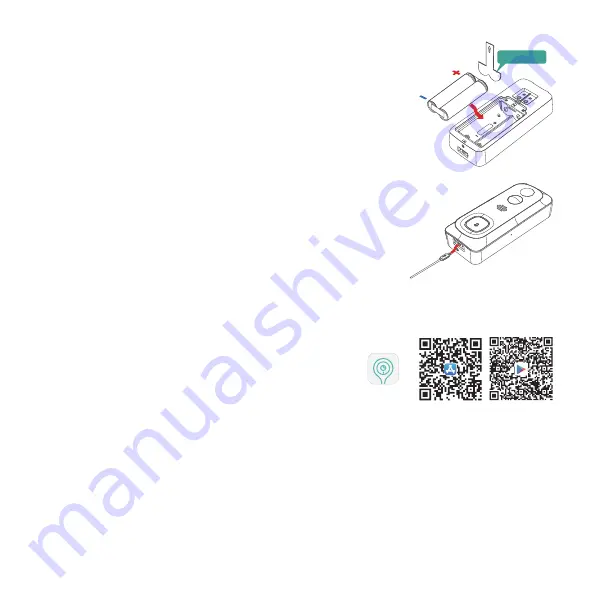
4. Battery installation

The batteries are pre-installed in the doorbell, with an isolating film inserted 
in the positive poles. 

Please remove the film and insert the battery pack

back to compartment, with positive poles upward!

NOTE: 

Improper battery installation will cause damage to the internal components
and may result in serious injury.

The batteries inside the doorbell are not fully charged in accordance with 
transportation safety regulations. 
Please charge the batteries with a USB compatible wall charger (not included)
and the provided USB cable for about 8~10 hours prior to installation.

5. Battery charging

- 2 -

7. wi-fi set up

Before you start the Wi-Fi configuration, please note below:
1). The doorbell works with 2.4 GHz Wi-Fi, but not with 5 GHz Wi-Fi.
2). Avoid using special characters or symbols like

 )(@~!#$%^&*...

, either in your Wi-Fi name or password.

3). Perform the configuration near your Wi-Fi router. 

6. Download the app

Download and install the '

CloudEdge

' App from Google Play

TM

 or the 

App Store

TM

. The App is also available by scanning the QR codes on 

the right, using your QR code scanner on your smart phone. 

NOTE: 

Google Play

TM

 is a trademark of Google Inc. 

App Store

TM

 is a service mark of Apple Inc.

Launch the

 ‘

CloudEdge

 App and register an account with your mobile phone numer or email ID. Start the 

Wi-Fi configuration, following the in-App instructions or refering to the following guiding steps.

Android

iOS

CloudEdge

isolating film

Содержание BELL J1

Страница 1: ......

Страница 2: ...cator USB Port Type A M 3 4 1 3 2 4 Indoor Chime Screw Tools 1 2MP camera Motion sensor Speakers Doorbell button LED indicator Charging indicator Micro USB port Reset hole Security screw hole Micropho...

Страница 3: ...2 7 wi fi set up Before you start the Wi Fi configuration please note below 1 The doorbell works with 2 4 GHz Wi Fi but not with 5 GHz Wi Fi 2 Avoid using special characters or symbols like either in...

Страница 4: ...on spot is covered by strong 2 4 GHz Wi Fi signal Note If the video quality from the doorbell outside is not as good as it was indoors you may need to move your router closer to your installation spot...

Страница 5: ...10 57 30 10 58 10 58 30 10 59 10 59 Calendar Alarm 10 58 06 10 57 10 57 30 10 58 10 58 30 10 59 10 59 Calendar Alarm Nov 2019 SUN MON TUE WED THU FRI SAT 27 28 29 30 31 1 2 10 11 12 13 14 15 16 17 18...

Страница 6: ...Share Receive Notifications Device Information Basic Function Alarm Setting Device Version SD Card Cloud Server Settings 1 Device Share 9 55 Add 2 Device Share Recent contacts Scan QR Code Account 3...

Страница 7: ...de your family members to download and install the CloudEdge App and register an account prior to device sharing 2 There is no limitation on numbers of users sharing one device 3 Only the adminstrator...

Страница 8: ...4 1 Press and hold reset button on the chime for about 5 seconds till the indicator flashes blue twice and the chime will be restored to factory default 2 You can also tap on refer to Picture 4 in the...

Страница 9: ...166 1 Shut off power at the breaker remove the old doorbell from the wall and dis connect the wires 2 Connect the wires to the screw terminals on your mounting bracket Either wire can be connected to...

Страница 10: ...tery life may be different due to different activation freqency 3 Optional The nameplate holder can be mounted on the top rear bottom rear of the bracket prior to bracket installation 1 Dismount the b...

Страница 11: ...ite OS 1920 1080 px HD SD dual stream High power IR LED with ICR 1 7mm F2 0 166 Digital WDR 2 way audio with noise cancellation Color 0 01 Lux B W 0 001Lux Network Wifi Frequency Standards Live View S...

Страница 12: ...s well as cloud storage You can activate the cloud storage service in App Q5 What happens when the SD is full A5 When the memory card is full the camera automatically erase the oldest footage Q6 Does...

Отзывы: