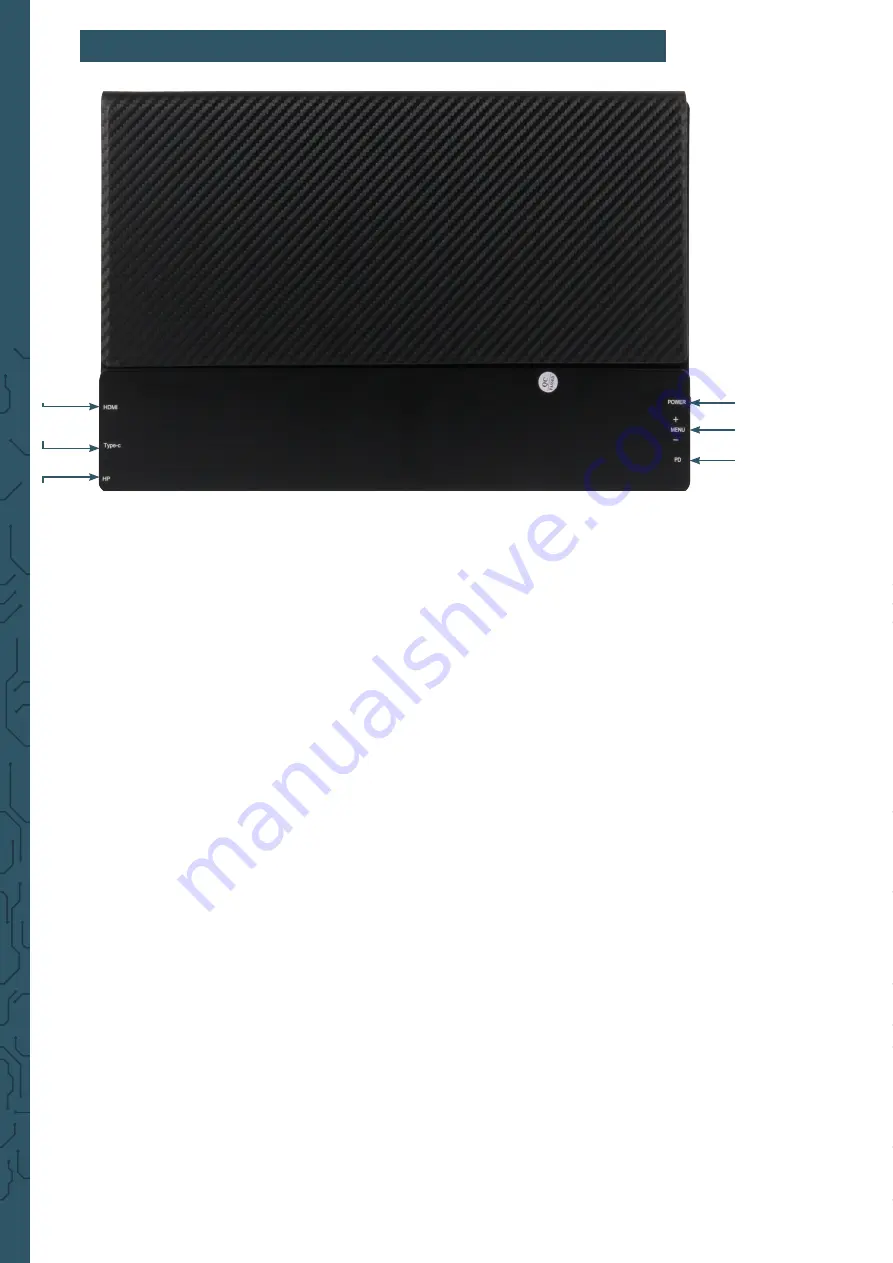
Joy-it VIEW 13 Скачать руководство пользователя страница 4

1. POWER


Press and hold down: switching the monitor on/off


Press shortly:  1. Open the signal source menue


2. Close or return in the OSD Menue

2. + / MENU / -


Push the button (MENU) to open the OSD Menue 


→ + / - to move through the menue


→ Push the button (MENU) to choose an option 


Push up the button t to open the brightness menue


→ + / - for brighter/ darker


Push down the button towards - to open the volume menue


→ + / - for volum up and volume down 

3. PD


Type-C port (supported PD) for power connection

4. HDMI


Mini-HDMI port for image transmission

5. Type-C


Type-C port for image transmisson, touchscreen and power

6. HP Headphones


port for audio output → 3,5 mm headphone jack

4.HDMI
5.Type-C

6.Loudspeaker

1.POWER

2.+ / Menue / -   

3.PD

5. FUNCTIONALITY OF BUTTONS & INTERFACES

Содержание VIEW 13

Страница 1: ...t hesitate to contact us The Joy View was designed for the USB type C interface and inherits a high quality touchscreen besides the Full HD resolution Many more devi ces like gaming consoles are suppo...

Страница 2: ...ity It can lead to fire or electric short circuits REMOVE CABLES BEFORE TRANSPORT Please remove cables before tranportation Otherwise this may lead to fire or short circuits DO NOT EXPOSE TO WATER Any...

Страница 3: ...72 sRGB bis zu 100 178 TFT IPS LCD 16 9 LED PD 5 20 V Type C USB 3 0 double loudspeaker 8 2W Mini HDMI Type C PD 3 5 mm headpone jack 0 50 C Aluminium alloy DO NOT TOUCH PLUG WITH WET HANDS In case yo...

Страница 4: ...the button towards to open the brightness menue for brighter darker Push down the button towards to open the volume menue for volum up and volume down 3 PD Type C port supported PD for power connecti...

Страница 5: ...ses language in the On screen display menue OSD H POS OSD V POS OSD TIMER TRANSPARENCY Horizontal orientation of the OSD position Vertical orientation of the OSD position Sets the durance of OSD open...

Страница 6: ...Hereto you can use different methods A Connecting the monitor without Touchscreen 1 Connect the monitor to electricity with the power supply or with a power bank via USB type A to USB type C 2 Connect...

Страница 7: ...f your device please connect it with a power sup ply additionally The Type C not PD port of the monitor still needs to be connected with your laptop or Raspberry Pi via the USB A port for operating th...

Страница 8: ...ook Pro MacBook Air iMac iMac Pro Microsoft Surface Book 2 Asus VivoBook Flip ROG STRIX Hero Edition ROG Zephyrus M GM501GS ROG STRIX Scar Edition ZenBook Pro 15 ZenBook S ROG STRIX ROG STRIX GL503VDU...

Страница 9: ...contact us via e mail phone und ticket support system E mail service joy it net Ticket System http support joy it net Phone 49 0 2845 98469 66 10 17 o clock For further information please visit our we...

Страница 10: ...ol projects as you can simply switch it off and close it at the end of the lesson and then continue working on the project in the next lesson Another advantage of the case is its great mobility and co...

Отзывы: