background image

17

MAINTENANCE

CLEAN AIR SCREEN 

Air screen must be kept free of dirt and chaff to prevent 
engine dam age from overheating.  Clean with a wire brush 
or compressed air to re move dirt and stubborn dried gum 
fi bers.

MUFFLER   

Inspect and replace corroded muffl er and spark arrester 
(if equipped) as it could create a fi re hazard and/or dam-
age.

SPARK PLUGS 

Replace spark plugs at the beginning of each mowing 
season or after every 100 hours of operation, whichever 
occurs fi rst.  Spark plug type and gap setting are shown in 
“PROD UCT SPECIFICATIONS” section of this manual.

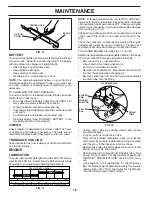
00667

CLAMP

FUEL
FILTER

CLAMP

FIG. 13

CLEANING

•     Clean engine, battery, seat, fi nish, etc. of all foreign 

matter.

•      Keep fi nished surfaces and wheels free of all gasoline, 

oil, etc.

•      Protect painted surfaces with automotive type wax.

We do not recommend using a garden hose or pressure 
washer to clean your tractor unless the engine and trans-
mission are covered to keep water out. Water in engine or 
transmission will shorten the useful life of your tractor.  Use 
compressed air or a leaf blower to remove grass, leaves 
and trash from tractor and mower.

CLEAN AIR INTAKE/COOLING AREAS

To insure proper cooling, make sure the grass screen, 
cooling fi ns, and other external surfaces of the engine are 
kept clean at all times.

Every 100 hours of operation (more often under extremely 
dusty, dirty conditions), remove the blower housing and 
other cooling shrouds. Clean the cooling fi ns and external 
surfaces as necessary. Make sure the cooling shrouds are 
reinstalled.

NOTE:

  Operating the engine with a blocked grass screen, 

dirty or plugged cooling fi ns, and/or cooling shrouds re moved 
will cause engine damage due to overheating.

AIR FILTER 

Your engine will not run properly using a dirty air fi lter. 
Service air cleaner more often under dusty conditions. See 
Engine Manual.

ENGINE OIL FILTER

Replace the engine oil fi lter every season or every other 
oil change if the tractor is used more than 100 hours in 
one year.

IN-LINE FUEL FILTER  (See Fig. 13)

The fuel fi lter should be replaced once each season.  If fuel 
fi lter becomes clogged, ob struct ing fuel fl ow to car bu re tor, 
re place ment is re quired.
•      With engine cool, remove fi lter and plug fuel line sec-

 tions.

•      Place new fuel fi lter in position in fuel line with arrow 

pointing towards carburetor.

•     Be sure there are no fuel line leaks and clamps are 

properly positioned.

•      Immediately wipe up any spilled gasoline.

Содержание LT2116

Страница 1: ...TOR ALWAYS WEAR EYE PROTECTION DURING OPERATION WARNING Read this Manual and follow allWarnings and Safety Instructions Failure to do so can result in serious injury IMPORTANT MANUAL Do Not Throw Away 403725 05 18 06 VB Printed in U S A 02478 ...

Страница 2: ...ass catcher or unclogging the discharge guard Operate machine only in daylight or good artificial light Do not operate the machine while under the influence of alcohol or drugs Watch for traffic when operating near or crossing road ways Use extra care when loading or unloading the machine into a trailer or truck Always wear eye protection when operating ma chine Data indicates that operators age 6...

Страница 3: ...gned for towing Do not attach towed equipment except at the hitch point Follow the manufacturer s recommendation for weight limits for towed equipment and towing on slopes Never allow children or others in or on towed equip ment On slopes the weight of the towed equipment may cause loss of traction and loss of control Travel slowly and allow extra distance to stop V SERVICE SAFE HANDLING OF GASOLI...

Страница 4: ...s will enable you to assemble and maintain your tractor properly Always observe the SAFETY RULES CUSTOMER RESPONSIBILITIES Read and observe the safety rules Follow a regular schedule in maintaining caring for and using your tractor Follow the instructions under Maintenance and Stor age sections of this owner s manual WARNING This tractor is equipped with an internal com bustion engine and should n...

Страница 5: ...ge Flat Washer Steering Boot Steering Wheel Adapter Seat 2 Keys Slope Sheet Key 1 Oil Drain Tube For Future Use 1 Washer 17 32 x 1 3 16 x 12 Gauge 1 Knob 2 Hex Bolts 1 4 20 x 3 4 2 Keps Nut 1 4 20 1 Hex Bolt 5 16 18 x 4 1 5 16 Lock Washer Steering Extension Shaft ...

Страница 6: ... hole in pan Push down on seat to engage shoulder bolt in slot and pull seat towards rear of tractor Pivot seat and pan forward and assemble adjustment knob and flat washer loosely Do not tighten Lower seat into operating position and sit on seat Slide seat until a comfortable position is reached which allows you to press clutch brake pedal all the way down Get off seat without moving its adjusted...

Страница 7: ... as shown Tighten securely Slide terminal cover over terminal Connect BLACK grounding cable to negative ter minal with remaining hex bolt and keps nut Tighten securely 02604 HEX BOLT NEGATIVE BLACK CABLE POSITIVE RED CABLE KEPS NUT SEAT PAN TERMINAL COVER DISCARD TERMINAL PROTECTIVE CAPS LABEL FIG 4 NOTE You may now roll or drive your tractor off the skid Follow the appropriate instruction below t...

Страница 8: ... Adjustments section of this manual CHECK FOR PROPER POSITION OF ALL BELTS See the figures that are shown for replacing motion and mower blade drive belts in the Service and Adjustments section of this manual Verify that the belts are routed correctly CHECK BRAKE SYSTEM Afteryoulearnhowtooperateyourtractor checktoseethat the brake is operating properly See TO CHECK BRAKE in the Service and Adjustm...

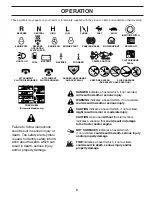
Страница 9: ...entify safety inform ation about hazards which can result in death serious injury and or property damage DANGER indicates a hazard which if not avoided will result in death or serious injury WARNING indicates a hazard which if not avoided could result in death or serious injury CAUTION indicates a hazard which if not avoided might result in minor or moderate injury CAUTION when used without the al...

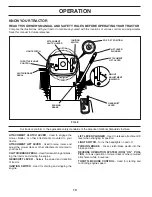
Страница 10: ... to your tractor CLUTCH BRAKE PEDAL Used for declutching and brak ing the tractor and starting the engine GEARSHIFT LEVER Selects the speed and direction of tractor IGNITION SWITCH Used for starting and stopping the engine LIFT LEVER PLUNGER Used to release attachment lift lever when changing its position LIGHT SWITCH Turns the headlights on and off PARKING BRAKE Locks clutch brake pedal into the ...

Страница 11: ...stoppingmaycauseengine to backfire Turn ignition key to OFF position and remove key Always remove key when leaving tractor to prevent unauthorized use Never use choke to stop engine IMPORTANT LEAVING THE IGNITION SWITCH IN ANY POSITION OTHER THAN OFF WILL CAUSE THE BATTERY TO BE DISCHARGED DEAD NOTE Under certain conditions when tractor is standing idle with the engine running hot engine exhaust g...

Страница 12: ...re grass catcher onmowerssoequipped orthedeflector shield in place BEFORE STARTING THE ENGINE CHECK ENGINE OIL LEVEL The engine in your tractor has been shipped from the factory already filled with summer weight oil Check engine oil with tractor on level ground REVERSE OPERATION SYSTEM ROS Your tractor is equipped with a Reverse Operation System ROS Any attempt by the operator to travel in the rev...

Страница 13: ...uit the terrain and give best performance of the attachment being used ADD GASOLINE Fill fuel tank to bottom of filler neck Do not overfill Use fresh clean regular unleaded gasoline with a minimum of 87 octane Use of leaded gasoline will increase carbon and lead oxide deposits and reduce valve life Do not mix oil with gasoline Purchase fuel in quantities that can be used within 30 days to assure f...

Страница 14: ...ithout oil filter 1 2 maint_sch tractore ROS e BEFORE EACH USE EVERY 8 HOURS EVERY 25 HOURS EVERY 50 HOURS EVERY 100 HOURS EVERY SEASON BEFORE STORAGE Lubrication Chart Check Brake Operation Check Battery Level Check Tire Pressure Clean Battery and Terminals MAINTENANCE SCHEDULE Check for Loose Fasteners Check Replace Mower Blades Check Operator Presence ROS Systems Check Transaxle Cooling Check V...

Страница 15: ... operator presence and reverse operation systems are working properly If your tractor does not function as described repair the problem immediately The engine should not start unless the brake pedal is fully depressed and the attachment clutch control is in the disengaged position CHECK OPERATOR PRESENCE SYSTEM Whentheengineisrunning anyattemptbytheoperator to leave the seat without first setting ...

Страница 16: ...ctorhasabatterychargingsystemwhichissufficient for normal use However periodic charging of the battery with an automotive charger will extend its life Keep battery and terminals clean Keep battery bolts tight Keep small vent holes open Recharge at 6 10 amperes for 1 hour NOTE The original equipment battery on your tractor is maintenance free Do not attempt to open or remove caps or covers Adding o...

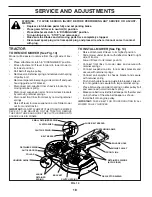
Страница 17: ... and mower CLEAN AIR INTAKE COOLING AREAS To insure proper cooling make sure the grass screen cooling fins and other external surfaces of the engine are kept clean at all times Every 100 hours of operation more often under extremely dusty dirty conditions remove the blower housing and other cooling shrouds Clean the cooling fins and external surfaces as necessary Make sure the cooling shrouds are ...

Страница 18: ... suspension arms Slide mower out from under tractor IMPORTANT IFANATTACHMENTOTHERTHANTHEMOWER DECK IS TO BE MOUNTED ON THE TRACTOR REMOVE THE FRONT LINKS AND HOOK THE CLUTCH SPRING INTO SQUARE HOLE IN FRAME TO INSTALL MOWER See Fig 14 Raise attachment lift lever to its highest position Slide mower under tractor with deflector shield to right side of tractor Lower lift lever to its lowest position ...

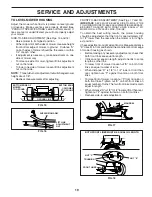
Страница 19: ...l number of turns When distance D is 1 8 to 1 2 lower at front than rear tighten nuts F against trunnion on both front links To raise front of mower loosen nut F from trunnion on both front links Tighten nut E on both front links an equal number of turns The two front links must remain equal in length Whendistance D is1 8 to1 2 loweratfrontthanrear tighten nut F against trunnion on both front link...

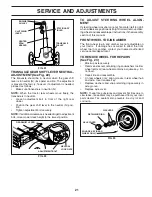
Страница 20: ...press clutch brake pedal all the way down and en gage parking brake Place gear shift lever in neutral N position Therearwheelsmustlockandskidwhenyoutrytomanually push the tractor forward If the rear wheels rotate the brake needs to be adjusted or the pads need to be replaced TO ADJUST BRAKE Depress clutch brake pedal all the way down and en gage parking brake Measure distance between brake operati...

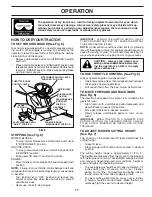
Страница 21: ... steering wheel crossbars are not horizontal left to right whenwheelsarepositionedstraightforward removesteer ing wheel and reassemble per instructions in the Assembly section of this manual FRONT WHEEL TOE IN CAMBER The front wheel toe in and camber are not adjustable on your tractor If damage has occurred to affect the front wheel toe in or camber contact your nearest authorized service center d...

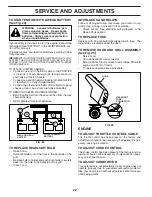
Страница 22: ...sec tion of this manual If jumper cables are used for emergency starting follow this procedure IMPORTANT YOURTRACTOR IS EQUIPPEDWITH A 12VOLT SYSTEM THE OTHER VEHICLE MUST ALSO BE A 12 VOLT SYSTEM DO NOT USEYOUR TRACTOR BATTERY TO START OTHER VEHICLES TO ATTACH JUMPER CABLES Connect one end of the RED cable to the POSITIVE terminal of each battery A B taking care not to short against tractor chass...

Страница 23: ...FUEL SYSTEM PARTS SUCH AS CARBURETOR FUEL FILTER FUEL HOSE OR TANK DURING STORAGE ALSO EXPERIENCE INDICATES THAT ALCOHOL BLENDED FUELS CALLED GASOHOL OR USING ETHANOLORMETHANOL CANATTRACTMOISTUREWHICH LEADSTOSEPARATIONANDFORMATIONOFACIDSDURING STORAGE ACIDIC GAS CAN DAMAGE THE FUEL SYSTEM OF AN ENGINE WHILE IN STORAGE Empty the fuel tank by starting the engine and let it run until the fuel lines a...

Страница 24: ...Faulty ignition switch 7 Check replace ignition switch 8 Faulty solenoid or starter 8 Check replace solenoid or starter 9 Faulty operator presence switch es 9 Contact an authorized service center department Engine clicks but will not 1 Weak or dead battery 1 Recharge or replace battery start 2 Corroded battery terminals 2 Clean battery terminals 3 Loose or damaged wiring 3 Check all wiring 4 Fault...

Страница 25: ...deck not level 4 Level mower deck 5 Low uneven tire air pressure 5 Check tires for proper air pressure 6 Worn bent or loose blade 6 Replace sharpen blade Tighten blade bolt 7 Buildup of grass leaves and trash under mower 7 Clean underside of mower housing 8 Mower drive belt worn 8 Replace mower drive belt 9 Blades improperly installed 9 Reinstall blades sharp edge down 10 Improper blades used 10 R...

Страница 26: ...26 SERVICE NOTES ...
Страница 27: ... never across the face Do not mow slopes greater than 15 degrees Make turns gradually to prevent tipping or loss of control Exercise extreme caution when changing direction on slopes 1 Fold this page along dotted line indicated above 2 Hold page before you so that its left edge is vertically parallel to a tree trunk or other upright structure 3 Sight across the fold in the direction of hill slope ...

Страница 28: ...l Number Manufacturer s I D Number b Description of part NOTE Electrolux Home Products provides parts and service through its authorized distributors and dealers therefore all requests for parts and service should be directed to your local dealer s The philosophy of Electrolux Home Products is to continually improve all of its products If the operating characteristics or the appearance of your pro...

Отзывы: