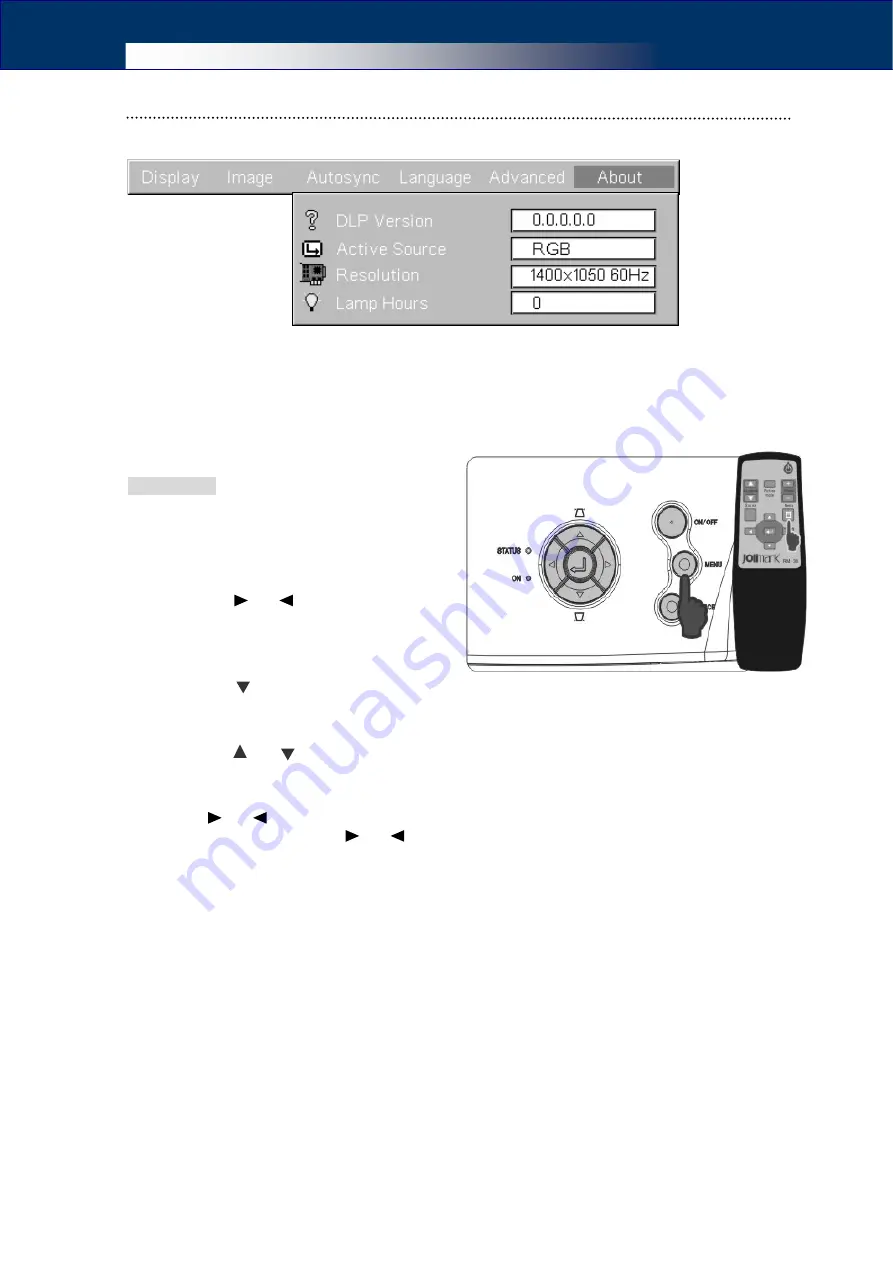
Jolimark DS-250 Скачать руководство пользователя страница 26

User’s Manual 

20 


“About” Menu 

This menu shows the information of the projector. User can not perform any operation.   


  Using the Menus 

The OSD menus can be performed by using the buttons on cabinet panel or the keys of 

the remote control. 


Operations: 

1 

Press the [MENU] button to call out the 

OSD menu.


2


Select the top menu. 

Press the [ ] or [ ] button to locate the 

top menu. 


3


Enter the sub menu. 

Press the [    ] button to enter the sub menu. 


4


Select the option. 

Press the [    ] or [    ] to select the option which you want to change. 


5


Change the option. 

Press [ ] or [ ] button to change the value of the selected option. 

Some options are changed by [ ] or [ ] button, some need to use the [Enter] button to 
confirm. 


6


Close the OSD menu.


Press the [MENU] button to close the OSD menu. (If no operation is performed for 

several seconds, the OSD menu will close automatically.) 


Содержание DS-250

Страница 1: ...User s Manual DLPTM Data Projector DX 400 DX 380 DX 300 DX 280 DS 250...

Страница 2: ...n receptacle with the other electrical devices which are large power and easily to make the voltage fluctuating Please use the supplied power cable Don t route the power cable that can be walked on If...

Страница 3: ...de the lamp will go out of the projector Leave the area immediately if the lamp scatters while being operated and ventilate the area for at least 30 minutes Otherwise it could be harmful to user s hea...

Страница 4: ...rn off the projector How to use the OSD On Screen Display How to replace the lamp How to solve the frequent problems Cautions Please read the safety instructions carefully Impropriety operations may c...

Страница 5: ...Output 10 Connecting to Equipment with S video Output 10 Connecting to Equipment with Component Video RCA Output 11 Connecting to Equipment with Component Video RGB Output 11 4 Basic Operation 12 Tur...

Страница 6: ...re 26 Picture is out of Focus and Fuzzy 26 Interference or Distortion Appear in Images 27 The Image is Truncated Large or Small 27 Image Colors are not Right 27 Images Appear Dark 27 No Sound 28 The R...

Страница 7: ...n meet your needs The projector offers the following features Optics by Carl Zeiss Single chip TI DLP technology High brightness High Contrast Sharp Image 4 3 16 9 screen aspect ratios adjustment Auto...

Страница 8: ...r and region If any of the components is missing or incorrect please contact the dealer Note Please save the original shipping carton and packing material in order to transport the projector in the fu...

Страница 9: ...rojection angle Remote Sensor Receive signals from the remote control Elevator Button Press and hold the button you can draw out or draw back the elevator foot Ventilation Holes Focus Ring Adjust the...

Страница 10: ...or closes the on screen display menu Analog RGB Connector Connects to analog RGB output of computer or YCbCr of video equipment Speaker Audio Out Jack stereo minijack Connects to external active speak...

Страница 11: ...place the lamp Suspension bracket fixing points 4 points Install the optional ceiling mount here when suspending the projector from a ceiling Tilt Adjustment Foots Extend to adjust the projection angl...

Страница 12: ...ctly match the and marks inside the battery compartment 3 Put back the cover Infrared Transmitter Outputs remote control signals On Off Key Turns on off the projector Volume Key Adjust volume of the p...

Страница 13: ...once they have run out and change two new batteries Do not mix new and old batteries or batteries of different types This may shorten the life on batteries or may cause old batteries to leak Usable Ra...

Страница 14: ...he table as a guide MODEL DS 250 DX 280 DX 300 DX 380 DX 400 Throw ratio 1 94 2 27 1 8 2 1 Screen Size feet Minimum Distance cm Maximum Distance cm A cm Minimum Distance cm Maximum Distance cm A cm 40...

Страница 15: ...l it out by the plug not the cable itself Connecting to a PC You can connect the projector to a PC a Notebook or a Macintosh with the supplied VGA cable The projector support VGA SVGA XGA WXGA SXGA an...

Страница 16: ...ellow line of the AV cable And the white line for mono audio or the left of stereo audio the red line for right of stereo audio Yellow Video White Mono L Red R Connecting to Equipment with S video Out...

Страница 17: ...cording to the equipment When non interlaced source is connected to the video input Video S video Component Video of the projector the projecting images might be abnormal the screen would divide to tw...

Страница 18: ...ow VGA DVI Only DX 380 400 Video S video YCbCr Notes The Projector has two power switches a main switch and a Power On Off button On Off Key on the remote control Before plugging in or unplugging the...

Страница 19: ...age is recommended for focusing Notes It is hard to focus the image when there is stain or condensation on the lens Please remove them first The optimal projection distance is range 1 to 5m You can no...

Страница 20: ...ator Foot 3 Lower the front of the projector to the desired height 4 Release the Elevator Button to lock the Elevator Foot 5 Rotate the Tilt Adjustment Foots to make fine adjustment If the projector i...

Страница 21: ...tandby mode You can unplug the power cord from the wall outlet now Notes Do not disconnect the main power supply during projection The power off confirmation message will disappear automatically if yo...

Страница 22: ...User s Manual 16 5 Advanced Functions Menu Navigator...

Страница 23: ...eas 50 Keystone Correct the keystone distortion 0 Volume Adjust the volume 0 Aspect Ratio Select the video aspect ratio Native Backdrop Color Select the screen color while having no source Blue Scalin...

Страница 24: ...the vertical position of the wide screen image Middle Full Screen Project the S video or Video image fully in the widow OFF Autosync Menu Sub Menu Function Default Phase You can adjust computer images...

Страница 25: ...hich will lower power consumption and increase lamp life Do not switch between the normal mode and the low consume mode frequently for this will decrease the lamp life OFF Gamma Select the desired gam...

Страница 26: ...top menu Press the or button to locate the top menu 3 Enter the sub menu Press the button to enter the sub menu 4 Select the option Press the or to select the option which you want to change 5 Change...

Страница 27: ...control None Control Commands Send command codes listed in the following table to control the projector Operation ASCII HEX Power On JKON 4Ah 4Bh 4Fh 4Eh Power Off JKOF 4Ah 4Bh 4Fh 46h JKUP 4Ah 4Bh 55...

Страница 28: ...le cloth for cleaning glasses to gently wipe the lens Note Do not rub the lens with harsh materials or subject the lens to shocks as it can easily become damaged Cleaning the Air Filter If dust collec...

Страница 29: ...wdriver Note Only one fixing screw needs to be loosened 3 Remove the lamp cover 4 Draw out the lamp wire from the black connector loosen the two screws on the lamp module and lift out the module Notes...

Страница 30: ...reset the timer as your likes Otherwise the lamp life alarm clock will be failure Cautions Use a Jolimark JMSP010 DS 250 DX 280 DX 300 or JMSP020 DX 380 DX 400 lamp module as the replacement lamp Usin...

Страница 31: ...STATUS Indicator Red Blinking Cycle 0 1 sec on 0 1s off after blinking for 5 times 2 sec off High Temp Error Overheating The lamp turns off automatically and projection stops Check the following two...

Страница 32: ...to the notebook s LCD monitor you need to change the output to an external destination as well For some notebook model when the signal is output externally they no longer appear on the LCD monitor See...

Страница 33: ...n selected Set the computer so that the signals being output are compatible with the projector Please refer to Compatible Input Signal List in Page 29 Is the computer set for dual display If dual disp...

Страница 34: ...infrared sensor on the projector when it is operated The operating angle for the remote control is described in Page 7 Is the remote control too far from the projector The operating range for the remo...

Страница 35: ...5 75 1152 864 77 1 85 VGA 60 60 70 70 1280 960 75 75 VGA 64 60 75 70 SXGA 1280 1024 80 75 VGA DVI 47 8 60 60 3 75 WXGA 1280 768 68 6 85 VGA Component Video Signal Horizontal Frequency kHz Vertical Fre...

Страница 36: ...User s Manual 30 Appendix F Appearance Dimensions Unit mm...

Страница 37: ...User s Manual Suspension Installation Dimensions Screws spec M5 Unit mm...

Страница 38: ...Zone XinHui District JiangMen City GuangDong Province P R C Post Code 529141 Service Tel 800 8308198 Fax 86 750 6390382 Web Site Http www jolimark com cn Class A This is a Class A product In a domesti...

Отзывы: