background image

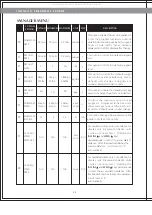
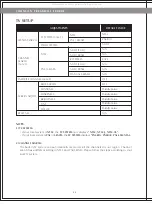
TV SETUP

SYSTEM SEARCH

FAVORITE CHANNEL (note 3)

RESET ALL

CHANNEL 
SEARCH
(note 2)

SCREEN ADJUST

TV SYSTEM (note 1)

NTSC

PAL / SECAM

BLUE SCREEN

CONTRAST

SHARPNESS

BRIGHTNESS

TINT

COLOR

VIDEO SYSTEM

NTSC

PAL / SECAM

AUTO (FULL)

ADD / ERASE

RF SYSTEM

AUTO (FULL)

ADD / ERASE

MANUAL SERACH

NTSC

PAL-B/G

AUTO

N/A

N/A

CATV

N/A

N/A

N/A

OFF

OFF

Middle Value

Middle Value

Middle Value

Middle Value

Middle Value

N/A

33

32

ADJUSTMENTS

DEFAULT VALUE

J O H N S O N   T R E A D M I L L   T 8 0 0 0 E

J O H N S O N   T R E A D M I L L   T 8 0 0 0 E

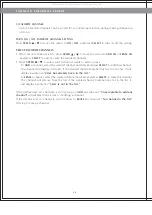
NOTE:

1) TV SYSTEM:

ê

If your local system is 

NTSC

, the 

TV SYSTEM

 only displays 

“NTSC, NTSC-J, NTSC-US”.

ê

If your local system is 

PAL

 or 

SEACM

, the 

TV SYSTEM

 displays 

“PAL-B/G, PAL-D/K, PAL-I,SECAM-L.

2) CHANNEL SEARCH:

     The built-in TV system can automatically memorize all the channels in your region. Channel

     search has a different setting in NTSC and PAL/SECAM. Please follow the steps according to your

     local TV system.

IF YOUR LOCAL SYSTEM IS “NTSC”, PLEASE SELECT LOCAL RF SYSTEM (RADIO 
FREQUENCY SYSTEM). 

1. Enter 

RF System

 to select 

“TV” 

or 

“CATV”

. TV means outdoor antenna connection; CATV means

    cable TV connection.

2. Press 

SPEED     /

     to move the scroll to 

AUTO(FULL)

, and then press 

SELECT

. The tuner will

    search through all available channels in your area and add them to the TV memory.

Sometimes, it may be difficult to preset when the broadcasting signals are weak, the channel cycle 

frequency is incorrect or the frequency jamming is occurring around the area. You can manually 

add weak or additional channels or erase unwanted channels from TV memory.

3. Press 

SPEED     /

     to move the cursor to 

ADD/ERASE

, and press ENTER to add or erase the channels.

4. Press 

SPEED     /

     to select which channel wants to add or erase.

ê

If 

“ADD”

 displays next to the channel number, it means this channel wasn't in the memory. Press


SELECT

 to add this channel.

ê

If 

“ERASE” 

displays next to the channel number, it means this channel has already been in the

    memory. Press 

SELECT

 to erase this channel.

IF YOUR LOCAL SYSTEM IS “PAL” OR “SECAM”, PLEASE FOLLOW THE STEPS BELOW.

1. Press 

SPEED     /

      to move the cursor to AUTO(FULL), and press 

SELECT

. The tuner will search

     through all available frequencies in your area and save them to the TV memory as a channel

    number in order. After pressing AUTO (FULL) search, you can manually erase unwanted channels

    from TV memory or add the erased channels back.

2. Press 

SPEED     /

      to move the cursor to ADD/ERASE, and press 

SELECT

 to select the wanted or

    unwanted channels.

ê

If 

“ERASE”

 displays next to the channel number, press 

SELECT

 to erase this channel.

ê

If 

“ADD” 

displays next to the channel number, press 

SELECT

 to add this channel.

Sometimes, it may be difficult to preset when the broadcasting signals are weak, the channel cycle 

frequency is incorrect or the frequency jamming is occurring around the area. You can manually 

add weak or additional channels as a new channel number.

3. Press 

SPEED     /

      to move the cursor to 

MANUAL SEARCH

, and press  

SELECT

 to enter the 

    MANUAL SEARCH screen.

3.1  Press 

SPEED     /

      to move the cursor to SEARCH, and press 

SELECT

 to search the frequency.

3.2  When you select the frequency, press 

SELECT

 to confirm.

3.3  Press 

SPEED     /

      to move down the cursor to SAVE AS A NEW CH, and press 

SELECT

.

3.4  Press 

SPEED     /

      to select a channel number, and press 

SELECT

 to save this channel number

       into TV memory.

All manuals and user guides at all-guides.com

Содержание T8000E

Страница 1: ...uan Rd Taya Hsiang Taichung Hsien 428 Taiwan R O C TEL 886 4 25667100 FAX 886 4 25601087 E mail sales johnsonfitness com http www johnsonfitness com July 30 07 SAP 065923 A All manuals and user guides at all guides com a l l g u i d e s c o m ...

Страница 2: ...All manuals and user guides at all guides com ...

Страница 3: ...rotect the unit read all the instructions before assembling and using the treadmill To ensure the proper use and safety of the treadmill make sure that all users read this manual Please make this manual a part of your facility s training program Remind the users that before undertaking any fitness programme they should obtain complete physical examinations from their physicians If at any time whil...

Страница 4: ...soles cleats or spikes Make sure no stones are embedded in the soles Do not turn the belt by hand Close supervision is necessary when used near children invalids or disabled people When the treadmill is in use young children and pets should be kept at least 3 meters 10 feet away When it is necessary to immobilize the treadmill set the display to read SELECT PROGRAM Pressing the Emergency Stop key ...

Страница 5: ...the chart below It is particularly important that no sensitive electrical equipment such as a computer or a TV shares the same circuit GROUNDING INSTRUCTIONS The Johnson Treadmill must be properly grounded If the product malfunctions or breaks down proper grounding provides a path of least resistance for the electric current to reduce the risk of electrical shock This product is equipped with an e...

Страница 6: ...the console the foam rubber handles and the hardware kit Carefully unpack the unit and dispose of the box material CAUTION This unit weighs 169 kg 374 lbs To avoid injury to the user and the unit be sure to have proper assistance to remove and move the unit 08 J O H N S O N T R E A D M I L L T 8 0 0 0 E All manuals and user guides at all guides com a l l g u i d e s c o m ...

Страница 7: ... the power plug is not plugged into the wall outlet while completing the following procedure To ensure correct assembly of the T8000E carefully read and follow these steps ATTENTION After installation is completed the treadmill will need to be calibrated by using the AUTO CHECK function If this is not done the treadmill s speed and incline values may be incorrect and damage the treadmill Do not st...

Страница 8: ...ute them through the right console mast Place the right console mast and then the left console mast in the console support brackets Secure the right and left support with the 4 screws and 4 washers provided Z51 Z50 Make sure these screws are tightened J O H N S O N T R E A D M I L L T 8 0 0 0 E Z51 Z51 Z50 Z50 All manuals and user guides at all guides com ...

Страница 9: ...the handlebar cap N06 N07 to secure the handle foam rubber Note The handle bar caps separate into right and left make sure these caps are in the correct position J O H N S O N T R E A D M I L L T 8 0 0 0 E N06 N04 N07 N03 All manuals and user guides at all guides com ...

Страница 10: ...e will be calibrated automatically This will take around 2 minutes to run After completing calibration press EMERGENCY STOP key twice to back to the initial starting screen J O H N S O N T R E A D M I L L T 8 0 0 0 E MANAGER s CUSTOM SETTINGS All manuals and user guides at all guides com ...

Страница 11: ...n to stop the running belt and end the current workout To resume press the button once again CONTROL KEYPAD The Control Keypad allows the user to set up programs control workout and adjust TV parameters D HEADPHONE JACK The jack is located on the left hand side of the console faceplate housing Headphones are necessary to access the sound for the TV 18 6 1 2 2 5 3 4 4 All manuals and user guides at...

Страница 12: ...ON AREA Shows the user what workout is currently being set up A2 2 CORRESPONDING KEYS These keys are corresponded to the keys on the Control Keypads listed in the following chart A3 VALUE CIRCLE Shows values for workout parameters set up The unenclosed circle would increase or decrease a dotted curve depending on the value input The small red numbers represent minimum and maximum values in each wo...

Страница 13: ...rows of lights stacked in columns The number of lit rows within a column corresponds to an incline percentage B3 WORKOUT READOUT Shows the workout readout the user is currently exercising B4 DISPLAY MODE Shows the LCD screen display mode The mode has relevant workout data and size of entertainment screen B5 TV SCREEN Shows the current TV program B6 CH VOL DISPLAY Shows the current channel number a...

Страница 14: ...rols the speed during the workout 5K Run is designed to simulate a 5K run with elevation changes The program completes when the user has completed 5K so there is no preset time The user can make speed changes during this program Target HR is a higher intensity workout for more fit users emphasizing cardiovascular benefits The user must wear a heart rate chest strap or grasps the HR grip sensors co...

Страница 15: ... LEFT arrow keys to select and pressing SELECT key to confirm 2 SELECT WEIGHT using the RIGHT and LEFT arrow keys to select and pressing SELECT key to confirm 3 Press START to begin the workout 26 J O H N S O N T R E A D M I L L T 8 0 0 0 E With the interactive screen the computerized display leads the user to step by step to input the workout The screen would instruct the user to use the PROGRAM ...

Страница 16: ...inment system and or a fitness network such as FitLinxx C SAFE PORT The C SAFE port located next to the On Off switch enables the treadmill to upload user workout statistics to a fitness network database CARDIO PORT The Cardio port is located on the back of the console that is compatible with entertainment protocol such as Cardio Theater or BroadcastVision All manuals and user guides at all guides...

Страница 17: ...g peak and non peak hours of club traffic Active variable displayed in the TIME display after change This option controls the default weight used in the calorie calculations Sets to default unit change kilograms or pounds Displayed in native units Controls the maximum speed for all programs Displayed in native units kilometers per hour or miles per hour Reverts to default value on unit change Accu...

Страница 18: ...alue Middle Value Middle Value N A 32 ADJUSTMENTS DEFAULT VALUE J O H N S O N T R E A D M I L L T 8 0 0 0 E NOTE 1 TV SYSTEM êIf your local system is NTSC the TV SYSTEM only displays NTSC NTSC J NTSC US êIf your local system is PAL or SEACM the TV SYSTEM displays PAL B G PAL D K PAL I SECAM L 2 CHANNEL SEARCH The built in TV system can automatically memorize all the channels in your region Channel...

Страница 19: ...d channel numbers and press SELECT to add this channel The channel will display in the list If the wanted channel number has been in the list it will display a sentence CHxx has already been in the list êTo ERASE a channel select the wanted channel numbers and press SELECT to erase this channel The channel will remove from the list If the wanted channel number was not in the list it will display a...

Страница 20: ...e making this adjustment 2 NEVER have the tensioning bolts more than 1 4 turned at a time 3 Tighten one side and loosen the other side to prevent from over tightening or loosing the belt Over tightening the belt will significantly shorten the life of the belt 4 After the belt adjustment let the treadmill run for 5 minutes to test If necessary repeat the procedure until the belt is centered If the ...

Страница 21: ... lamp key Still Blue Light When the treadmill s accumulated distance reaches 4000 kilometers 2500 miles it means that the treadmill needs to be maintained To turn off the maintenance light after performing service hold the INCLINE and SPEED keys at the same time for 3 seconds Flashing Blue Light When the treadmill s accumulated time reaches 6000 hours it means that the treadmill s running deck nee...

Отзывы: