background image

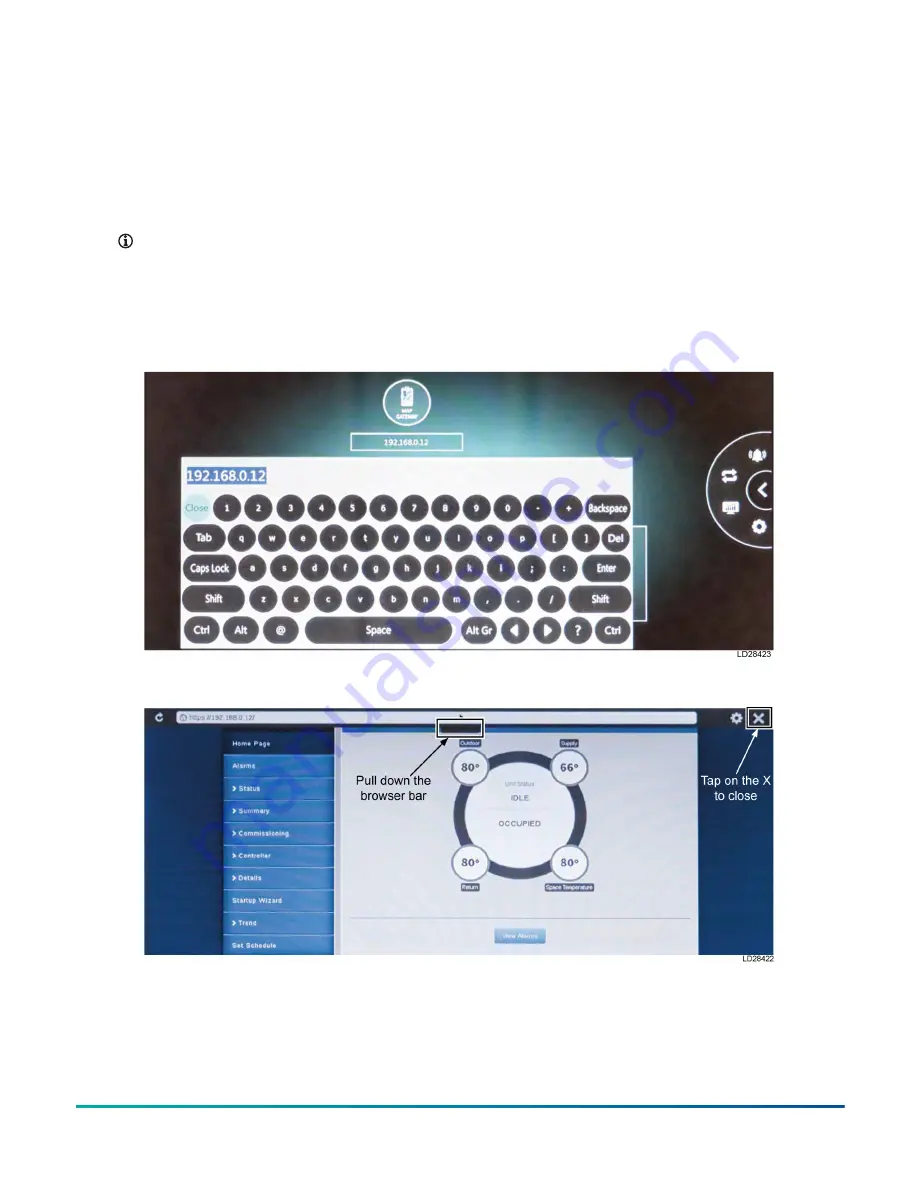
25.  Enter the IP address of the MAP device in the

MAP Gateway field. Tap on the 

MAP Gateway

icon, which opens the browser (Figure 28).

26.  The browser connects to the MAP device using

the IP address. Accept the security features

by tapping on 

Advanced

, and select the

controller under 

Choose a Device

 for the data

to be viewed.

Note: 

The user can also view controller

data on their personal device as a

secondary option when working remotely

from the display mounted location. The

wireless connection on the MAP allows

the user to access the MAP menu by

using Wi-Fi feature. It allows users to be

up to 100 ft, or 31 m, line of sight, away

indoors and up to 300 ft, or 91 m, line

of sight, away outdoors while using a

supported mobile device.

27.  To close the MAP browser, pull down the

browser address bar. Tap on the 

X

 to close

the application. See Figure 29. The MAP

communicates status using LEDs to indicate

the functional states listed in Table 9.

Figure 28: Enter IP address

Figure 29: Closing the MAP browser

Advanced Graphic Touchscreen Display on 25 Ton to 80 Ton Johnson Controls Premier Rooftop Units

28

Johnson Controls

Содержание Advanced Graphic Touchscreen Display

Страница 1: ...A 921 Supersedes 5795595 JIM A 1120 Installation Guide Issue Date 2021 09 28 Johnson Controls Advanced Graphic Touchscreen Display on 25 Ton to 80 Ton Johnson Controls Premier Rooftop Units Installati...

Страница 2: ...2 Advanced Graphic Touchscreen Display on 25 Ton to 80 Ton Johnson Controls Premier Rooftop Units Johnson Controls...

Страница 3: ...multiple controllers 15 Operating the display 17 Introduction 17 Key concepts 17 Display 17 Operate the touchscreen 17 Using the display 17 Procedure overview 18 Detailed procedures 19 System settings...

Страница 4: ...4 Advanced Graphic Touchscreen Display on 25 Ton to 80 Ton Johnson Controls Premier Rooftop Units Johnson Controls...

Страница 5: ...utlines the main sections 2 Key concepts Describes background information necessary to perform or understand specific tasks 3 Procedure overview Describes general steps for performing the tasks descri...

Страница 6: ...l in a wall mounted enclosure or in a remote control panel as part of the existing workstation setup Figure 1 Touchscreen display mounted on control panel Features The display is intuitive simple to l...

Страница 7: ...oard is referred to as controller and the MAP Gateway tool is referred to as MAP The Applied Smart Equipment controller is only provided on the Premier line of rooftop units Display configurations Eac...

Страница 8: ...terface must be replaced with the touchscreen display in the field contact the factory for further information Key concepts Mounting options Mount the display remote in an existing control panel or on...

Страница 9: ...ovided with the display unit The SA or FC bus adapter is required at the controller for communications with the display The SA adapter is required when only one controller is integrated with the displ...

Страница 10: ...2 Serial port position to SA FC Bus connection Serial port position SA Bus connection FC Bus connection 1 2 2 2 2 2 3 1 1 4 1 1 5 NA NA 6 3 3 7 NA NA 8 shield NA 4 Advanced Graphic Touchscreen Display...

Страница 11: ...24 VDC supply voltage to power up the display To extend the serial communications cable in order to view field bus devices 1 The display can integrate multiple field bus devices on Metasys systems Fac...

Страница 12: ...where wire connections can be made and display parameters can be viewed from a floor level Mount the display box on a dry surface Avoid prolonged exposure to direct sunlight to prevent the risk of ov...

Страница 13: ...the display Use one of the removable slots provided on the box to run cable back to the controller Note Refer to the sections Cabling a display with a single controller and Cabling a display with mult...

Страница 14: ...gasket is applied is 0 004 in Figure 10 Cutout and display clearances Note A Display B Installation cutout Cabling a display with a single controller Figure 11 shows the connections made to the displa...

Страница 15: ...when the unit is without a factory installed MAP For SA and FC bus cable recommendations and controller terminal block information refer to the BACnet Integration Setup section in the Johnson Controls...

Страница 16: ...to the MAP Terminate the RJ 45 cable on the display from the MAP in any of the available ETH0 ETH1 ETH2 ports This guide shows the RJ 45 cable connected to the ETH2 port on the display Note Refer to...

Страница 17: ...d design The display is a glass projected capacitive touchscreen with 10 1 in wide screen and 1280 x 800 pixels The interface on the touchscreen display supports multi touch gesture programming Figure...

Страница 18: ...r sensors connected to the unit USB functions Provides the ability to do backup restore export data and clone Table 4 Display touch commands Motion Finger action Description Tap Tap on the touchscreen...

Страница 19: ...ee the Detailed procedures in this chapter for further instructions for all of the tasks above Detailed procedures Table 6 Icons Icon Icon description Edit Login Settings Alarm USB functions System se...

Страница 20: ...and password from Table based on the level of access desired 1 The display requires users to set a new user name and password after the first time logging in as one of the accounts in Table Advanced...

Страница 21: ...tapping on the downward arrow next to the login Admin icon and selecting sign out Figure Table 7 User level restrictions User name and password Access level Descriptions admin admin Read write User co...

Страница 22: ...igure tap on the Search icon to scan for controllers available on the SA FC BACnet MS TP bus 2 After the search device discovery is complete the Dev ID of available controllers appears in the drop dow...

Страница 23: ...en Figure 2 The unit display configuration matches the actual unit configuration The graphical display instantly adapts to the unit sequence of operation to give the user an enhanced visual experience...

Страница 24: ...for connected controller enclosed cabinet Figure 21 Home page for connected controller cutaway cabinet Advanced Graphic Touchscreen Display on 25 Ton to 80 Ton Johnson Controls Premier Rooftop Units...

Страница 25: ...nect Note The MAC addresses are printed on the back of the MAP 5 To connect use the password Map YYYYYY where YYYYYY is the last six digits or characters of the MAC address of the Ethernet port Figure...

Страница 26: ...outed through an Ethernet switch Check with Building IT management for an available IP Address For questions related to MAP security certificates refer to the document Installing and Using Private Key...

Страница 27: ...be 192 168 0 XX XX should be a value other than 12 20 Enter the Network Subnet Mask and Gateway address which are the same as the MAP configuration from Step 13 Tap Save on the top of the screen 21 Ta...

Страница 28: ...ted location The wireless connection on the MAP allows the user to access the MAP menu by using Wi Fi feature It allows users to be up to 100 ft or 31 m line of sight away indoors and up to 300 ft or...

Страница 29: ...een Flicker Off Receiving data On steady Transmitting data Flicker Data transmission Ethernet Green On steady Off Communication not established On steady Communication established Flicker Data transmi...

Страница 30: ...navigation structure For a complete menu structure with parameters units and ranges see Table 10 Figure 30 Display navigation structure Advanced Graphic Touchscreen Display on 25 Ton to 80 Ton Johnso...

Страница 31: ...ply fan reset zone temp reset external Heating discharge air temp upper setpoint F 86 135 Heating discharge air temp lower setpoint F 85 134 Outside air temperature reset setpoint upper F 61 131 Outsi...

Страница 32: ...ture off low supply voltage off high pressure lockout off low pressure lockot off freeze condition off anti short cycle delay off cooling stage is disabled Compressor 1C status Off idle on minimum on...

Страница 33: ...reset setpoint lower F 50 80 Supply fan DAT setpoint high threshold 0 100 Supply fan DAT setpoint low threshold 0 100 Compressor 1A enabled Yes no Compressor 1B enabled Yes no Compressor 1C enabled Ye...

Страница 34: ...1D Off on Condenser fan 2A Off on Condenser fan 2B Off on Condenser fan 2C Off on Condenser fan 2D Off on Minimum runtime for a cooling stage Minutes 3 10 Rapid start time limit Minutes 0 15 Cool Cool...

Страница 35: ...free cooling is active miinimum position test comfort ventilation low OA ambient Econ free cooling available No yes Economizer damper command Supply air temperature F Operational outside air temperatu...

Страница 36: ...s on Counts Fan VFD2 accumulated runtime Hours Fan VFD2 number of times on Counts Isolation damper 1 status Close open Isolation damper 2 status Close open Demand ventilation service page 1 of 2 Suppl...

Страница 37: ...aust fan VFD command Exhaust fan accumulated runtime Hours Exhaust fan VFD1 fault Normal alarm Exhaust fan VFD2 fault Normal alarm Exhaust air differential pressure in w c Demand ventilation exhaust s...

Страница 38: ...artup wizard Displays all steps to run the start up wizard Trend Displays trends for cooling heating fan sensors economizer features and provides fault status and diagnostics Set schedule Provides the...

Страница 39: ...s page 1 of 2 Effective OAT source Note For parameter definitions refer to the Johnson Controls Premier Rooftop Units Start Up and Operation Guide 5881375 JSG A To view parameters or functionality tha...

Страница 40: ...a user adjustable point value Modifications to setpoints are saved based on the most recent adjustment regardless of the device display or MAP that was used Read and write capability assigned to the...

Страница 41: ...e and reset lockouts performed and cycle controller power for normal operation to resume Service priority Soft lockout Requires conditions to return to a normal range for normal operation to resume an...

Страница 42: ...ort and export To read documents complete the following steps 1 Navigate to the configuration page by tapping on the Settings icon on the display 2 Connect a USB drive to either of the USB ports on th...

Страница 43: ...keep folders related to the backup on the USB drive When multiple folders are available this feature does not work Restore Factory Defaults can be used to restore factory defaults in the controller Th...

Страница 44: ...on the MAP icon Check that the MAP and display IP settings are configured correctly Not able to connect to MAP MAP browser on mobile laptop or tablet display Check that the MS TP bus is connected on t...

Страница 45: ...ols Premier Rooftop Units Start Up and Operation Guide 24 10737 16 Getting Started with MAP Gateway 24 10737 8 Installing and Wiring MAP Gateway LIT 12011999 Using MAP Gateway LIT 12012015 Installing...

Страница 46: ...screen display a wall box for indoor installation 24 VDC power supply 3 prong power cord and a touchscreen display Includes the following for the MAP installation a MAP device Does not include communi...

Страница 47: ...ifications SA Bus RS 485 connector field installed 22 AWG stranded 5 wire two twisted pair shielded cable FC Bus RS 485 connector field installed 22 AWG stranded 5 wire two twisted pair shielded cable...

Страница 48: ...display a 24 VDC power supply and 3 prong power cable shall be provided Refer to Figure 5 for wiring information Communication wire is to be supplied and installed in the field by others Advanced Gra...

Страница 49: ...ble 18 Kit number 2TS0402 Line item Part number Description Quantity Unit 10 5882845 Graphic display W 281 9 mm H 198 1 mm TFT 1 PCS 20 5523538 Mount adv disp remote mntg 1 PCS 30 5514233 PSU In 88 26...

Страница 50: ...s follows Single point 25 ton to 50 ton is 1 PTB Dual point 40 ton to 50 ton is 100 PTB Dual point 25 ton to 30 ton is 100 PTB 2021 Johnson Controls All rights reserved Subject to change without notic...

Отзывы:

Похожие инструкции для Advanced Graphic Touchscreen Display