5
Operational Features
Passive Arming Mode
Upon closing the last door after turning off the ignition, there will be a 30 second arming delay. During this time the
LED will be flashing rapidly. When this 30-second period expires, the
J-965
system will arm itself. This is a
selectable feature and can be found at position 1 in the programming table.
Door Trigger Delay
Program position 9 allows a delayed door trigger to be selected. This is especially useful when operating the
J-
965
system passively (see above) without its remote transmitters. When selected (position 9,mode 2), upon
opening the vehicle door the siren will begin chirping for 10 seconds during which time turning on the ignition with
the vehicle key will disarm the system. If the vehicle ignition is not activated within this 10 second window the
J-
965
system will be triggered and must be disarmed by either using one of the included remote transmitters or via
the Valet/Override switch. Details for using this switch are discussed on the front of this manual.
Accidental Disarm (Auto Rearming)
If the
J-965
system has been armed for at least 20 seconds and has been disarmed with the remote transmitter by
mistake, it will automatically rearm itself in 30 seconds. Opening a door or turning on the vehicle ignition will
cancel rearming. If selected (position 2, mode 2) this feature will always be active no matter if the
J-965
system is
in active or passive operating mode.
Arming with Defective Zone Alert
After arming (active or passive mode) if a defective or open zone is detected the
J-965
system will signal this
detection by chirping the siren 5 times and flashing the park lights 5 times. The defective zone will be bypassed
until the system is disarmed and then rearmed again.
Impact Sensor Warn Away Feature
The included impact sensor enables two levels of protection. Zone 1 responds to a light impact to the vehicle and
warns against further intrusion by chirping the siren 5 times. Zone 2 responds to a heavier impact by triggering the
full alert mode of the
J-965
system.
Remote Starter Features
Engine Start Detection
The
J-965
is designed to successfully start most vehicles (including diesel vehicles) found on the roads today with
the exception of older vehicles equipped with a carburetor. The vehicle should start easily and idle smoothly on its
own. Engine start detection can be accomplished by three different methods:
Smart Sense
(position 25, mode 1): This method simply analyzes the vehicle electrical system voltage before and
after starting. If the voltage change is satisfactory a successful start operation will occur.
Noise Sense
(position 25, mode 2): This method looks for a particular type of electrical noise generated by the
ignition system of a running vehicle. Using this setting requires that the Black/Grey wire be wrapped around a
spark plug wire, etc to sense this noise.
Tach Sense
(position 25, mode 3): This method looks for the electrical pulse produced in the ignition system and/
or fuel injection system of the running vehicle. Using this setting requires an actual electrical connection to the
ignition coil trigger wire or to a fuel injector trigger wire with the Black/Grey wire of the
J-965
system. Using this
mode requires a tach learning process. Once in
Tach Sense
mode, re-enter the programming mode with the
engine running (rather than just turning on the key), go to position 26 and select mode 2. If the
J-965
system is
properly sensing a tach signal, the LED should be flashing (rev the engine a little if it is not flashing). When the
LED is flashing, press
Button 3 / Trunk
to learn the tach signal; the LED should stop flashing when signal is
learned. The
J-965
system is now ready to start the vehicle using
Tach Sense
mode.
Engine Start Interruption
The Remote start feature will not function if the following conditions exist: 1.) The gear selector is not in the Park
or Neutral position. 2.) The ignition key is turned ‘ON’. 3.) The hood is opened (white/black wire is connected to a
hood pin switch). 4.) The brake is applied (green/white wire connected to the brake light switch circuit).
Remote Engine Shut-Off
At any time during the remote run time period, the engine can be shut off using the included remote transmitters.
Simply press
Button 4 / *
during the remote run cycle and the engine will shut off. Otherwise the engine will shut
off automatically at the end of the preset remote run time.
Gasoline and Diesel Engine Modes
-
Gasoline Engine
(position 17, mode1): The vehicle ignition will be powered up for 5 seconds before
starting to allow the fuel injection pump to pressurize the fuel system.
-
Diesel Engine
– 10 second wait time
(position 17, mode 2): The vehicle ignition will be powered up
for 10 seconds before starting to allow the diesel wait-to-start system to function. If the Blue/Yellow
wait-to-start wire of the
J-965
system is connected, the engine will start as soon as the signal on this
wire terminates.
-
Diesel Engine
– 30 second wait time
(position 17, mode 3): The vehicle ignition will be powered up
for 30 seconds before starting to allow the diesel wait-to-start system to function. This longer wait
time should only be necessary for older diesel vehicles. If the Blue/Yellow wait-to-start wire of the
J-
965
system is connected, the engine will start as soon as the signal on this wire terminates
Engine Cranking Time
The engine cranking time of the
J-965
system is adjustable (position 26). Most vehicles should successfully start
using the default setting of 1 second. Some diesel vehicles may require this time to be increased for reliable
starting. The
J-965
system is programmed for up to 3 start attempts, in the case that a successful start does not
occur. Each attempt will increase the engine crank time by ¼ of second starting from the base setting selected in
position 26 of the program table.
Accessing programmable features
(Only 1 program change can be made per session)
1.
Open the vehicle door. The
J-965
unit must sense the door open to perform this operation.
2.
Turn ignition key to the on/run position. Then, within 10 seconds, press the valet switch 5 times.
3.
When step (2) is completed the LED will flash 5 times and optional siren will chirp 5 times.
4.
Select the feature you want to change by pressing the valet switch the same number of times as the
feature number (see table). The LED will flash and the siren will chirp each time the switch is
pressed.
5.
When you have reached the desired program location, press
Button 1 / Lock
on the transmitter to
select ‘Mode 1’,
Button 2 / Unlock
for ‘Mode 2’, and
Button 3 / Trunk
for ‘Mode 3’. The LED will
flash and the siren will chirp 1,2, or 3 times to confirm selection.
6.
Now turn the ignition key off. Program change is complete. Repeat steps 2 thru 6 for additional
changes.
Resetting all functions to factory default (Mode 1)
Enter program mode as listed above. Press and hold
Button 4 / *
on the transmitter until the LED flashes
4 times and siren chirps 4 times. All program options are now reset to Mode 1 factory default settings.
Remote Transmitter Code Teaching
1.
Please read through these instructions first before attempting.
2.
Open the driver door. The
J-965
unit must sense the door open to perform the code teaching operation.
3.
Within a 5 second period, turn ignition key on-off, on-off, on and leave on. (*Hint: You will find that if you
click the key on and off from the first key click position, rather than from the lock/off position, that this
procedure will be much easier.)
4.
If step 2 is completed successfully, the siren will chirp one time and LED indicator will flash one time.
5.
Now press the valet switch 5 times. If completed successfully, the siren will chirp 5 times and the LED
indicator will flash 5 times.
6.
The system is now ready to learn new transmitter codes. You have 10 seconds to complete this
process.
7.
Press
Button 1 / Lock
of each transmitter that you wish to have the system learn, one at a time. Each
time a new code is received the siren will chirp once and LED will flash once confirming that the
transmitter code has been learned. The system will learn a total of 4 different codes.
8.
Turn the ignition key off. Remote transmitters should now be ready for use with the system.
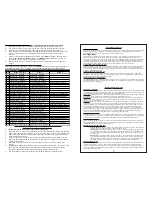
Programming table
D
#
Mode 1 (default)
Mode 2
Mode 3
1 Passive arm - Disabled
Passive Arm - Enabled
2 Auto Rearm - Disabled
Auto Rearm - Enabled
3 Siren Chirps - Enabled
Siren Chirps - Disabled
4 Ignition door lock-Enabled
Ignition door lock-Disabled
5 Ignition Unlock all doors
Ignition Unlock-Driver door
Ignition Unlock - Disabled
6 Unlock with Single Pulse
Unlock with Double Pulse
7 Lock/Unlock pulse -1 sec.
Lock/Unlock pulse - 3 sec.
8 Lock w/Passive arm-disabled
Lock w/Passive arm-Enabled
9 Door trigger delay-Disabled
Door trigger 10 sec. Warning
10 Bad door zone report-20 sec.
Bad door zone report-60 sec.
11 Trunk (Aux.1) output - Pulsed
Trunk (Aux.1) - 10 seconds
Trunk (Aux.1) - Latched on/off
12 Aux. 2 output - Pulsed
Aux. 2 output - 10 seconds
Aux. 2 output - Latched on/off
13 Doors lock w/remote start
No door lock w/remote start
Doors lock w/success start
14 Doors lock upon shut down
No door lock upon shut down
15 Remote run time - 15 mins.
Remote run time - 30 mins.
16 Cold Start - Disabled
Cold Start every 1 hour
Cold Start every 2 hours
17 Set Starter for Gas engine
Set Starter for Diesel - 10 sec.
Set Starter for Diesel - 30 sec.
18 Aux. Relay for Ignition #2
Aux. Relay for Accessory #2
Aux. Relay for Starter #2
19 Aux. 3 output - Horn (-)
Relay cont.(-) for 2nd Accs.
Relay cont.(-) for RAP shutdn.
20 Anti Car Jack - Disabled
Anti Car Jack - Enabled
21 Anti Car Jack by Remote
Anti Car Jack by Door
22 Remote Starter - Enabled
Remote Starter - Disabled
23 Shock Sensor test - Disabled
Shock Sensor test - Enabled
24 Turbo Timer - Disabled
Turbo Timer - Enabled
Manual Trans. - Remote start
25 Smart sense - Run sensing
Noise sense - Run sensing
Tach sense - Run sensing
26 Tach Learn - Disabled
Tach Learn - Enabled
27 Crank time - 1 second
Crank time - 1.25 seconds
Crank time - 1.50 seconds
28 LCD TX-Run confirm every min LCD TX-Run confirm-Disable


