background image

13W7AE Subwoofer:


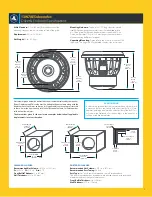
Driver & Enclosure Specifications 

Grille Clearance:

 2.7 in. (69 mm) from the bottom of the 

mounting flange to the lowest inside surface of the grille.

Displacement: 

0.21 cu. ft. (5.9 ltrs)

Net Weight: 

52 lbs. (23.6 kg)

Mounting Hardware:

 Twelve #12 x 1.75" long clear, zinc-plated 

steel Phillips pan-head sheet metal screws (included) 

or

 twelve  

#12-28 long steel Phillips pan-head machine screws with #12-28 
T-Nuts, each at least 1/2-inch (12.5 mm) longer than the thickness  
of the mounting baffle (not included). 

Unpacking/Mounting: 

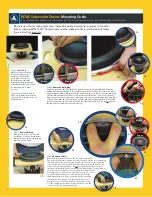
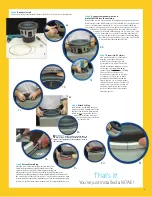
Please refer to the “How to: Mount a W7AE 

Subwoofer ” on pages 4 & 5 for detailed, step-by-step instructions.

PORTED ENCLOSURE:

Recommended Net Volume:

 2.375 cu. ft. (67.3 ltrs.)

Recommended Port Tuning:

 34.6 Hz

Port Type:

 “Slot” ports are recommended. See information above.  

The port recommendations listed above are derived through actual tests and 
measurements (not computer simulations). 

Front Baffle Thickness:

 1 in. (25 mm) 

Wall Thickness:

 0.75 in. (19 mm)

Net volumes given below do not include the air volume displaced by the speaker 

(Driver Displacement). This value must be added to the net volume along with the 

displacement of any braces and/or ports (if applicable) to arrive at a gross internal 

volume.  Air inside a port is not part of the effective net volume. Calculate ports as 

solid, not hollow objects.

The dimensions given for the enclosure examples below take all applicable 

displacements into consideration.

SEALED ENCLOSURE:

Recommended Net Volume:

 1.875 cu. ft. (53.1 ltrs.)

Fc:

 40.5 Hz     

F3:

 37.4 Hz     

Qtc:

 0.771

Front Baffle Thickness:

 1 in. (25 mm) 

Wall Thickness:

 0.75 in. (19 mm)

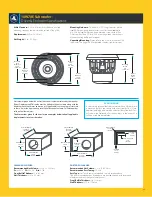
Overall

Diameter

14 in.

(356 mm)

Bolt Hole

Circle

12.7 in.

(323 mm)

12 Holes

Magnet

Diameter

8.38 in.

(213 mm)

Mounting

Hole

Diameter

11.9 in.

(302 mm)

Overall

Depth

12 in.

(305 mm)

Mounting

Depth

10.5 in.

(267 mm)

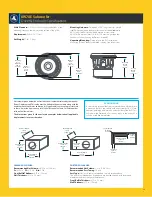
External Width

16.0 in.

(406mm)

External Height

16.0 in.

(406 mm)

External Depth

18.875 in.

(479 mm)

External Width

25.875 in.

(657 mm)

External Height

16.0 in.

(406 mm)

External Depth

17.25 in.

(438 mm)

Slot Height

14.5 in.

(368 mm)

Extension Length

7.875 in.

(200 mm)

Slot Width

2.25 in.

(57 mm)

Slot Width

2.25 in.

(57 mm)

Slot Port Depth

26.25 in.

(667mm)

SAFETY NOTICE!

It is absolutely essential that the completed subwoofer enclosure 
is mounted firmly to the vehicle with heavy steel bolts (1/2 inch 
diameter) and large steel washers on both sides of the bolts. This 
will reduce the likelihood of occupant injury in the event of a 
collision or sudden deceleration.

7    

Содержание W7AE

Страница 1: ...W7AE Owner s Manual ...

Страница 2: ...0 0 W 1 2 5 W 13W7AE 12W7AE 10W7AE 8W7AE Thank you for purchasing a JL Audio W7AE subwoofer driver The W7AE embodies JL Audio s commitment to pushing the envelope of speaker technology with eight patented technologies a design patent and a completely unique set of component parts Each W7AE model has been meticulously engineered to reproduce sub bass with extreme fidelity at any volume level provid...

Страница 3: ...ool air through slots directly above the top plate to the voice coil of the speaker This not only enhances power handling but also sound quality by minimizing dynamic parameter shifts and power compression In addition to the patented technologies listed above multiple U S and International patents are currently pending WARNING Prolonged exposure to high sound pressure levels can lead to permanent ...

Страница 4: ...th your fingertips and set it aside Step 4 Remove Screws Once the O Ring is out of the way the surround is completely free of the speaker frame no glue is used to secure it Lift the surround up and fold it back inside the speaker frame picture 4a This exposes the mounting screws picture 4b The surround should be folded back and in towards the center of the speaker picture 4c Do not pull it up pict...

Страница 5: ... to disastrous consequences so don t do it While holding the surround back with two fingers picture 7a screw the speaker into the enclosure picture 7b Once all twelve screws are in place you did use all twelve right place the surround back over the outside of the speaker frame picture 7c Step 8 Attach O Ring Next take the steel O Ring that you removed in step 3 and place it over the outside of the...

Страница 6: ...h one controller by adding standard phone cable splitter not included This is a true subwoofer level control not a bass boost Output Polarity Carefully listen to the sub bass to mid bass transition with music that has strong mid bass content Select the switch position which gives the smoothest most natural mid bass response If using multiple HD1200 1 s on multiple subwoofers make sure this switch ...

Страница 7: ... with the displacement of any braces and or ports if applicable to arrive at a gross internal volume Air inside a port is not part of the effective net volume Calculate ports as solid not hollow objects The dimensions given for the enclosure examples below take all applicable displacements into consideration SEALED ENCLOSURE Recommended Net Volume 1 875 cu ft 53 1 ltrs Fc 40 5 Hz F3 37 4 Hz Qtc 0 ...

Страница 8: ...listen to the sub bass to mid bass transition with music that has strong mid bass content Select the switch position which gives the smoothest most natural mid bass response If using multiple HD750 1 s on multiple subwoofers make sure this switch is set to the same position on all amplifiers Infrasonic Filter Turn Off for Sealed Enclosure Select 30Hz for Ported Enclosure Input Sensitivity Controls ...

Страница 9: ...on pages 4 5 for detailed step by step instructions PORTED ENCLOSURE Recommended Net Volume 1 75 cu ft 51 54 ltrs Recommended Port Tuning 36 7 Hz Port Type Slot ports are recommended See information above The port recommendations listed above are derived through actual tests and measurements not computer simulations Front Baffle Thickness 1 in 25 mm Wall Thickness 0 75 in 19 mm Net volumes given b...

Страница 10: ...ed This is a true subwoofer level control not a bass boost Input Sensitivity Controls Proper adjustment of these controls is critical For virtually all aftermarket head units set Input Voltage to Low See Input Sensitivity Setting Guide on pg 14 for precise setting instructions JL Audio XD600 1v2 These settings are intended as a baseline for tuning your system Depending on your vehicle and your pre...

Страница 11: ... with the displacement of any braces and or ports if applicable to arrive at a gross internal volume Air inside a port is not part of the effective net volume Calculate ports as solid not hollow objects The dimensions given for the enclosure examples below take all applicable displacements into consideration SEALED ENCLOSURE Recommended Net Volume 1 25 cu ft 35 4 ltrs Fc 43 5 Hz F3 40 5 Hz Qtc 0 7...

Страница 12: ...d This is a true subwoofer level control not a bass boost Input Sensitivity Controls Proper adjustment of these controls is critical For virtually all aftermarket head units set Input Voltage to Low See Input Sensitivity Setting Guide on pg 14 for precise setting instructions JL Audio XD600 1v2 These settings are intended as a baseline for tuning your system Depending on your vehicle and your pref...

Страница 13: ...splacement of any braces and or ports if applicable to arrive at a gross internal volume Air inside a port is not part of the effective net volume Calculate ports as solid not hollow objects The dimensions given for the enclosure examples below take all applicable displacements into consideration SEALED ENCLOSURE Recommended Net Volume 0 875 cu ft 24 8 ltrs Fc 45 9 Hz F3 41 3 Hz Qtc 0 798 Front Ba...

Страница 14: ... input sensitivity control until the desired voltage determined in Step 5 is delivered If multiple subwoofer amps are being used set each one to the same exact voltage and you have also level matched them On an amplifier with a sensitivity range switch if excessive voltage is read with the control at minimum full counterclockwise switch the Input Voltage to High and re adjust Step 9 Once you have ...

Страница 15: ...imitations on implied warranties therefore these exclusions may not apply to you This warranty gives you specific legal rights and you may also have other rights which vary from state to state If you need service on your JL AUDIO product All warranty returns should be sent to JL AUDIO freight prepaid through an authorized JL AUDIO dealer and must be accompanied by proof of purchase a copy of the o...

Страница 16: ...logo are registered trademarks of JL Audio Inc W7AE VRC OverRoll W Cone and their respective logos are trademarks of JL Audio Inc U S PATENTS 5 734 734 5 949 898 6 118 884 6 229 902 6 243 479 6 294 959 6 501 844 6 496 590 6 441 685 5 687 247 6 219 431 6 625 292 D472 891 8 605 936 D480 709 Other U S Foreign patents pending For more detailed information please visit us online at www jlaudio com Due ...

Отзывы: