Duo Freestanding
3
Installation
Clearances to combustibles & flue requirements
To comply with the Australian Standard, your Duo Freestanding Heater must be installed with a 6 inch Australian Standard
Flue kit.
The Duo Freestanding has been tested to the Australian Standard 2918:2001 Appendix B,
Test Report No HCMG/05/002. Tested with a Western Valley 6 inch Australian Standard flue kit.
The Duo Freestanding heater conforms to the Australian Standard in the following placement of the appliance in relation to
combustible surfaces.
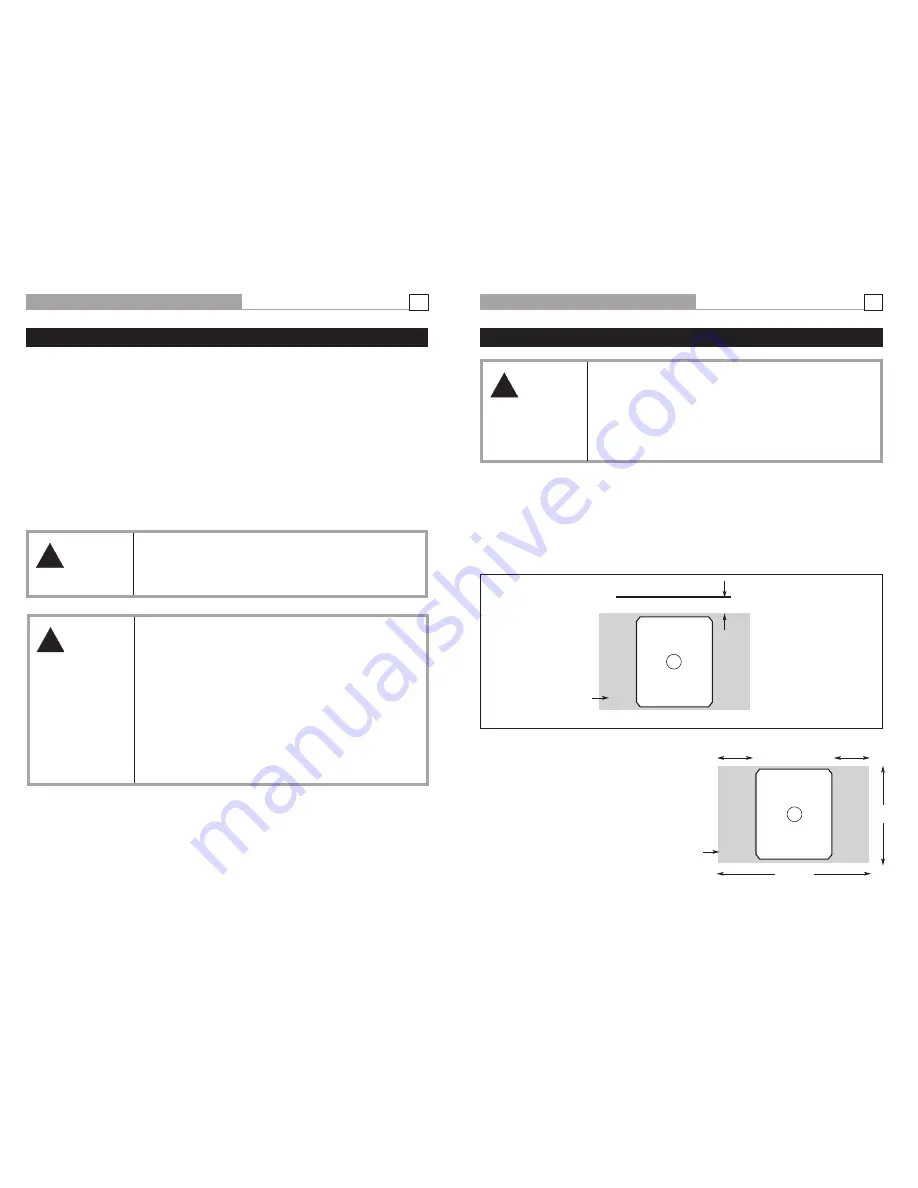
The Duo Freestanding conforms to A.S. 2918:2001
Appendix B when placed in the position at right.
A minimum 1750mm deep x 900mm wide x 6mm
thick floor protector should be used under and in
front of the appliance when installing the appliance.
The floor protector should extend 500mm in front of
the appliance base on both doors.
Hearth Requirements
FRONT OF HEATER
FRONT OF HEATER
275mm
Side Wall
Floor Protector
1750mm
900mm
500mm
500mm
Floor Protector
!
WARNING
THE INSTALLATION OF THIS APPLIANCE MUST BE CARRIED OUT AS PER THIS
MANUAL AND THE FLUE MANUFACTURERS SPECIFICATIONS.
WE RECOMMEND THAT YOU USE A QUALIFIED INSTALLER TO CARRY OUT
THE INSTALLATION.
If you have any other enquiries, please contact the dealer from whom you
purchased your heater.
THIS APPLIANCE WEIGHS IN EXCESS OF 200 KILOGRAMS. EXTREME CARE
SHOULD BE TAKEN WHEN HANDLING THE APPLIANCE.
Installation
Door
Door
Duo Freestanding
6
Operating your Jindara
(Continued)
Cleaning your flue
Carefully remove baffle plate and put it to one side. Close the heater door. Obtain a 150mm flue brush from your local
Dealer and proceed up onto your roof. Remove the cowl. Slowly push the flue brush down the chimney until it stops. Pull
the brush back out and repeat the process. Each time you do this you will notice that the brush will go further down the
chimney till it reaches the bottom. The soot and creosote will fall down the chimney and into the firebox. Clean residue
from firebox. Replace the baffle plate. Make sure you do the job well. The cleaner the flue the less chance there will be of
the creosote sticking again. After you have replaced the cowl, inspect the roof flashing for any damage that may have
been incurred whilst you were cleaning the flue. Reseal the seal on the roof with roof and gutter silicone if required.
The fans
It is recommended to run the fans while the heater is operating above low burn on low speed. For extended periods
when the heater is running above medium fire, high or boost is recommended. Boost is recommended for short bursts
where a quick temperature rise is desired in conjunction with a high fire setting. The fans should be cleaned on a regular
basis. (Refer Troubleshooting for fan removal and cleaning.)
!
WARNING
Leaving Door Open
As stated previously in relation to leaving door open 25mm to encourage the fire
to pick up at a faster rate. Your heater has been tested to ensure that no
structural damage can take place if the door is inadvertently left open. However
your paint finish can be damaged if the door is left open for a long period with a
full firebox of fuel with the fan off. Closely supervise your heater while the door is
left open.
Closing the Door
Always ensure that before you close your door there is no wood protruding
beyond the front of the firebox opening. Do not use the door glass as a ’battering
ram’ to push the wood back into the firebox. Damage to the glass by such
impact is not covered by your warranty.
The Door
Operation of the Fan
!
WARNING
If firebox failure is reported and it is found that the firebox has been abused
through improper use of the fan, Jindara reserve the right to disallow any
warranty claims in relation to firebox failure.


