background image

EN

GL

IS

H


12 

AM/ FM Presets 

 
Up to 10 AM and 10 FM stations can be stored 

in the preset memory. 
1. Tune in the station you want to store. 
2. Press 

MEMORY

 button, the LCD will show a 

flashing “MEM”.  

3. Press the numeric button (0 to 9) on which to 

store the station on. 

4.   Press 

MEMORY

 button again, MEM stops 

blinking and the station is stored on that    
preset button. 

To recall a preset station from memory, select 
BAND and the press the preset number on the 
numeric pad.  
 

Reception 

• 

FM reception can be improved by extending 

and adjusting the telescopic antenna. 

• 

AM reception can be improved by re-
positioning the radio, as the AM antenna is 
fixed inside the enclosure. 

Clock and Alarm setting 
 

The clock can be set in standby mode only. 

1. Press 

MEMORY 

button, the digits in the LCD 

start flashing. 

2. Set the alarm time by pressing the        button 

to set the hours and       button to set the 
minutes. 

3. Press 

MEMORY 

again to confirm the clock 

setting. 

To set the alarm time, 
1. press  the 

ALARM 

button in any mode, the LCD 

digits start flashing. 

2. Set the alarm time by pressing the     button 

to set the hours and       button to set the  
minutes. 

3. Press 

MEMORY 

to confirm the alarm setting.  

After setting the alarm time, the LCD will show 

the ALARM icon and the alarm will be activated. 
To deactivate the alarm, press the 

ALARM    

button twice in standby mode, the ALARM icon 
will disappear. 

Содержание NR 200

Страница 1: ...NR 200 UKW MW NOSTALGIERADIO AM FM PLL WOODEN RADIO BEDIENUNGSANLEITUNG USER MANUAL ...

Страница 2: ...achsener betrieben werden Gerät möglichst weit weg von Mikrowellen geräten TV Geräten Computern aufstellen sonst kann es zu Empfangsstörungen kommen Verwenden sie für die Gangreserve der Uhr ausnahmslos nur Batterien die frei von Quecksilber Cadmium ist Möglichst eine Alkaline Batterien verwenden Batterien nicht im Lieferumfang Bei längerem Nichtgebrauch oder bei Gewitter Blitzschlag Gerät unbedin...

Страница 3: ...der zu suchen Drücken Sie die Tasten und kurz um die Frequenz manuall abzustimmen Wenn Sie die Frequenz des gewünschten Senders kennen können Sie diese auch direkt mit den Zifferntasten eingeben Drücken Sie die Taste BAND zur Auswahl von UKW FM oder MW AM Drücken Sie die Taste AM im AM Modus oder FM im FM Modus die angezeigte Frequenz wird gelöscht Geben Sie nun mit den Zifferntasten die Frequenz ...

Страница 4: ...opantenne verbessert werden Die Antenne für den Mittelwellenempfang ist im Gehäuse eingebaut der Empfang kann durch Drehen des Gerätes verbessert werden Uhrzeit und Alarm einstellen Die Uhr kann nur im Standby eingestellt werden 1 MEMORY drücken die Anzeige beginnt zu blinken 2 Die Uhrzeit mit den Tasten Stunden und Minuten einstellen 3 Zum Speichern der Einstellungen nochmals MEMORY drücken Alarm...

Страница 5: ...n Timer vorzeitig beenden drücken Sie die Taste SLEEP sooft bis im LCD 00 angezeigt wird Externer Eingang Sie können externe Audiogeräte an diesem Radio anschliessen und über den eingebauten Lautsprecher wiedergeben Schließen Sie einfach das externe Gerät mit einem 3 5mm Klinkenstecker Stereo oder Adapterkabel nicht im Lieferumfang enthalten an die Buchse Ext Eing an Beim Einstecken schaltet das R...

Страница 6: ...kenstecker an die Kopfhörerbuchse anschließen Daber wird der eingebaute Lautsprecher abgeschaltet Auf Werkseinstellung zurücksetzen Das Radio überwacht ständig die Spannung der Backupbatterie Das Symbol erscheint wenn die Batteriespannung zu niedrig ist Ersetzen Sie die Batterien Wird das Gerät ohne Batterien oder mit zu schwachen Batterien betrieben verliert das Radio bei Netzausfall sämtliche ge...

Страница 7: ... Gebrauchsanleitung oder auf der Verpackung weist darauf hin Die Werkstoffe sind gemäß ihrer Kennzeichnung wieder verwertbar Mit der Wiederverwendung der stofflichen Verwertung oder anderen Formen der Verwertung von Altgeräten leisten Sie einen wichtigen Beitrag zum Schutze unserer Umwelt Bitte fragen Sie bei Ihrer Gemeindeverwaltung nach der zuständigen Entsorgungsstelle Für den Fall daß trotz un...

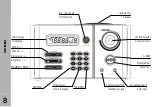
Страница 8: ... Einstellung Adjustment MEMORY BAND Zifferntasten Numeric keypad FM UKW AM MW Kopfhöreranschluß Headphones jack Ext Audioeingang AUX input Einschlaftimer Sleeptimer ALARM Lautstärkeregler Volume Control Lautsprecher Speaker Ein Aus Taste On Off button ...

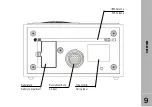
Страница 9: ...9 OVERVIEW Batteriefach Battery compartment Bassreflexöffnung Air duct Typenschild Rating label UKW Antenne FM Antenna ...

Страница 10: ...ower button is located on the front panel of the radio The power indicator is illuminated in red if the radio connected with AC power and in standby mode The LCD would display 0 00 after connecting to AC as default setting Press the power button once to switch the radio to on the power indicator will go off and the backlight of the LCD and function buttons will illuminate in blue The first time th...

Страница 11: ...n by entering the direct frequency on the numeric keypad Choose the band AM or FM by BAND button then press AM in AM mode or FM in FM mode frequency reading will disappear Enter the frequency with the numeric keypad and press AM in AM mode or FM in FM mode to confirm The selected frequency must be within the frequency range for AM or FM band otherwise the display will show ERR Valid frequency rang...

Страница 12: ...roved by re positioning the radio as the AM antenna is fixed inside the enclosure Clock and Alarm setting The clock can be set in standby mode only 1 Press MEMORY button the digits in the LCD start flashing 2 Set the alarm time by pressing the button to set the hours and button to set the minutes 3 Press MEMORY again to confirm the clock setting To set the alarm time 1 press the ALARM button in an...

Страница 13: ...re the timer runs out just set the remain time to 00 using the SLEEP button AUX in function You can connect and listen to external devices on the radio speaker by connecting them to the Ext Eing Aux in jack Any device with head phone or line out can be connected to the port using a 3 5mm stereo plug or adapter cable not included When the plug is connected the radio will auto matically switch to AU...

Страница 14: ...d to excessive heat such as sunshine fire or the like The apparatus shall not be exposed to dripping or splashing and that no objects filled with liquids such as vases shall be placed on apparatus Mains plug is used as the disconnect device It shall remain readily operable and should not be obstructed during intended use To be completely disconnected the apparatus from supply mains the main plug o...

Страница 15: ...aste electrical products should not be disposed of with household waste Please recycle where facilities exist Check with your Local Authority or retailer for recycling advice Waste Electrical and Electronic Equipment Directive If this product should be defective despite our high standard quality control please contact the service support hotline The hotline is available Monday through Friday from ...

Страница 16: ......
Отзывы: