background image

- 8 -

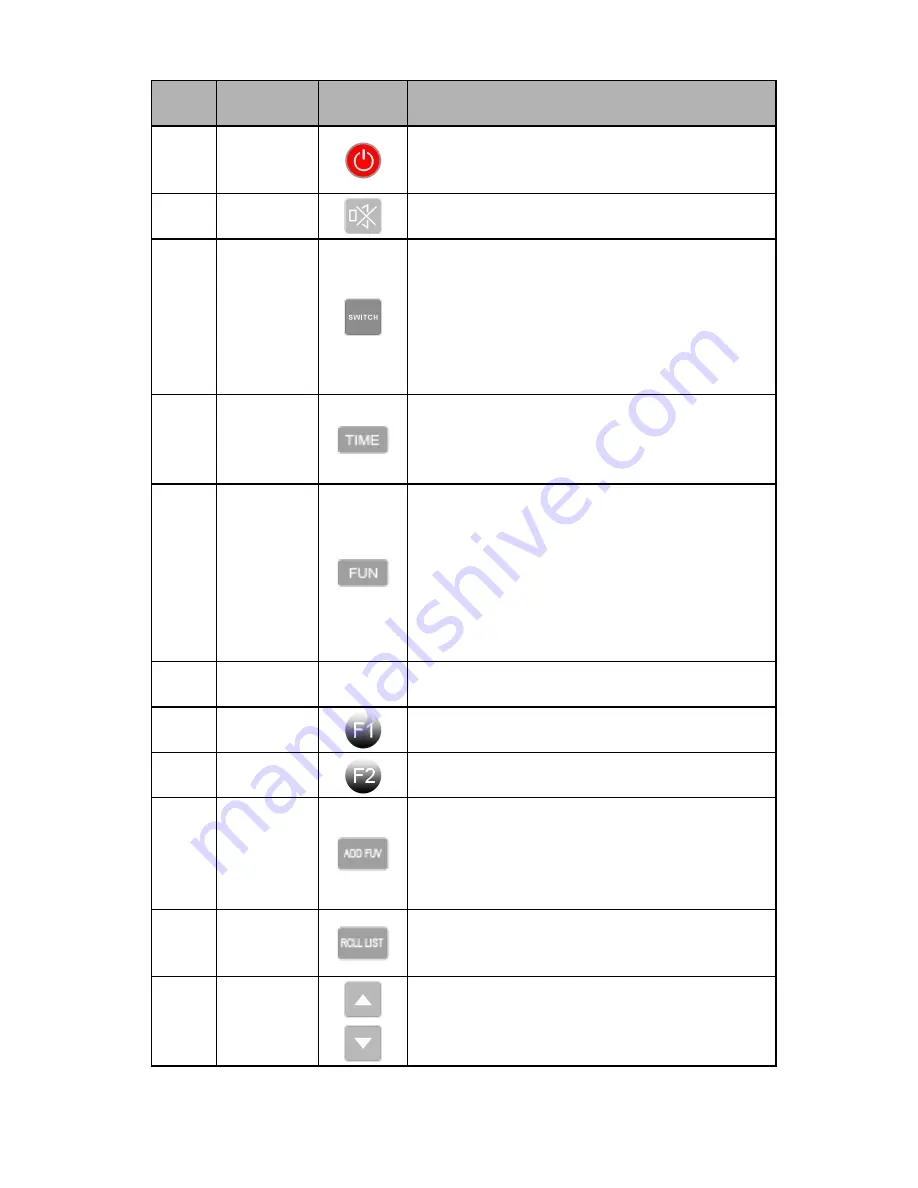
No.

Button

name

Button

icon

Functions

1

Standby

After powered on,the remote control will get into
standby status until powered off.It will take 3 seconds
to power off by pressing this key

Not support use

2

Mute

Mute sounds or open audio.

3

Function

switch

1. In the player interface, press this key to switch play
mode.
2. In DAC status, press this key to switch different
Input signal sources.
wireless WPS key. In the menu screen, press this key
to directly connect with a router without having to
enter a password.

4

Picture

switch

1.In file status, press this key to reveal or conceal the
pictures.
2. In screen-protecting status, press this key to switch
between level meter and pictures.

5

Functional

key

1. The menu for Copy, Paste, Cut, Delete, etc.
2. In playing status

press this key to delete collected

files.
3.In playing status

press this key to quickly switch to

the audio settings interface.
4.In playing status

press this key to switch the

functions between WIFI and AP.(AP--the built-in
virtual router)

6

numerical

keyboard

Press this key to Input the numbers 0-9

7

search key

Press this key to Search the list of files.

8

The key of

exit or enter

CD exit or enter

9

ADD FAV

Favorite

1. Press this key to add the current playing file or
internet radio to the Favorites for the purpose of direct
playback next time.
2. In playing status, press this key to enter folder
custom interface.

10

RCLL LIST

home button

In any state, press this key to return to the main menu
interface.

11

Vol+/Up

Vol-/Down

1.In playing status, press this key to adjust the sound
2.In other states, press this key to operate as
up/down.

Содержание UDS-1

Страница 1: ... 1 UDS Series User s Manual Shenzhen JingFeng Digital Technology Co Ltd http www jfdigital com ...

Страница 2: ...instead of organic chemicals For stubborn spots please wipe with soft cloth dipped by neutral detergent then use the dry cloth to wipe No not splash the water or other liquids inside the player or on its surface No little metal fragments are inside the machine 4 Don t use the player under the condition of worn and torn power line 5 Don t put the machine on the damp base 6 Don t use the player in t...

Страница 3: ...7 CD play ripping function 17 Document retrieval function 17 3 3 2 playlist 18 Create a custom folder 20 3 3 3 Network Music 22 Samba settings Sharing 22 UPNP settings Sharing 23 web radio 24 3 3 4 DAC 25 UDS 1 D A 25 UDS 3 UDS 5 25 S P DIF input 27 HDMI input 27 Analog input 29 3 4 system configuration 30 3 4 2 network settings 31 AP function 31 3 4 3 language selection 33 3 4 4 time zone setting...

Страница 4: ...time 2 7 inch true color screen 3 Receive Window with infra red remote control 4 6 5mm earphone export connect to the earphone of high impedance above 50 ohmic 5 Pulling hard disk rack to support 4TB hard disk 6 the USB2 0 interface on the right to connect with storage device such as USB flash disk or mobile hard drive 5V 0 5A power ...

Страница 5: ...e 8 USB PC Computer access built in hard disk to copy or delete the files 9 RJ 45 100M network interface 10 WIFI antenna plug 11 HDMI input interface 2 group BY PASS output interface 1 group 1 2 UDS 3 Device layout introduction Front panel 1 Power button and power LED are red in the standby time 2 7 inch true color screen 3 Receive Window with infra red remote control 4 6 5mm earphone export conne...

Страница 6: ...the standby time 2 7 inch true color screen 3 Receive Window with infra red remote control 4 up down Last Next OK exit 5 CD Ripper disk 6 Pulling hard disk rack to support 4TB hard disk UDS 3 UDS 5 Back Panel 1 AC power input socket 2 Power fuse box 250V 2A ...

Страница 7: ...SB 2 0 Input interfaces to connect with storage device such as USB flash disk or mobile hard drive 8 USB PC Computer access built in hard disk to copy or delete the files 9 RJ 45 100M network interface 10 WIFI antenna plug 11 HDMI input interface 4 group BY PASS output interface 1 group match 12 S PDIF input RCA jack 4 group S PDIF input balanced jack2 group S PDIF input optical fiber jack 2 group...

Страница 8: ...key 1 The menu for Copy Paste Cut Delete etc 2 In playing status press this key to delete collected files 3 In playing status press this key to quickly switch to the audio settings interface 4 In playing status press this key to switch the functions between WIFI and AP AP the built in virtual router 6 numerical keyboard Press this key to Input the numbers 0 9 7 search key Press this key to Search ...

Страница 9: ...ist press this key to operate as up down the pages 17 Play Pause 1Press this key to pause in play status and press it again to keep playing 2 in other states press this key to rapidly return to the player interface 18 Record Press this key to record the current playing songs or web radio in the local disc CD Ripper ripping function DAC record radio record 19 DAC In the menu press this key to enter...

Страница 10: ... 10 3 2 The main interface After the completion of the machine starting to enter the main menu a total of five functional icons appear ...

Страница 11: ...he OK button to enter the storage partition file list If no partition storage such as U disk enters directly Local hard disk Machine with a built in hard disk support 4 TB support for NTFS FAT FAT32 hard disk format USB 1 external USB storage devices U disk or mobile hard disk etc support 4 TB hard disk USB 2 Insert two storage devices at the same time CD drives CD music resources UDS 5 is equippe...

Страница 12: ...ge Press the remote s ADD FAV it can add document to the playlist Press the remote s F1 to enter the file search interface Press the TIME button on the remote album pictures can be hidden or displayed Press the remote s FUN key to cut copy delete paste and so on Select the music needs to be played press OK on the remote controller then the play interface as shown below ...

Страница 13: ...play pause next page stop playback modes shift from left to right Press the remote s SWITCH it can switch the playback modes with four categories single play list play random play Loop play Single play List play Random play After playing 5 seconds the display screen will enter a state of screen saver shown as follows if needing to cancel the level meter display press the TIME switch to album pictu...

Страница 14: ...h pictures or level meter DSD format can only display pictures Audio Setup function In the play interface press FUN key to enter the audio setup set the parameters then press the escape key to return to the current state Recording ...

Страница 15: ...terface press F2 key on the remote control the disc tray will pop up 2 Insert the CD ROM 3 Press the F2 key to hide the tray 4 The player will read the disc information enter the CD information list 5 Press the Up Down Left Right and OK button to select the contents you want to play CD Ripping Ripping 1 On the list screen of the CD file press the record button on the remote control it will enter t...

Страница 16: ...ight press the OK button to confirm or just press the number keys on the remote control After input move the cursor to the Create button and press the OK button 3 The letter input select the corresponding letter keys on the remote control with up down left right press the OK button select key then you can switch uppercase and lowercase letters after input move the cursor to Create key and press th...

Страница 17: ...e of the local music the network sharing and network radio press ADD FAV button each document can be stored in the play list Network sharing you can view a list of favorite files via UPNP Samba Radio sharing you can view the favorite and history radio stations Local sharing You can view a list of favorite files via removable storage devices ...

Страница 18: ...Create user defined folder 1 Select your favorite document or the radio station in each list and then press the remote control ADD FAV key the icon behind document turns yellow from gray which means file added to favorites and press ADD FAV key you can cancel it Favorites can also be operated during playback with pressing ADDFAV 2 Create a personalized list document first enter the play list open ...

Страница 19: ...ace and it has been created successfully If it does not just directly press EXIT selection 4 When you need to add other documents to favorites next time the system will display the file that user created you can add the same type of file directly to the favorites folder Note The list of documents in the local share is a shortcut stored in the machine s memory if you change the mobile storage devic...

Страница 20: ... world and it supports to add radio stations manually the logo and other information display SAMBA share display all network sharing files UPNP share only show the sharing multimedia files music video picture the system will filter some special music formats including resources on the network server APE DSD etc Samba share 1 Set up network share partition the disk with music files in PC or set the...

Страница 21: ...s not set the password then click OK and find the shared file for playback You can manually enter the specified IP address the shared IP address can connect network equipment The method of entering the IP address With the up down keys to select the number of changes on the remote control with the left right to control the cursor to move back and forth UPNP share ...

Страница 22: ...are to support It actually sets shared folder in the operating system and then visits shared files folder by built SAMBA in the player to achieve the purpose of sharing files Advantages and disadvantages We need to have some simple setup to network sharing device for win XP and PC system of win 7 have different setup All audio files can be shared as long as formats that the player supported can pl...

Страница 23: ... number key on the remote control on the station list press the number keys on the remote control to input a number which corresponds to each left number of every radio station in the list then you can easily select the station you want 4 In any mode press key to enter the station list of the history and in history radio where you can view a list of 10 stations visited recently and it is convenien...

Страница 24: ...ce press the DAC to enter to select different channel interface 3 Select the corresponding signal option press the OK button to enter the DAC playback interface 4 In DAC player interface press the SWITCH on the remote control to switch between various input signals in order 5 Press the Return key to exit the current DAC status and return to the previous menu press the Home key RCLL LIST key to exi...

Страница 25: ... Support the decoding formats of PCM and DSD Support 2 HDMI signal input 1 HDMI direct output 1080P 3D Support PCM and DSD format source signal recording Save PCM as wav format Save DSD as dff format UDS 3 UDS 5 S P DIF input interface ...

Страница 26: ...ration Instructions 1 Please first enter settings Audio settings HDMI setting open the HDMI 2 With HDMI cable connecting set top boxes mobile phones video cameras and the like external signal source to the HDMI input port 1 4 then use the other HDMI cable to connect the Pass Through and connect the monitor with an HDMI input 3 Entering the DAC interface to choose the HDMI input select the correspo...

Страница 27: ... the file named after D1 date when stop recording please press the record button again Note HDMI input port only supports transparent PCM and DSD signals which does not support formats not decoded DTS Dolby etc We suggest users set output mode of video player to LPCM output Analog Inputs optional Features Support analog signal transferring PCM and DSD formats output Support PCM and DSD format sour...

Страница 28: ...e saved in the Analog folders files named after A1 date when stop recording please press the record button again Note Please make sure the selected storage device has sufficient memory otherwise the recording will be interrupt 3 4 System settings In the main menu select the setup option as follows Audio setting They are ES9018 D A setting WM8741 D A setting analog input S PDIF input HDMI output th...

Страница 29: ...rs which will achieve a better sound experience ES9018 setting the digital filter parameters de emphasis filter phase adjustment DPLL phase locked loop bandwidth and jitter suppression WM8741 setting PCM mode DSD Direct mode DSD PLUS mode Analog Input PCM output format DSD output format digital filter parameters S PDIF Input pre emphasis control de emphasis control HDMI Output on and off if not us...

Страница 30: ...og recordings default output format is DSD2 822M 3 4 2 Network settings Network settings network type IP settings DHCP WIFI switch 1 Wired network priority settings insert the home computer network cable directly into a LAN interface select in the main menu settings Network Settings Network type wired network icon the icon turns to in the lower right corner which indicates that the network has bee...

Страница 31: ...WPS connection WPS function to simplify Wi Fi wireless security setup and management with WPS button not needing configure complicated parameters it can be fast easy to establish a wireless connection Operation Firstly make sure your wireless router to be connected with a WPS function button turn on the player and connect WIFI antenna Press the WPS button on your wireless router and then in the pl...

Страница 32: ...hoose Network settings icon to open WIFI search device choose the device name in the search list which shows a serial number for instance 20 59 a0 10 a6 31 the serial number of each machine is different entering the settings and view in the version information or can be found in the back of the chassis Touch the link and input the default password 12345678 then enter the player s built in router 4...

Страница 33: ...onal Chinese German Italian Japanese and other languages to match with different countries and regions 3 4 4 Time zone settings Provide global zone selection get the current time automatically in different countries and regions 3 4 5 Display settings ...

Страница 34: ... are 4 modes available setting the display light time including 5 seconds 10 seconds 30 seconds and always keeping brightness 3 4 6 Firmware Upgrade 1 Network upgrade when the network connection is OK the backstage has the latest firmware the system will pop up a dialog which shows if you need to upgrade the program If you press the button of confirmation the system will automatically download the...

Страница 35: ...e the device name software version hardware version number release date and network MAC address code Ⅳ Simple Troubleshooting If the machine has no any response with power firstly check whether the power is plugged in both edges secondly the Indicator next to the power switch is illuminated or not or whether it has fused Fuse box position is as follows With screwdriver gently pry the fuse lifted l...

Страница 36: ...t PCM 24Bit 192KHz DTS format 24Bit 192KHz HDMI Input DSD 1Bit 5 6MHz PCM 24Bit 192KHz DTS 24Bit 192KHz Analog Input PCM 24Bit 192KHz DSD 1Bit 5 6MHz Package contents and parameters Package contents 1 Product host 1 AC power cord 1 Remote control 1 Manual 1 WI FI antenna UDS 1 Size 285 W 310 D 150 H mm Weight 5KG 11B UDS 3 5 Size D W H 435 W 310 D 150 H mm Weight 11KG 23B ...

Страница 37: ... machine does not work due to the force majeure 5 For the consumable parts and wearing parts such as the remote control the warranty period is three months 6 There is any damage caused by unauthorized move or misuse 7 We will charge for repairing any damage arised from the man made factors Ⅴ Any modification on the product without any authorization belongs to infringing act Out company will not be...

Страница 38: ... China Tel 86 755 83225760 Fax 86 755 86093355 Code 518031 http www jfdigital com Customer name Customer address Postal code Contact department Contact person Tel Email Fax Distributor Contact department Contact person Tel Email Fax Model purchased Date purchased Serial number Customer code filled by manufacturer Servicing time Fault descriptions Servicing time Fault descriptions ...

Отзывы: