background image


12


(6)


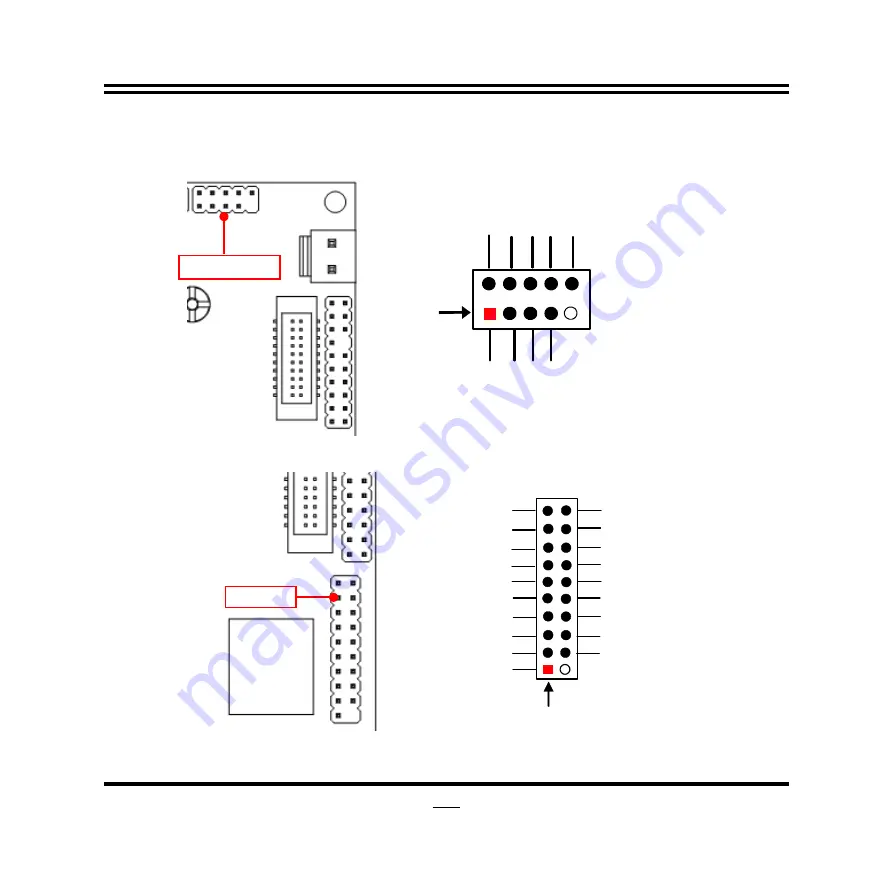
FP_USB20 (9-pin): USB 2.0 Port Wafer 


Pin 1

V

C

C

-D

A

T

A

G

N

D

+

D

A

T

A

V

C

C

N

C

C

-D

A

T

A

G

N

D

+

D

A

T

A

2

(7)


USB30 (5-pin): USB 3.0 Port Header


D2-

D1+

GND

Pin 1

D2+

XX

GND

SSTX1+

10

D1-

SSTX1-

GND

SSRX1+

SSRX1-

VBUS

SSTX2-

SSTX2+

GND

VBUS

11

19

SSRX2+

SSRX2-


FP_USB20

USB30

Содержание JNP793D2-3160

Страница 1: ...F Revision 4 0 Release date February 17 2020 Trademark Specifications and Information contained in this documentation are furnished for information use only and are subject to change at any time witho...

Страница 2: ...ii Environmental Protection Announcement Do not dispose this electronic device into the trash while discarding To minimize pollution and ensure environment protection of mother earth please recycle...

Страница 3: ...LAYOUT DIAGRAM 3 1 4 MECHANICAL DRAWING 5 CHAPTER 2 HARDWARE INSTALLATION 2 1 JUMPER SETTING 6 2 2 CONNECTORS WAFERS AND HEADERS 9 CHAPTER 3 INTRODUCING BIOS 3 1 ENTERING SETUP 15 3 2 BIOS MENU SCREEN...

Страница 4: ...t is moved from a cold environment to a warmer one to avoid condensation phenomenon These water drops attached on PCB or the surface of the components can bring about phenomena as minor as computer in...

Страница 5: ...T NOTICE MANUFACTURER PROVIDES THIS MANUAL AS IS WITHOUT WARRANTY OF ANY KIND AND WILL NOT BE LIABLE FOR ANY INDIRECT SPECIAL INCIDENTIAL OR CONSEQUENTIAL DAMAGES INCLUDING DAMANGES FOR LOSS OF PROFIT...

Страница 6: ...GB DDR3L DRAM Equipped with 32GB on board eMMC Onboard 1 full size Mini PCIE slot Onboard 1 M 2 slot M key SATA interface 2242 Support HDMI and eDP pin header for dual display output 12V DC in power 2...

Страница 7: ...ATA slot M key SATA interface 2242 LAN Chip 2 Intel i211AT GbE Support Fast Ethernet LAN function of providing 10 100 1000 10000 Mbps Ethernet data transfer rate BIOS AMI Flash ROM Internal I O 1 2 pi...

Страница 8: ...IE Slot MPE M 2 SATA Slot M 2 GPIO Header COM1 Header 12V DC in Power Connector HDMI Port Header USB 3 0 Port Header RJ 45 LAN Port Header RJ 45 LAN Port Header Onboard eMMC SMBUS Header Front Panel H...

Страница 9: ...s P N Name Description DCIN1 Internal 12V DC in power connector 2 pin Block JW_FP Front panel header PWR LED HDD LED Power Button Reset 9 pin Block SMBUS SMBUS header 5 pin Block GPIO GPIO header 10 p...

Страница 10: ...5 1 4 Mechanical Drawing Unit mm...

Страница 11: ...2 of JP1 6 pin Clear CMOS RAM Setting 1 2 Closed Clear CMOS One Touch 1 2 Open Normal Default Pin 1 2 Pin 1 2 of JP1 Clear CMOS 2 Pin 1 Pin 3 4 of JP1 6 pin RTC Reset Select Pin 1 2 2 Pin 1 Pin 3 4 of...

Страница 12: ...1 Flash Override 5 6 Open Enable Security Measures in the Flash Descriptor Default 5 6 Closed Disable Security Measures in the Flash Descriptor Override MPE_PWR 3 pin MPE Slot VCC 3V 3VSB Select MPE_P...

Страница 13: ...1 3 1 3 ATX Mode Selected Press power button to power on after power input ready AT Mode Selected Directly power on as power input ready JPCOM1 4 pin COM1 Port Pin9 Function Select JPCOM1 COM1 Port P...

Страница 14: ...tors Wafers and Headers 1 DCIN1 2 pin Internal 12V DC in power connector Pin No Definition 1 12V 2 GND Pin1 2 JW_FP 9 pin Front Panel Header Pin 1 HDLED PWRBTN PWRLED HDLED RESET GND VCC 2 GND PWRLED...

Страница 15: ...10 3 SMBUS 5 pin SMBUS Header Pin 1 VCC3V SMB_CLK GND SMB_DATA NC 4 GPIO 10 pin GPIO Header 9 GPIO21 GND GPIO23 GPIO25 GPIO27 GPIO20 GPIO22 2 Pin 1 10 VCC GPIO24 GPIO26 SMBUS GPIO...

Страница 16: ...ted by COM1 header only with compatible COM cable for RS422 or RS 485 function User also needs to go to BIOS to set Transmission Mode Select for COM1 refer to Page 20 Pin NO RS232 RS422 RS485 Pin 1 DC...

Страница 17: ...USB 2 0 Port Wafer Pin 1 VCC DATA GND DATA VCC NC C DATA GND DATA 2 7 USB30 5 pin USB 3 0 Port Header D2 D1 GND Pin 1 D2 XX GND SSTX1 10 D1 SSTX1 GND SSRX1 SSRX1 VBUS SSTX2 SSTX2 GND VBUS 11 19 SSRX2...

Страница 18: ...Pin Define 1 EDP_POWER 2 GND 3 EDP_POWER 4 EDP_DATA1N 5 GND 6 EDP_DATA1P 7 GND 8 GND 9 EDP_Backlight power 10 EDP_DATA0N 11 EDP_Backlight power 12 EDP_DATA0P 13 NC 14 GND 15 EDP_HPD 16 EDP_AUXP 17 Ba...

Страница 19: ...D HDMI_HPD DATA0P GND DDC_SCL DATA0N NC GND DATA2N DATA2P NC TMDS_CLKP DATA1P 2 GND GND DATA1N TMDS_CLKN 10 LAN1 LAN2 15 pin LAN Header Pin 1 GND GigaLAN LED 3VSB 2 MDI_3 MDI_3 MDI_2 MDI_2 MDI_1 MDI_1...

Страница 20: ...s the entire hardware device and configures the parameters of the hardware synchronization Only when these tasks are completed done it gives up control of the computer to operating system OS Since the...

Страница 21: ...16 3 2 BIOS Menu Screen The following diagram show a general BIOS menu screen BIOS Menu Screen Menu Bar Menu Items Current Setting Value Function Keys General Help Items...

Страница 22: ...ss keys when you want to modify the BIOS parameters for the active option F1 General help F2 Previous value F3 Optimized defaults F4 Save Exit Press Esc to quit the BIOS Setup F7 User can press this k...

Страница 23: ...curity Password settings Boot To change boot settings Save Exit Save setting loading and exit options User can press the right or left arrow key on the keyboard to switch from menu bar The selected on...

Страница 24: ...tween time elements 3 7 Advanced Menu Trusted Computing Press Enter to enable or disable Security Device Support Configuration Security Device Support Use this item to enable or disable BIOS support f...

Страница 25: ...erial Port Use this item to enable or disable serial port COM The optional settings are Enabled Disabled When set as Enabled the following sub items shall appear Change Settings Use this item to selec...

Страница 26: ...optional settings Disabled Enabled Note This item should be set as Disabled if you wish to have all active wake up functions WatchDog Reset Timer Use this item to enable or disable WDT reset function...

Страница 27: ...d Enabled When set as Enabled the following sub items shall appear Console Redirection Settings The settings specify how the host computer and the remote computer which the user is using will exchange...

Страница 28: ...event data loss from buffer overflow When sending data if the receiving buffers are full a stop signal can be sent to stop the data flow Once the buffers are empty a start signal can be sent to re sta...

Страница 29: ...l settings Disabled Enabled When set as Enabled the following sub items shall appear Console Redirection Settings The settings specify how the host computer and the remote computer which the user is u...

Страница 30: ...Data Bits The default setting is 8 This item may or may not show up depending on different configuration Parity The default setting is None This item may or may not show up depending on different conf...

Страница 31: ...optional settings C7 C6 C1 SATA Configuration Press Enter to make settings for the following sub items SATA Configuration SATA Controller The optional settings Enabled Disabled SATA Mode Selection Th...

Страница 32: ...presence of media will be checked The optional settings range is from 1 to 50 CSM Configuration Press Enter to make settings for the following sub items Compatibly Support Module Configuration Boot Op...

Страница 33: ...is affected by ERP function in S4 Please disable ERP Support before activating this function in S4 This function is supported when ERP Support is set as Disabled USB Configuration Press Enter to make...

Страница 34: ...ttings Auto Manual Select Manual you can set value for the following sub item Device Power up Delay in Seconds Device Power up Delay in Seconds The delay range is from 1 to 40 seconds in one second in...

Страница 35: ...Press Enter to view current using memory information and make settings for the following sub items PAVC Use this item to enable or disable Protected Audio Video Control The optional settings are Disa...

Страница 36: ...lay selection will appear based on your selection The optional settings are Auto HDMI eDP Secondary IGFX Boot Display Use this item to select secondary display device The optional settings are Disable...

Страница 37: ...unconditionally enabled SCC eMMC Support Use this item to enable or disable SCC eMMC support The optional settings are Disabled Enabled System state after Power Failure Use this item to select AC powe...

Страница 38: ...ator password and user password settings Administrator Password Press Enter to create new administrator password Press again to confirm the new administrator password User Password Press Enter to crea...

Страница 39: ...t for setup activation key Bootup Numlock State Use this item to select keyboard numlock state The optional settings are On Off Quiet Boot The optional settings are Disabled Enabled Boot Option Priori...

Страница 40: ...r of available legacy devices in this group Press Enter to make settings for the following sub items Boot Option 1 2 The optional settings are MMCBJTD4R Disabled 3 11 Save Exit Menu Save Changes and R...

Страница 41: ...re User Defaults Use this item to restore defaults to all the setup options Boot Override UEFI Built in EFI Shell MMC BJTD4R Press this item and a dialogue box shall appear to ask if user wish to save...

Отзывы: