background image


10 

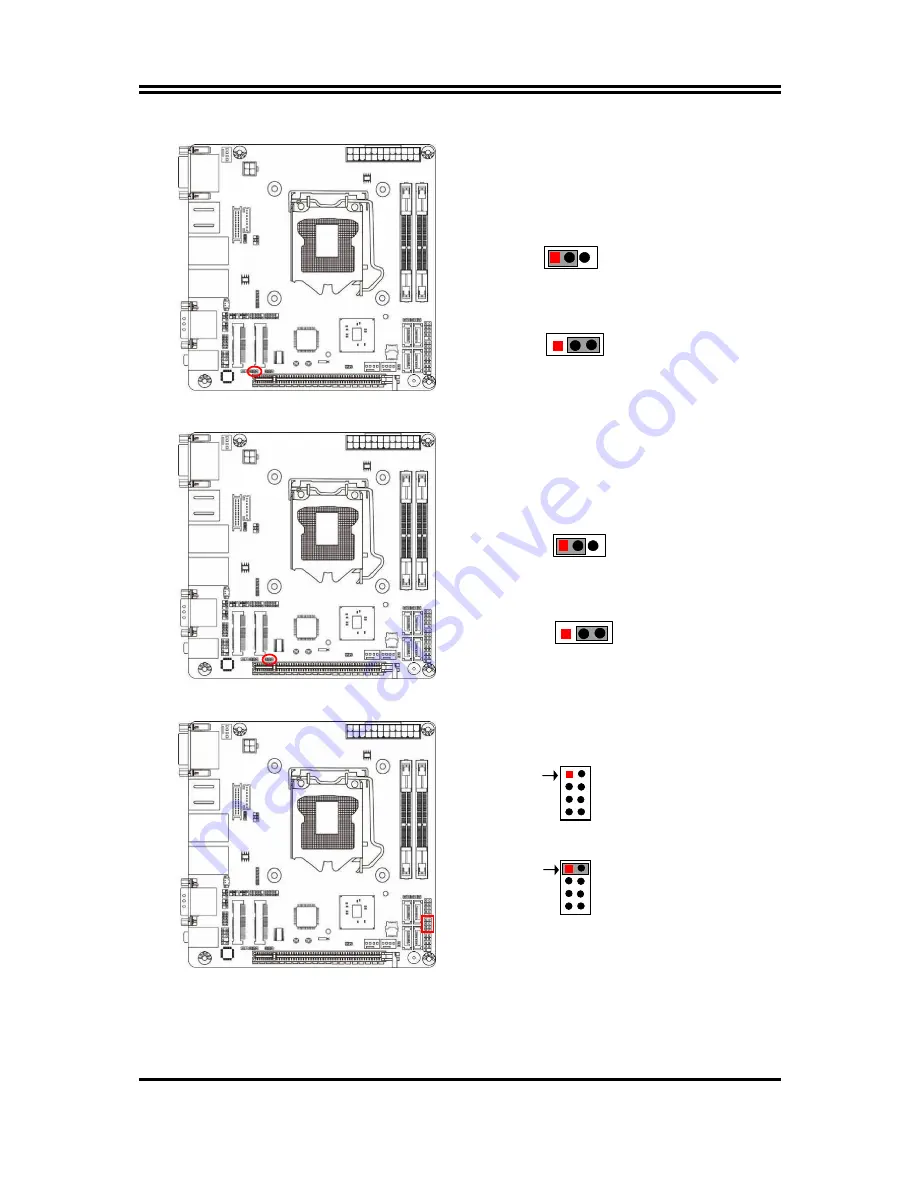
JP9 (3-pin): MMPE Slot PWR VCC 3.3V/3.3 VSB Select 


2-3 Closed

MMPE Slot PWR VCC= 3.3VSB. 


JP9

MMPE Slot PWR VCC 

1-2 Closed

MMPE Slot PWR VCC= 3.3V(Default); 


JP10 (3-pin): MPE Slot PWR VCC 3.3V/3.3 VSB Select 


2-3 Closed

MPE Slot PWR VCC= 3.3VSB. 


JP10

MPE Slot PWR VCC 

1-2 Closed

MPE Slot PWR VCC= 3.3V(Default); 


Pin (1-2) of JP7 (8-pin):Case Open Message Display Function Select 


Pin 1 

Pin(1-2) of JP7

Case Open Detection 

1-2 Open: Normal (Default); 

Pin 1 

1-2 Close: Case Open Function Selected   

(One Touch). 


Pin  (1-2)  Close:  When  Case  open  function  pin  short  to  GND,  the  Case  open 
function was detected. When Used, needs to enter BIOS and enable 

Case Open 

Detect

 function. In this case if your case is removed, next time when you restart 

your computer, a message will be displayed on screen to inform you of this. 


Содержание HPC170SR-ITQ170 Series

Страница 1: ...Panel PC User s Manual NO G03 PCNF594RIT F Manual Revision 1 0 Release Date April 20 2018 ...

Страница 2: ...s 7 2 4 Hardware Installation 12 2 4 1 To Dissemble CPU Fan 12 2 4 2 To install CPU 12 2 4 3 To install SO DIMM 14 2 4 4 To install Wireless LAN Card 15 2 4 5 To install HDD 16 2 4 6 To install Optional Fixed Parts 17 Chapter 3 Introducing BIOS 20 3 1 Entering Setup 20 3 2 BIOS Menu Screen 21 3 3 Function Keys 21 3 4 Getting Help 21 3 5 Menu Bars 22 3 6 Main Menu 22 3 7 Advanced Menu 23 3 8 Chipse...

Страница 3: ...ke sure to set up or use the product on a stable surface Make sure not to drop the product or strike it by any means Make sure not to move the product when the power is on Make sure not to step on the power cables and other cables or rest anything in them Be sure to ground yourself to prevent static charge when installing any internal components Use a grounding wrist strap and place all electronic...

Страница 4: ...warranty of any kind and will not be liable for any indirect special incidental or consequential damages including damages for loss of profit loss of business loss of use of data interruption of business and the like Products and corporate names appearing in this manual may or may not be registered trademarks or copyrights of their respective companies and they are used only for identification or ...

Страница 5: ...hat can act as a mini wireless modem when external antennas are connected Different computers in the house can build wireless connections through the Mini TOP system and take necessary data from it thus reducing the complexity in network establishment Giga LAN The system is integrated with Gigabit LAN network controller with ACPI management realizing efficient power management for the operating sy...

Страница 6: ... dual channel function BIOS 128MB AMI Flash ROM I O System Standard I O 1 AC Power Jack 1 HDMI Port 1 DVI D Port 1 Display Port 6 USB 3 0 Port 2 RJ 45 for Gigabit Ethernet 2 RS 232 422 485 2 RS 232 1 Line In 1 Line Out 1 MIC 1 Power Button 1 Expansion Card Slot System Power Input AC version 100 240V AC Temperature Limits Operating 10 C 60 C with W T DRAM HDD in airflow condition Storage 20 C 65 C ...

Страница 7: ...C Power Jack 1 HDMI 1 DVI D 1 DP 1 USB3 0 6 RJ 45 2 RS232 422 485 2 RS232 2 Line In 1 Line Out 1 MIC 1 Power Button 1 DVI D HDMI AC Jack DP 2 RJ 45 4 USB 3 0 2 USB 3 0 RS232 RS232 RS232 422 485 RS232 422 485 MIC Line In Line Out Power Button For Expansion Card ...

Страница 8: ...t HDMI specification Display Port To the system to corresponding display device with compatible DP cable USB 3 0 Port To connect USB keyboard mouse or other devices compatible with USB specification USB 3 0 ports supports up to 5Gbps data transfer rate RJ 45 LAN Port This connector is standard RJ 45 LAN jack for Network connection Serial Port Mainly for user to connect external MODEM or other devi...

Страница 9: ... set Transmission Mode Select for COM1 COM2 refer to Page 25 at first before using specialized cable to connect different pins of this port Note in the case that the COM port marked as RS232 port it can not support RS422 485 function RJ 45 Ethernet Connector Ethernet connection can be established by plugging one end of the Ethernet cable into this RJ 45 connector and the other end phone jack to a ...

Страница 10: ...6 Chapter 2 Hardware and Installation 2 1 Dimension and Outlines Product Dimension for HPC170SR ITQ170 Series Measure Unit mm ...

Страница 11: ...er installation see to it that the connecting cables are not unplugged It is very important for the cables connected to their original places for normal functioning 2 3 Jumper Settings Jumper is a small component consisting of jumper clip and jumper pins Install jumper clip on 2 jumper pins to close the pins And remove jumper clip from 2 jumper pins to open the pins Diagram 2 1 illustrates how to ...

Страница 12: ...V 4 6 Closed Pin9 12V JP5 4 pin COM2 Port Pin9 Function Select JP5 COM2 Port Pin 9 6 4 2 3 1 5 1 2 4 6 3 5 2 4 6 1 3 5 2 4 Closed Pin9 RING 3 4 Closed Pin9 5V 4 6 Closed Pin9 12V JP3 4 pin COM3 Header Pin9 Function Select JP3 COM3 Header Pin 9 4 6 Closed Pin9 12V 6 4 2 3 4 Closed Pin9 5V 2 4 Closed Pin9 RING 3 1 5 1 3 5 2 4 6 1 3 5 2 4 6 ...

Страница 13: ... 5 2 4 6 1 3 5 2 4 6 JP1 3 pin INVERTER Backlight VCC 5V 12V Select 2 3 Closed Inverter backlight VCC 12V JP1 INVERTER Backlight VCC 1 2 Closed Inverter backlight VCC 5V 1 3 1 3 JP2 4 pin LCD Panel VCC 3 3V 5V 12V Select JP2 LCD Panel VCC 4 6 Closed LCD VCC 12V 2 4 6 3 4 Closed LCD VCC 5V 2 4 Closed LCD VCC 3 3V 3 5 1 5 6 4 2 3 1 6 4 2 5 3 1 ...

Страница 14: ... Default 1 3 1 3 Pin 1 2 of JP7 8 pin Case Open Message Display Function Select Pin 1 2 Pin 1 2 of JP7 Case Open Detection 1 2 Open Normal Default Pin 1 2 1 2 Close Case Open Function Selected One Touch Pin 1 2 Close When Case open function pin short to GND the Case open function was detected When Used needs to enter BIOS and enable Case Open Detect function In this case if your case is removed ne...

Страница 15: ... 4 4 3 ATX Mode Selected Press power button to power on after power input ready AT Mode Selected Directly power on as power input ready JBAT 2 pin Clear CMOS RAM Settings JBAT Clear CMOS 1 2 1 2 1 2 Open Normal Default 1 2 Closed Clear CMOS Settings JP8 2 pin ME Features Select 1 2 Closed Disable ME Features JP8 ME Features 1 2 Open Enable ME Features Pin1 Pin1 ...

Страница 16: ...the marked spots 2 4 2 To Install CPU Please refer to the following instructions and illustration to install a compatible LAG 1151 CPU Before installation please refer to 2 4 1 to dissemble the pre installed CPU FAN 1 Find CPU socket on the board Please make sure that CPU socket is facing towards you and the level is on you right hand side 2 Remove the plastic protective plastic cover from the soc...

Страница 17: ... will be pulled up at the same time 5 Make sure that Pin 1 Golden Finger Indicator in the right place as shown in the above photo and match the two alignment keys on the CPU with two points of the socket CPU can only be correctly installed with this direction Incorrect installation might cause damage to CPU Golden Finger Indicator Alignment Key Alignment Key ...

Страница 18: ...cables unplugged during this process they should be plugged to their original places after installation 2 4 3 To Install SO DIMM Please refer to the following instructions and illustration to install a compatibleDDR4 SO DIMM 1 Find the SO DIMM slot on the board and open the two eject tabs for further installation 2 Insert the gold figure side of the compatible SO DIMM into the slot The eject tabs ...

Страница 19: ...o lock WIFI card to the slot in later installation 2 Insert the gold figure side of the compatible WI FI card into the slot and press down 3 Lock the card to the board by tightening up the screw to the marked spot 4 Press the metal hat on the end of the antenna string to the antenna slot on the card as showed 5 After the above steps finished please connect the external Wi Fi receiver antenna to th...

Страница 20: ...allation steps are basically the same refer to step1 3 2 4 5 To Install HDD Please refer to the following instructions and illustration to install a 2 5 SATA HDD 1 Dissemble the pre installed HDD racks from the system 2 Align the racks to both sides of the SATA HDD as showed above Match the screw holes of the racks to corresponding screw holes of the HDD 3 Lock the HDD to the HDD rack by tightenin...

Страница 21: ...DD cable into corresponding HDD interface 7 Connect the other side of SATA HDD cable into SATA port onboard 2 4 6 To Install Optional Fixed Parts 1 Please find the optional fixed part with metal support attached in the accessories package 2 The marked spots with 3 reserved screw holes are for installing the optional fixed parts Solution 1 ...

Страница 22: ...e system 5 Insert corresponding edges of the fixed part into the slots of metal support until them matched Make sure the fix part is installed in the way the photo shows with protruding tips upwards User can choose the height of installing spot 6 Tightening up the screw so that the fixed part can be fitted into the slots of the metal support tightly Install other fixed parts to the system in the s...

Страница 23: ...ved on both sides of the system User can choose the height or position of installing spot 3 Insert corresponding edges of the fixed part into the slots until them matched Tightening up the screw so that the fixed part can be fitted into the slots tightly Install other fixed parts to the system in the same way Note Fixed parts metal supports are only optional for specific models Please refers to th...

Страница 24: ...ts the entire hardware device and configures the parameters of the hardware synchronization Only when these tasks are completed done it gives up control of the computer to operating system OS Since the BIOS is the only channel for hardware and software to communicate it is the key factor for system stability and in ensuring that your system performance as its best 3 1 Entering Setup Power on the c...

Страница 25: ...o modify Press Enter to select Press keys when you want to modify the BIOS parameters for the active option F1 General help F2 Previous values F3 Optimized defaults F4 Save Exit Press Esc to exit from BIOS Setup 3 4 Getting Help Main Menu The on line description of the highlighted setup function is displayed at the top right corner the screen Status Page Setup Menu Option Page Setup Menu Press F1 ...

Страница 26: ...tting loading and exit options User can press the right or left arrow key on the keyboard to switch from menu bar The selected one is highlighted 3 6 Main Menu Main menu screen includes some basic system information Highlight the item and then use the or and numerical keyboard keys to select the value you want in each item System Date Set the date Please use Tab to switch between data elements Sys...

Страница 27: ...abled Enabled Pending Operation Use this item to schedule an operation for the security device Your computer will reboot during restart to change state of device The optional settings None TPM Clear ACPI Settings Press Enter to make settings for the following sub items ACPI Settings ACPI Sleep State Use this item to select the highest ACPI sleep state the system will enter when the suspend button ...

Страница 28: ...figuration Press Enter to view ME information and make settings in the following sub items Firmware Update Configuration Press Enter to make settings for ME FW Image RE Flash ME FW Image Re Flash Use this item to enable or disable ME FW Image Re Flash function The optional settings Disabled Enabled In the case that user needs to update ME firmware user should set ME FW Image Re Flash as Enabled sa...

Страница 29: ...This item should be set as Disabled if you wish to have all active wake up functions Serial Port 1 Configuration Serial Port 3 Configuration Press Enter to make settings for the following items Serial Port Use this item to enable or disable serial port COM Change Settings Use this item to select an optimal setting for super IO device Transmission Mode Select The optional settings are RS422 RS232 R...

Страница 30: ...pen or not show message in POST PS2 KB MS Connect Use this item to select PS2 connect primary device The optional settings are Keyboard First Mouse First PC Health Status Press Enter to view current hardware health status make further settings in SmartFAN Configuration and set value in Shutdown Temperature SmartFAN Configuration Press Enter to make settings for SmartFan Configuration SmartFAN Conf...

Страница 31: ...ms Terminal Type The optional settings are VT100 VT100 VT UTF8 ANSI Bits per second The optional settings are 9600 19200 38400 57600 115200 Data Bits The optional settings are 7 8 Parity The optional settings are None Even Odd Mark Space Stop Bits The optional settings are 1 2 Flow Control The optional settings are None Hardware RTS CTS VT UTF8 Combo Key Support The optional settings are Disabled ...

Страница 32: ...nding on different configuration CPU Configuration Press Enter to view current CPU configuration and make settings for the following sub items Hyper Threading The optional settings Disabled Enabled Enabled for Windows XP and Linux OS optimized for Hyper Threading Technology Disabled for other OS OS optimized not for Hyper Threading Technology This item might not be available depending different CP...

Страница 33: ... disable each SATA port respectively Hot Plug The optional settings Disabled Enabled mSATA Port The optional settings Disabled Enabled Use this item to enable or disable mSATA device Network Stack Configuration Press Enter to go to Network Stack screen to make further settings Network Stack Use this item to enable or disable UEFI Network Stack The optional settings Disabled Enabled When set as Ena...

Страница 34: ...karound for OSes without XHCI hand off support The XHCI ownership change should be claimed by XHCI driver The optional settings are Enabled Disabled USB Mass Storage Driver Support The optional settings are Disabled Enabled USB hardware delay and time out USB Transfer time out Use this item to set the time out value for control bulk and interrupt transfers The optional settings are 1 sec 5 sec 10 ...

Страница 35: ...ure Size The optional settings are 128MB 256MB 512MB 1024MB DVMT Pre Allocated Use this item to select DVMT 5 0 pre allocated fixed graphics memory size used by the internal graphics device The optional settings are 32M 64M 96M 128M 160M 192M 224M 256M 288M 320M 352M 384M 416M 448M 480M 512M 1024M 1536M 2048M 4M 8M 12M 16M 20M 24M 28M 32M F7 36M 40M 44M 48M 52M 56M 60M DVMT Total Gfx Mem Use this ...

Страница 36: ...ion Press Enter to make further settings for PEG port Configuration PEG Port Configuration PEG PCIE1 Slot This will show the current PCIE1 slot connected if any available Max Link Speed Use this item to configure maximum speed for available working card connected to PCIE1 slot The optional settings are Auto Gen1 Gen1 Gen3 Memory Configuration Press Enter to view brief information for the working m...

Страница 37: ...n Always Off Former State 3 9 Security Menu Security menu allow users to change administrator password and user password settings Administrator Password Press Enter to create new administrator password Press again to confirm the new administrator password User Password Press Enter to create new user password Press again to confirm the new user password 3 10 Boot Menu ...

Страница 38: ...user to reset the system after saving the changes Discard Changes and Reset This item allows user to reset the system without saving any changes Restore Defaults Use this item to restore load default values for all the setup options Save as User Defaults Use this item to save the changes done so far as user defaults Restore User Defaults Use this item to restore defaults to all the setup options B...

Страница 39: ...ont bazel Display Type 17 0 with LED backlight Brightness 350 nits Display Color 262k Resolution 1280 x 1024 60Hz Viewing Angle H V 170o 160 o Pixel Pitch 0 264 x 0 264 mm Aspect Ratio 4 3 Contrast Ratio 1000 1 Response Time 3 5 ms Touch Screen Type 5 wires analog resistive type Active Range 337 00 x269 50mm 0 2mm Transparency 80 3 Surface Hardness 3H ASTM D3363 pressure 750g 45 o Operating Force ...

Страница 40: ... Fi Alliance Usage Environment and Your Health Wireless LAN PCI Express Mini Card emits radio frequency electromagnetic energy like other radio devices However the level of energy emitted is far much less than the electromagnetic energy emitted by wireless devices like for example mobile phones Due to the fact that Wireless LAN PCI Express Mini Card operates within the guidelines found in radio fr...

Страница 41: ...ximum exposure allowed by the Federal Communications Commission FCC This device complies with the limits for the Class B digital device pursuant to Part 15 subject to the following two conditions This device may not cause harmful interference This device must accept any interference received including interference that may cause undesired operation The FCC limits are designed to provide reasonable...

Отзывы: