Jetson GEN 1 Скачать руководство пользователя страница 7

7

CHARGING THE BATTERY

Your Gen 1 comes with a built-in rechargeable lithium battery. Always use 

the provided charger only. Before your first ride you must fully charge the 

Gen 1 - charge for 12 hours for the first 3 times you use it. For every ride after, 

charge your Gen 1 until it is fully charged, and NOT LONGER. Do not leave any 

chargers plugged in overnight, or leave it plugged in past the charge time. The 

extension cord should not be plugged directly into the Gen 1 or the battery. It 

needs to be plugged into the power supply. You can also charge the Gen 1 by 

disconnecting the battery from under the seat and then charging the battery 

directly.

1. Plug one end of the power cord into a grounded AC outlet and the other 

into the Gen 1’s charging port. The red charging light on the charger unit will 

turn on.


2. The red light will turn green once fully charged. Recharge the Gen 1 after 

each use.

(Please note: Always plug the charger into the wall first before the device. If the 

wall outlet doesn’t have power and you plug the charger into the device first, it 

will light green, even if the battery is not full. So always plug into the wall first to 

make sure there is power.) 

THE CHARGER OFFERS A CHARGING STATUS ON THE TOP OF THE 

CHARGER:

CHARGING LIGHT RED:

 Battery is charging.

CHARGING LIGHT GREEN:

 Charging is complete. 

Charge the battery when the Gen 1 displays low power. When you are done 

charging the battery, remember to cover the Charging Port.

Don’t use the Gen 1 if the battery emits strange odors, overheats, or begins 

leaking. If the battery does leak, do not touch any leaking materials, as the 

battery contains dangerous substances. Do not open the battery and do not 

insert anything into the battery.

Only use the provided charger for the Gen 1. Do not charge the battery if it has 

over-discharged. It should be discarded for your safety. Do not turn on the Gen 

1 while it is charging.

Содержание GEN 1

Страница 1: ...1 GEN 1 MANUAL...

Страница 2: ...6 E Charging the Battery 7 F Operating the Gen 1 8 1 Turning On and Off 2 Turning Lights On and Off 3 Turn Signal Lights 4 The Horn 5 Brake Levers 6 Pedals 7 Kickstand 8 LCD Display Screen G Safe Dri...

Страница 3: ...anual can help you understand use and maintain your Gen 1 In order to avoid danger caused by collisions falls and loss of control please use caution and learn how to ride the Gen 1 safely Jetson and a...

Страница 4: ...4 INCLUDED IN THE BOX 1 Front LED Headlight 2 Hook 3 Charging Port 4 Seat 5 Seat Cask Lock 6 Rear Handle 7 Motor 8 Rear Brake 9 Chain 10 Pedal 11 Deck 12 Front Brake 1 4 5 6 8 9 10 11 12 7 3 2...

Страница 5: ...BRUSHLESS MOTOR 500w CHARGER 110 240V CHARGE TIME 4 5 HOURS PRODUCT WEIGHT 125 LBS WEIGHT LIMIT 300 LBS REMOVABLE BATTERY YES RECOMMENDED AGE 18 1 Kickstand 2 Turn Signal Lights 3 Horn 4 Rear Brake Le...

Страница 6: ...clasps hooked onto the Handlebars of the Gen 1 Be careful not to scratch the frame of the Gen 1 Please check the cardboard carton and metal crate for loose parts before discarding The Gen 1 comes ful...

Страница 7: ...once fully charged Recharge the Gen 1 after each use Please note Always plug the charger into the wall first before the device If the wall outlet doesn t have power and you plug the charger into the d...

Страница 8: ...e Seat Cask Lift the Seat and locate thecircuit switch Switch it to On It is recommended to turn off the circuit switch when transporting or storing the Gen 1 Close the Seat and press down firmly to m...

Страница 9: ...ns for the High Beam The High Beam switch is located on the Left Handlebar Flipping the High Beam Switch up will raise the High Beam Flipping the High Beam Switch down will lower the High Beam To turn...

Страница 10: ...left to turn on the Left Turn Signal Lights and flip the switch to the right to turn on the Right Turn Signal Lights When the Turn Signal Lights are activated you will also hear a beeping sound To tur...

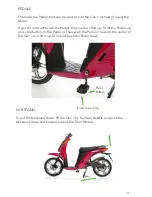
Страница 11: ...can be lifted up To lift the Pedals up press the button on the Pedal in Then push the Pedal in towards the center of the Gen 1 and lift it up To unfold push the Pedal down KICKSTAND To put the Kickst...

Страница 12: ...ds the Rear Wheel LCD DISPLAY SCREEN The LCD Display Screen is an interface that shows the Battery Life Indicator Speedometer and Odometer while in operation The trip will reset once you turn off the...

Страница 13: ...and all inherent risk is on you It is crucial that you know understand and act according to safety rules Turns The turns on the Gen 1 are commanded by the direction you turn the Handlebar Front Wheel...

Страница 14: ...ect the Gen 1 to intense physical shock severe vibration or impact Protect the Gen 1 from water or moisture Never disassemble the Gen 1 or its battery If there are any issues with the battery please c...

Страница 15: ...edals or foot rest The Gen 1 cannot be ridden by more than two people Only up to two people can ride at a time When you ride the Gen 1 along with other cyclists always keep a safe distance to avoid a...

Страница 16: ...from Jetson Customer Support This will void any warranty and can lead to malfunctions which may cause injury ADDITIONAL OPERATION CAUTIONS Do not lift the Gen 1 off the ground while it is on and the w...

Страница 17: ...use or other intentional or unintentional damage to the product This Limited 1 Year Warranty will not cover any damage which results from the application of improper cleaners solvents or chemicals to...

Страница 18: ...___________________ Purchase Date _________________________ Purchased From __________________________ Serial Number ______________________________________________________________________ Gender ______...

Страница 19: ...19...

Страница 20: ...20 GEN 1...

Отзывы: