background image


12

Emptying the Collector Bag 


CAUTION 

Wearing a particle mask/respirator for 

protection against fine dust particles during 

cleaning is highly recommended. 

 
During first use and after cleaning, the bag may 
allow some dust to escape.  This is normal and 
will stop after a short period of time. 
 
Clean the collector bag frequently to keep the 
collector's performance at its optimum.  To 
clean: 
 
1.  Disconnect the machine from the power 

source, unplug. 

 
2.  Remove the collector bag from the hanger 

rods.   

 
3.  Loosen the ring clamp and remove the bag. 
 
4.  Empty the contents into an appropriate 

container.  The bag is easily emptied by 
unzipping the bottom of the bag. 


Optional Accessories 

 
57620025: JET Stik Abrasive Belt and Disc 
Cleaner. 
 

JDS-12B Sanding Disc PSA Aluminum Oxide 

“J” Weight Cloth Back. 

12” 

36 Grit 

50 Grit 

60 Grit 

Stock 
Number 

57698525 57698650 57698750 

Master 
Carton 

25 50 50 

12” 

80 Grit 

100 Grit 

120 Grit 

Stock 
Number 

57698850 57698950 57699050 

Master 
Carton 

50 50 50 


Troubleshooting 

Trouble Possible 

Cause Solution 

Sander will not start 

1.  Sander unplugged from wall 

or motor 

2.  Fuse blown or circuit breaker 

tripped 

3. Cord 

damaged 

1.  Check all plug connections 

2.  Replace fuse or reset circuit 

breaker 

3. Replace 

cord 

Sanding disc does not come 
up to speed 

1.  Extension cord too light or 

too long 

2. Low 

current 

1.  Replace with adequate size 

and length cord 

2.  Contact a qualified 

electrician 

Machine vibrates excessively 

1.  Stand or base on uneven 

surface 

1.  Adjust stand or base so that 

it rests evenly on the floor 

2. Bolt 

down 

Sanded edge not square 

1.  Table not square to sanding 

disc 

1.  Use a square to adjust table 

to sanding disc 

Sanding marks on wood 

1.  Work held still 

2.  Wrong grit sanding disc 

3.  Feed pressure too great 

4.  Sanding against the grain 

1.  Keep workpiece moving 

2.  Use coarser grit for stock 

removal and fine grit for 
finish sanding. 

3.  Never force workpiece 

4.  Sand with the grain 

Содержание PDS-12CS

Страница 1: ...ER S MANUAL PDS 12CS 12 Disc Sander POWERMATIC 427 Sanford Rd Phone 253 351 6000 WMH Tool Group LaVergne TN 37086 Fax 1 800 274 6840 www powermatic com e mail powermatic wmhtoolgroup com M 1791201K 06...

Страница 2: ...ectly to misuse abuse negligence or accidents normal wear and tear repair or alterations outside our facilities or to a lack of maintenance THE WMH TOOL GROUP LIMITS ALL IMPLIED WARRANTIES TO THE PERI...

Страница 3: ...emoving starter keys DON T FORCE THE MACHINE It will do the job better and safer at the rate for which it was designed USE THE RIGHT TOOL Don t force a machine or attachment to do a job for which it w...

Страница 4: ...ine silica from bricks and cement and other masonry products and arsenic and chromium from chemically treated lumber Your risk from those exposures varies depending on how often you do this type of wo...

Страница 5: ...uipment grounding conductor to a live terminal Check with a qualified electrician or service personnel if the grounding instructions are not completely understood or if in doubt as to whether the tool...

Страница 6: ...with a UL CSA listed plug suitable for 230V operation D Contact your local Authorized POWERMATIC Service Center or qualified electrician for proper procedures to install the plug The sander must comp...

Страница 7: ...Tools Required for Assembly Adjustment 8 Unpacking 8 Stand Assembly 9 Sander Assembly 9 Collector Bag Assembly 10 Table Adjustment 10 Sanding Disc Replacement 11 Center Point 11 Brake 11 On Off Switc...

Страница 8: ...t Head Cap Screw M5x8 Closed Stand 1 Stand 1 Inlet 2 Hangers 1 Ring Clamp 1 Collector Bag Tools Required for Assembly Adjustments 1 13mm Wrench or socket 1 Combination Square WARNING Read and understa...

Страница 9: ...pins and threaded shaft 3 Reinstall the trunnion holder washer and knob Repeat for opposite side 4 Make sure the trunnion and trunnion holder engage and tighten the knobs 5 Open the door in the cabine...

Страница 10: ...le and the disc 2 If adjustment is needed move the table so that it rests 90 degrees from the table and loosen the hex nut I Fig 5 and tighten the set screw J Fig 5 until it contacts the table surface...

Страница 11: ...in place with the socket head cap screw K Fig 8 When not using the filler bar thread the socket head cap screw K Fig 8 in the tapped hole as a stop Brake After turning the sander OFF you can press th...

Страница 12: ...Master Carton 25 50 50 12 80 Grit 100 Grit 120 Grit Stock Number 57698850 57698950 57699050 Master Carton 50 50 50 Troubleshooting Trouble Possible Cause Solution Sander will not start 1 Sander unplu...

Страница 13: ...13 Base Assembly Breakdown...

Страница 14: ...6 612112 Bushing 1 17 BB 6204LLU Ball Bearing 6204LLU 2 18 RR470000 Retaining Ring R47 1 19 612090 Shaft 1 20 612091 Pulley 1 21 TS1523031 Set Screw M6 x 8 2 22 KD050530 Key 5 x 5 x 30 2 23 612121 Bus...

Страница 15: ...15 Sander Assembly Breakdown...

Страница 16: ...998621 Strain Relief 1 15 IC314101 Power Cord 1 16 TS 1490041 Cap Screw M8 x 25 4 17 TS 1551061 Lock Washer M8 4 18 TS 1550061 Flat Washer M8 x 12 4 19 KD050535 Key 5 x 5 x 35 1 20 612114 Disc Guard 1...

Страница 17: ...8 1 57 TS 1504041 Socket Head Cap Screw M8 x 20 1 58 TS 1550061 Flat Washer M8 x 18 2 59 612052 Trunnion Holder B 1 60 612037 Table Bracket 1 61 TS 1490021 Cap Screw M8 x 16 4 62 TS 1551061 Spring Was...

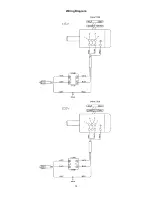
Страница 18: ...18 Wiring Diagram...

Отзывы: