


7. Download the .hex and save it to your Desktop, download link is found here:
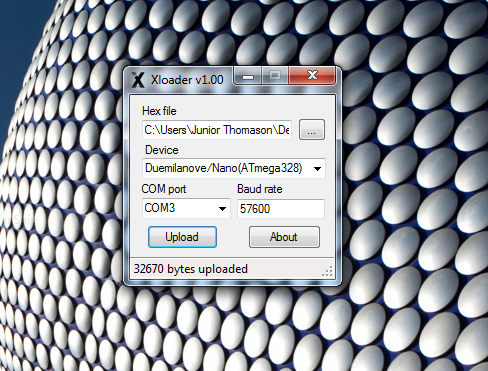
8. Open the XLoader application and upload the .hex file downloaded from the previous
step. Choose Duemilanove/Nano(ATmega328) as the Device and select the COM port
your Micro is plugged into. Please note that your COM port may vary depending on your
computer, if you noticed in step 4 it was COM port 4 but below on a different computer it
is COM port 3. Then hit the "Upload" button, once the software has finished loading, your
Micro should be all set to use the new features!
9. Repeat steps 1 - 3 in the reverse order to close back up your Micro. Pay close attention to
Содержание Micro HX 3.0
Страница 2: ...Basic features and controls of the JET Micro Overview...
Страница 4: ...Instructions for setting up your HX Stomp to use with the JET Micro Getting Started...
Страница 7: ...How to use the JET Micro HX 3 0 Operating the JET Micro...
Страница 13: ...Access various features of the Micro Global Settings...
Страница 17: ...Frequently Askes Questions FAQ...
Страница 19: ...3 Remove the stand off located next to the USB port...
Страница 20: ...4 Plug a micro USB into the usb port Once plugged into your computer your computer should recognize the device...