background image


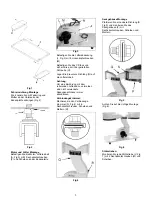
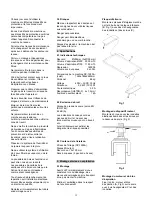
Fig 3 

Attach inlet guard (L) to fan housing 
using 8 pan head screws (M). 

Press the inlet port and secure with 
provided screw (O). 

Place the lower gasket (N) on the fan 
housing. 

Attention: 

To reduce the risk of injury from 
moving parts, always keep inlet port 
covered with the caps provided, if they 
are not connected to a hose. 


Connector Tube: 

Place the connector tube (Q, Fig 4) on 
the fan housing and attache with 6 hex 
screws, washers and nuts (R). 


Fig 4 


Connector Housing: 

Place an upper gasket (S, Fig 5) and 
attach bag housing (F) with hex cap 
screws, washers and nuts. 


Fig 5 

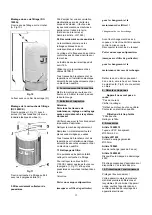
Refere to Fig 6 for correct assembly. 

Fig 6 


Support bracket: 

Attach support bracket (V, Fig 7) to 
the base with 2 hex head screws (W) 
and washers. 


Fig 7 

Insert bag hanger bracket (T) and 
attach with 2 hex head screws (U) and 
washers. 


Collector bag: 

Fold the plastic bag over the top of the 
snap ring (E, Fig 8). 

Fig 8 

Insert the snap ring (E) of the collector 
bag into the bottom of the housing at 
an angle. Pull down until it engages in 
the grove (F, Fig 9) 

Fig 9 


Содержание DC-1900C

Страница 1: ...WNER S MANUAL DC 1900C Dust Collector JET EQUIPMENT TOOLS INC P O BOX 1349 Phone 253 351 6000 A WMH Company Auburn WA 98071 1349 Fax 1 800 274 6840 www jettools com e mail jet jettools com M 708637C 1 02 ...

Страница 2: ...s of daily use If this is exceeded the warranty period shall be reduced in proportion to the excess use but to no less than three months Returning rejected goods requires the prior express consent of the Seller and is at the Buyer s risk and expense Further warranty details can be found in the General Terms and Conditions GTC The GTC can be viewed at www jettools com or can be sent by post upon re...

Страница 3: ...lassified as a carcinogenic substance Connection and repair work on the electrical installation may be carried out by a qualified electrician only Have a damaged or worn power cord replaced immediately 3 3 Remaining hazards When using the machine according to regulations some remaining hazards may still exist Dust can cause injuries The use of incorrect mains supply or a damaged power cord can lea...

Страница 4: ...th 6 hex screws washers and nuts R Fig 4 Connector Housing Place an upper gasket S Fig 5 and attach bag housing F with hex cap screws washers and nuts Fig 5 Refere to Fig 6 for correct assembly Fig 6 Support bracket Attach support bracket V Fig 7 to the base with 2 hex head screws W and washers Fig 7 Insert bag hanger bracket T and attach with 2 hex head screws U and washers Collector bag Fold the...

Страница 5: ...ive safety devices must be replaced immediately Repair and maintenance work on the electrical system may only be carried out by a qualified electrician 7 1 Cleaning Filter When the air flow reduces the filter must be cleaned To clean the filter on DC 1900CK turn the handle I Fig 11 a couple of rotations so the dust falls into the collector bag ATTENTION During the changing or cleaning of the filte...

Страница 6: ...prüche müssen innerhalb von 12 Monaten ab dem Verkaufsdatum Rechnungsdatum geltend gemacht werden Weitergehende Ansprüche sind ausgeschlossen Die vorliegende Garantie umfasst sämtliche Garantieverpflichtungen seitens des Verkäufers und ersetzt alle früheren Erklärungen und Vereinbarungen betreffend Garantien Die Garantiefrist gilt für eine tägliche Betriebszeit von 8 Stunden Wird diese überschritt...

Страница 7: ...m Gefahrenbereich fern Eine laufende Maschine nie unbeaufsichtigt lassen Vor dem Verlassen des Arbeitsplatzes die Maschine ausschalten Benützen Sie das Elektrogerät nicht in der Nähe von brennbaren Flüssigkeiten oder Gasen Beachten Sie die Brandmelde und Brandbekämpfungsmöglichkeiten z B Standort und Bedienung von Feuerlöschern Benützen Sie das Absauggerät nicht in feuchter Umgebung und setzen Sie...

Страница 8: ...ten Schraube O Legen Sie die untere Dichtung N auf die Lüftereinheit Achtung Um eine Berührung mit dem rotierenden Lüfterrad zu vermeiden sind nicht verwendete Absauganschlüsse immer abzudecken Verbindungskrümmer Montieren sie den Verbindungs krümmer Q Fig 4 mit 6 Sechskantschrauben Scheiben und Muttern R Fig 4 Sackgehäuse Montage Platzieren Sie eine obere Dichtung S Fig 5 und montieren Sie das Sa...

Страница 9: ...chluss Der kundenseitige Netzanschluss sowie die verwendeten Verlängerungsleitungen müssen den Vorschriften entsprechen Die Netzspannung und Frequenz müssen mit den Leistungsschilddaten an der Maschine übereinstimmen Die bauliche Absicherung muss dabei 16 A betragen Verwenden Sie nur Anschlussleitungen mit Kennzeichnung H07RN F Anschlüsse und Reparaturen der elektrischen Ausrüstung dürfen nur von ...

Страница 10: ... aus dem Gehäuse indem Sie den Spannring E Fig 8 an einer beliebigen Stelle nach oben drücken und in schräger Lage aus dem Gehäuse entfernen 8 Störungsabhilfe Gerät startet nicht Kein Strom Netzsicherung prüfen Motor Schalter oder Kabel defekt Elektrofachkraft kontaktieren Luftstrom zu schwach Filterpatrone verstopft Filterpatrone Reinigen 9 Lieferbares Zubehör Artikel Nummer 10000312 PVC Schlauch...

Страница 11: ... Au delà le délai de garantie diminue proportionnellement au dépassement mais pas en deçà de trois mois Le renvoi d une marchandise faisant l objet d une réclamation requiert l accord préalable exprès du vendeur et s effectue aux frais et aux risques de l acheteur Les prestations de garantie détaillées figurent dans les Conditions générales CG Ces dernières sont disponibles sur www jettools com ou...

Страница 12: ...aration sur l installation électrique doivent être exécutés uniquement par un électricien qualifié Remplacer immédiatement tout câble endommagé ou usé 3 3 Risques Même en respectant les directives et les consignes de sécurité les risques suivants existent Danger par poussières Danger par câble électrique endommagé usé ou mal branché Risque d explosion si la machine n est pas reliée à la terre 4 Sp...

Страница 13: ... des écrous R Fig 4 Montage du support de sac Placer un joint supérieur S Fig 5 et monter le support du sac F avec des vis hexagonales des rondelles et des écrous Fig 5 Veiller à ce que ce montage soit correct Fig 6 Fig 6 Tiges de soutien Monter chaque tige de soutien V Fig 7 avec 2 vis hexagonales W et des rondelles Fig 7 Monter en même temps les crochets des sacs de filtrage T et les fixer avec ...

Страница 14: ...s Tous travaux de branchement et de réparation sur l installation électrique doivent être exécutés uniquement par un électricien qualifié 7 1 Nettoyage de filtre Si la puissance d aspiration faiblit nettoyer la cartouche de filtrage Pour nettoyer la cartouche DC 1100CK opérer quelques tours avec la poignée I Fig 11 afin que les poussières accumulées tombent dans le sac Attention Porter un masque a...

Отзывы: