14
10.0
Adjustments
10.1
Drawbar operation - changing
tooling
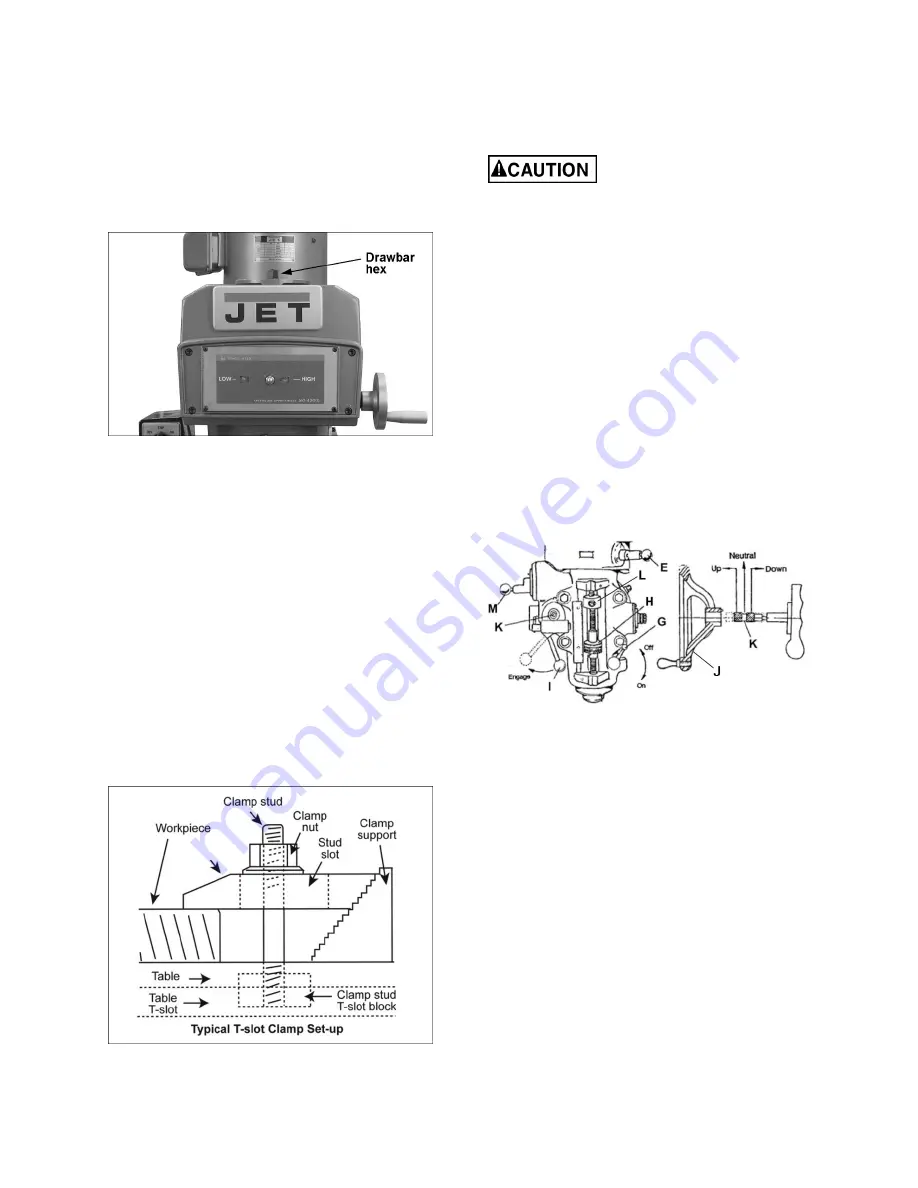
1. Apply spindle brake and loosen draw bar two
or three turns (counterclockwise) with the
provided wrench placed over the draw bar hex
(Figure 10-1).
Figure 10-1: Draw bar
2. Tap the top of draw bar with a soft-faced
hammer to loosen collet from taper.
3. Remove tool from collet.
4. Insert new tool into collet.
5. Tighten draw bar firmly using provided wrench
with spindle brake applied. The tool is now
ready for use.
10.2
Clamping workpiece to table
The worktable has 5/8-inch T-slots for clamping
workpiece to table.
1. Set switch to OFF position.
2. Place work piece on table.
3. Clamp workpiece using T-slot clamps, studs,
and step blocks as required. See Figure 10-2.
Figure 10-2: Work piece clamping
10.3
Changing speed range
To change from high to low speed range, push in
lever (D, Figure 9-1) and rotate it almost 180
degrees. Lever will stay in position once pressure
is released.
Do not change gears while
spindle is running. Rotate spindle by hand to
ensure clutch is engaged prior to turning on.
Do not turn on machine unless spindle can be
moved freely.
10.4
Manual feed
10.4.1
Manual fine feed (handwheel)
Refer to Figure 10-3.
1. Disengage auto feed by pulling out knob (E,
Figure 8) and moving lever to left hole.
2. Position feed reversing knob (K) to center, or
neutral, position.
3. Engage feed trip lever (I) by pulling it away
from head assembly.
4.
The quill can now be moved up or down by
turning handwheel (J). Quill will retract when
stop nut is reached.
Figure 10-3: Manual feed controls
10.4.2
Manual coarse feed (handle)
Refer to Figure 10-3.
1. Disengage auto feed by pulling out knob (E,
Figure 10-3) and moving lever to left hole.
2. Position feed reversing knob (K) to center, or
neutral, position.
3. Disengage feed trip lever (
I
) by pushing
towards head assembly.
4. Use coarse feed handle (see F, Figure 9-1) to
move spindle.
10.4.3
Depth stop for manual feed
Refer to Figures 9-1 and 10-3.
1. Lower quill to required depth.
2. Tighten quill lock (G).
3. Move micrometer nut (H) against quill stop (L).
4. Loosen quill lock (G).
Содержание 691050
Страница 7: ...7 5 0 JTM 1050VS2 Machine dimensions Figure 5 1 machine dimensions ...
Страница 21: ...21 13 1 1 JTM 1050VS2 Upper Head Assembly Exploded View ...
Страница 25: ...25 13 2 1 JTM 1050VS2 Lower Head Assembly Exploded View ...
Страница 29: ...29 13 3 1 JTM 1050VS2 Column and Base Assembly Exploded View ...
Страница 36: ...36 14 0 Electrical connections for JTM 1050VS2 ...
Страница 38: ...38 This page intentionally left blank ...
Страница 39: ...39 This page intentionally left blank ...
Страница 40: ...40 427 New Sanford Road LaVergne Tennessee 37086 Phone 800 274 6848 www jettools com ...


