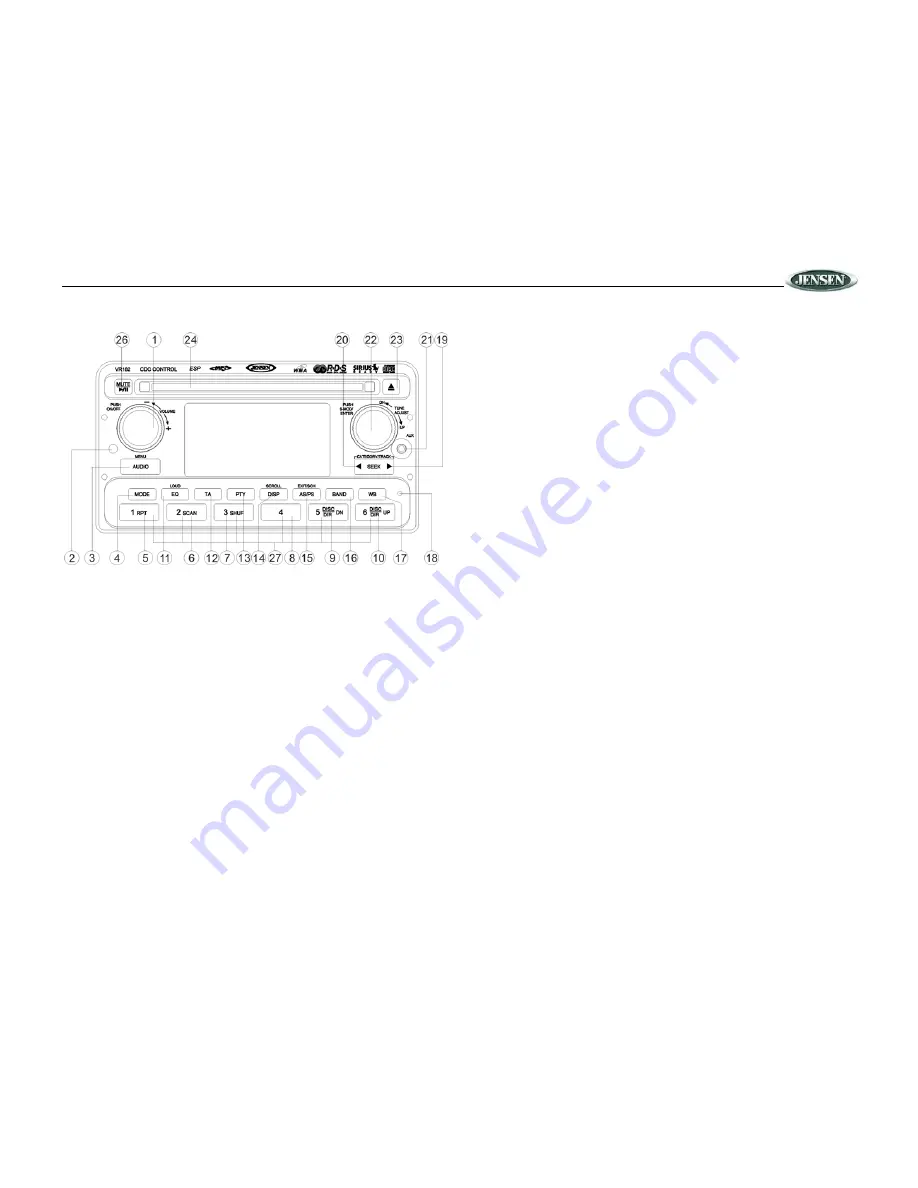
VR182
11
SIRIUS RADIO OPERATION
Switching to SIRIUS Mode
Press the
MODE
button (4) to change the mode to Sirius Satellite Radio mode.
Activating Sirius Satellite Radio
In Sirius mode,
press and hold
the
S-MOD
button (22) to select DIRECT mode. The LCD will
display “DIRECT _ _ _” upon entry. Use the
TUNE ADJUST UP/DN
knob (22) to select “0” and
then press the
ENTER
button (22) to input the number. Continue for remaining digits. Enter
“000” to display the 12 digit Sirius ID.
Selecting a Band
In Sirius mode, press the
BAND
button (16) to access the Sirius user-preset channel groups in
the following order: SIR1, SIR2, SIR3.
Tuning a Channel
Rotate the
TUNE ADJUST UP/DN
knob (22) clockwise to tune up or counter-clockwise to tune
down the available Sirius channels. The channel information display can be changed to
emphasize either Artist or Song Title by pressing the
DISP
button (14).
Press and hold
the
DISP
button to scroll.
Selecting a Category
Press the
CATEGORY < / >
buttons (20/19) to view available categories. Each category title
and associated channels will be displayed in increments. While in the category mode, the
individual channels within a category may be accessed by rotating the
TUNE ADJUST UP/DN
knob (22). Once a highlighted channel has been selected, press the
ENTER
button (22) to
tune to that channel. While viewing a category list, press the
DISP
button to change display
information between Channel Name, Artist, or Song Title.
Storing Preset Channels
The preset buttons (27) can be used to store 6 channels per band (SIR1, SIR2 and SIR3),
allowing convenient access to your favorite channels.
Programming Channels
1.
Select the channel you want to store in memory.
2.
Press and hold
a preset button (27) until the corresponding preset button number
appears.
3.
Repeat steps 1 and 2 to program additional channels.
Recalling a Preset Channel
Press one of the six preset buttons (27) within a selected band to tune a preset channel
directly.
Channel Preset Scan
Press the
AS/PS
button (15) to preview each stored preset channel in SIR1, SIR2 and SIR3 for
10 seconds.
Press the
AS/PS
button again to stop scanning and play the current channel.
Direct Tune Mode
1.
Press and hold
the
S-MOD
button (22) to switch to Direct Tune/Skip Channel mode. After
accessing Direct mode, “DIRECT _ _ _” appears on the display.
2.
Use the
TUNE ADJUST UP/DN
knob (22) to select a number for the hundreds digit
position.
3.
Press the
ENTER
button (22) to confirm entry of the hundreds digit. The tens digit will
flash on/off.
4.
Use the
TUNE ADJUST UP/DN
knob to select a number for the tens digit position.
5.
Press the
ENTER
button again to confirm entry of the tens digit. The ones digit will flash
on/off.
6.
Use the
TUNE ADJUST UP/DN
knob to select a number for the ones digit position.
7.
Press the
ENTER
button to tune to the selected channel.
Skip Channel Mode
1.
Press and hold
the
S-MOD
button (22) to switch to Direct Tune/Skip Channel mode.
2.
While the display is showing “DIRECT _ _ _”, press the
S-MOD
button to access Skip
Channel mode.
3.
Use the
TUNE ADJUST UP/DN
knob (22) to select the channel to be skipped.
4.
Press and hold
the
ENTER
button (22) to skip or release the current channel. (If the
channel was previously skipped, the “SKIP” icon will be displayed.)
5.
Press the
S-MOD
button (22) to return to normal mode. The unit will automatically return
to normal mode after several seconds of inactivity.


