background image

12

VM9412

USING THE TFT MONITOR

Open/Close TFT Monitor

Open TFT Monitor

Press the 

OPEN

 button (1) on the front panel or press the 

(

) button (25) on the remote control to activate the 

mechanism that moves the display panel into the viewing 
position.

Close TFT Monitor

Press the 

OPEN

 button (1) on the front panel or press the 

(

) button (25) on the remote control to load the display 

panel back into the compartment.

TFT Monitor Auto Open

If “TFT Auto Open” is “on” when the unit is turned on, the 
monitor automatically moves to the viewing position.

If “TFT Auto Open” is ”off” when the unit is turned on, press 

the 

OPEN

 button (1) or (

) button (25) on the remote 

control to move the monitor into the viewing position.

If “TFT Auto Open” is set to ”Manual”, the TFT will not close 
when the key is turned off. 

Monitor Tilt Angle Adjustment

A known characteristic of LCD panels is the quality of the 
display in relationship to the viewing angle. The monitor 
angle can be adjusted for optimum viewing using one of the 
following methods.

Step by Step Angle Adjustment

Press the (

) or (

) button on the remote control to adjust 

the tilt angle of the screen one step at a time.

Continuous Angle Adjustment

Press and hold

 the (

) or (

) button on the remote control 

to adjust the tilt angle in a continuous motion.

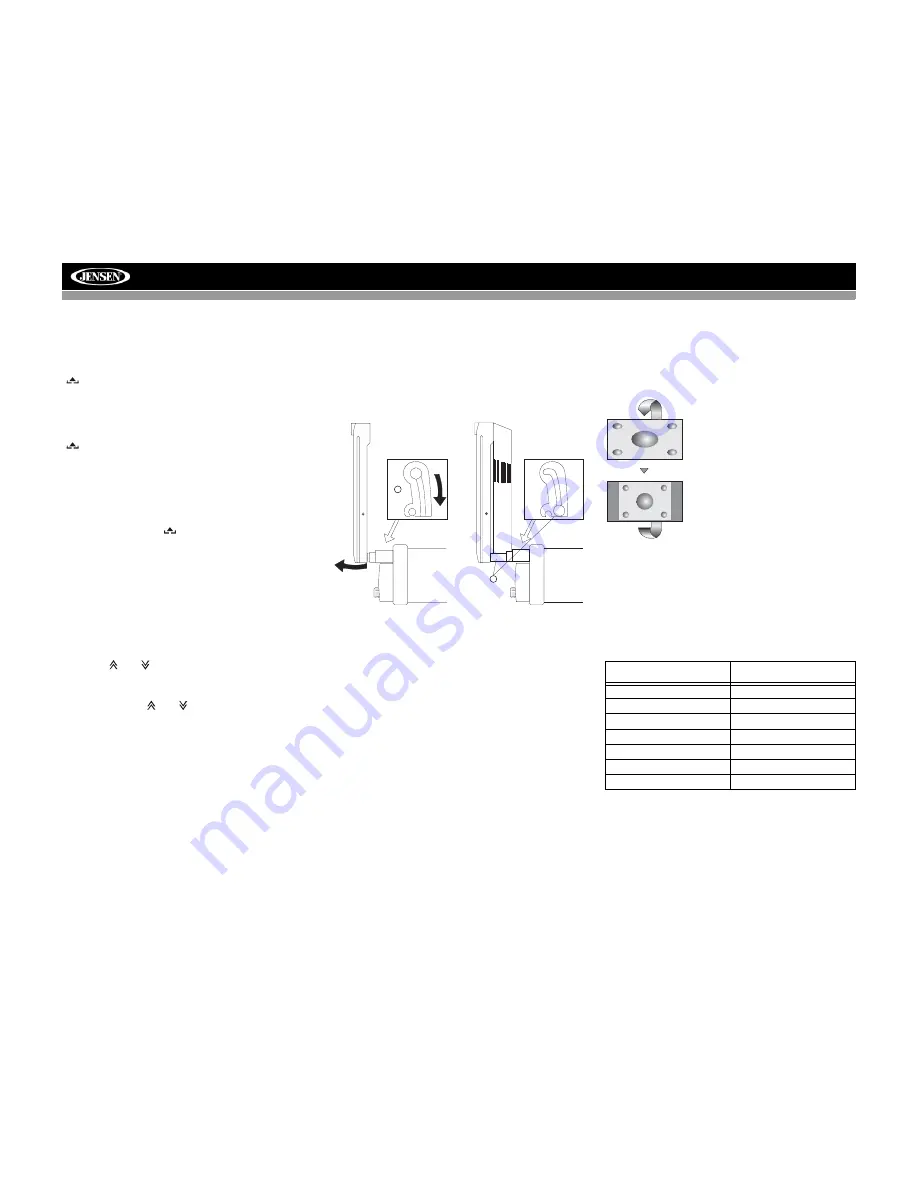
Monitor Left/Right Angle Adjustment

To manually adjust the left/right angle of the TFT screen, 
follow these steps:

1.

Make sure the TFT screen in “Out”. Press the 

OPEN


button (1), if necessary.

2.

Locate the extender mechanism behind the screen.

3.

Firmly grasp both sides of the screen near the bottom.

4.

Gently pull on either the left or right side until the 
extender mechanism becomes fully extended.

Reverse Driving Use

If the rear-view video camera is connected, the unit is on, and 
the monitor is stationed inside the main compartment of the 
unit, the monitor automatically moves into the viewing 
position and switches to CAMERA mode upon reverse 
driving. When the reverse driving stops, the monitor returns 
to the main storage compartment.

If the monitor is in display mode, the monitor automatically 
switches to CAMERA mode upon reverse driving. When the 
reverse driving stops, the monitor returns to its original input 
mode.

Aspect Ratio

Press the 

WIDE

 button (28) on the remote control or 

WIDE


button (23) on the monitor to adjust the aspect ratio as 
follows:

Image Setting

Table 2 shows the video output mode for each playing 
source. 

*CVBS – Composite Video Baseband Signal

2

4

Extender Mechanism
          - Closed

Extender Mechanism
   - Fully Extended

Table 2: Video Output Modes

Playing Source

Video Output Modes

AM/FM TUNER

RGB Mode

SAT TUNER

RGB Mode

iPod

RGB Mode

DVD/Disc

RGB Mode

AUX IN

CVBS Mode

NAV

RGB Mode

CAMERA

CVBS Mode

CINEMA
The entire screen is extended 
horizontally to the aspect ratio of 16 to 
9. The extension ratio is the same at 
any point.

NORMAL
The conventional display image has a 
4 to 3 ratio of horizontal to vertical, 
leaving a blank area on the right and 
left sides of the display.

STANDBY
Screen becomes black. Touch screen 
to resume.

Содержание VM9412 - In-dash DVD Receiver

Страница 1: ...ximo 40W x 4 VM9412 VM9412 Press Audio Enter SRC STOP REAR SCN RPT RDM STOP REAR SCN RPT RDM PTY MUTE BAND AS DISP OPEN BAND AS DISP OPEN BAND CLOSE AS DISP PICTURE ANGLE TILT Multimedia Receiver WIDE...

Страница 2: ......

Страница 3: ...s of your new Jensen VM9412 Mobile Multimedia Receiver for maximum enjoyment Preparation 1 Installation 5 Anti Theft Feature 6 Controls and Indicators 7 Remote Control 9 Using the TFT Monitor 12 Opera...

Страница 4: ...ii...

Страница 5: ...ccess iPod Playlists Artists Albums Songs Photos and Video Requires Photo or Video iPod Power Management Charges iPod while Connected Requires jLinkCable Sold Separately MediaLink3 Under Dash Interfac...

Страница 6: ...re for power connections 16 18 gauge speaker wire Disconnecting the Battery To prevent a short circuit be sure to turn off the ignition and remove the negative battery cable prior to installation NOTE...

Страница 7: ...W RED Mute leave open if not connected MUTE BROWN Car Phone SUB W REAR L REAR R BLUE RED WHITE FRONT L FRONT R RED WHITE WHITE RED Rear Video 1 YELLOW WHITE YELLOW RED Rear View Video Camera External...

Страница 8: ...y iPod Nano iPod Mini iPod iPod Video SAT Radio SAT L SAT R To Head Unit VIDEO LEFT RIGHT 3 5mm Audio MediaLink MEDIALINK AND SATELLITE CONNECTIONS SAT Cable Kit JXMC or XMDJEN100 sold separately XM o...

Страница 9: ...til problem is corrected Once proper operation is achieved turn off the ignition switch and proceed with final mounting of the chassis 1 Connect wiring adapter to existing wiring harness 2 Connect ant...

Страница 10: ...the SETUP button 31 on the remote control or touch the button on the screen to enter the SETUP menu 2 Touch RATINGS to view the RATINGS sub menu The small lock icon will be unlocked 3 Enter a new 6 d...

Страница 11: ...ume previous volume level NOTE The VM9412 features Softmute which will allow the volume to increase or decrease gradually when the MUTE function is activated or deactivated 9 IR Remote Control Receive...

Страница 12: ...once for disc insertion ejection Press and hold to reset core mechanism position 17 TFT Display 18 REAR Select rear zone source Allows front passengers to listen to the radio while rear passengers li...

Страница 13: ...to rear zone move the F R switch 32 located on the right side of the controller 29 3 4 5 9 6 7 26 27 15 16 34 33 19 32 23 24 31 30 8 35 1 2 10 13 28 25 11 12 14 20 18 17 22 21 NOTE Your remote contro...

Страница 14: ...ates the preset station list Navigates list window PRESET 12 Zooms out when playing DVD DivX or Photo Zooms out Navigates the preset station list Navigates list window Navigates the preset station lis...

Страница 15: ...play mode CIN EMA or Standby Selects display mode CIN EMA or Standby Selects display mode CIN EMA or Standby 1 2 3 4 5 6 7 8 9 0 Numeric Keypad 29 Directly accesses chapter 1 6 selects preset for curr...

Страница 16: ...een in Out Press the OPEN button 1 if necessary 2 Locate the extender mechanism behind the screen 3 Firmly grasp both sides of the screen near the bottom 4 Gently pull on either the left or right side...

Страница 17: ...displayed on the TFT monitor within 1 2 seconds Parking break is disengaged off when the vehicle is started or the accessory ignition is turned on To activate video the following sequence of events mu...

Страница 18: ...unit via RCA output or MediaLink3 Select AUX1 or AUX2 mode to access and control connected auxiliary devices Source Menu To access the SOURCE MENU touch the TFT screen in the top left corner of the s...

Страница 19: ...a rear touch screen installed you can touch the screen to control most rear zone functions NOTE The rear zone volume can only be controlled from the front You can also use the remote control The VM94...

Страница 20: ...orner of the screen and on the LCD screen during certain opera tions NOTE The AM PM indication will change as you continue to adjust the hour past 12 Video Input Input cir cuitry autode tects the vide...

Страница 21: ...BACK button on the screen Tuner Region USA AM Frequency Spacing 10kHz AM Frequency Band 530kHz 1720kHz FM Frequency Spacing 200kHz FM Frequency Band 87 5MHz 107 9MHz America 1 AM Frequency Spacing 10k...

Страница 22: ...ote control 8 to switch to the AM FM or RADIO source Select FM AM Band Touch the BAND button 15 on the screen or press the BAND button on the unit 4 or remote control 20 to change between the followin...

Страница 23: ...Preview Scan PS To scan the AM or FM band for a preview of available stations in your particular area touch the PS button 21 on page two of the on screen controls Touch again to stop preview scan Loca...

Страница 24: ...ion Preset Mode To enter preset mode touch the BAND button on the screen or press the BAND button on the unit 14 or remote control 20 to change between the following bands SAT1 SAT2 or SAT3 indicated...

Страница 25: ...choices While in Search Mode to switch between Channel and Category search modes press the CH or CAT buttons on the touch screen Use the scroll bar and arrows on the touch screen to view the next prev...

Страница 26: ...n to fast forward Keep pressing and releasing the button to increase the rate from 2X to 4X 6X and 8X Press the joystick enter button 18 on the remote control or touch the play button to resume normal...

Страница 27: ...itles to appear NOTE During VCD playback press the AUDIO button 5 on the remote control to choose between Left Channel Right Channel and Stereo PBC Play Back Control VCD Only For VCDs with play back f...

Страница 28: ...umber of subtitle languages available on the disc maximum of 32 Number of angles provided maximum of 9 Aspect ratios available LB stands for Letter Box and PS stands for Pan Scan In the example on the...

Страница 29: ...een or use the button on the joystick to advance to the next track on the disc Press the button 17 on the remote control or on screen or use the button on the joystick to move to the previous track Re...

Страница 30: ...hey were written by the CD writer As a result the order in which they are expected to be played may not match the order in which they are actually played You may be able to set the order in which MP3...

Страница 31: ...directional keys on the remote control to navigate the iPod menus iPod Music Playback To access iPod music files touch the button on screen or press the TITLE button 2 on the remote control Touch the...

Страница 32: ...esired track file using the on screen number pad Press the Enter button to tune to the selected station To exit the screen without changing the station touch Exit To clear your entry and start over to...

Страница 33: ...malfunction MUTE wire is grounded Check that the MUTE connection is not grounded and that it s properly insulated Unit resets itself when engine is off Incorrect connection between ACC and positive b...

Страница 34: ...d files Incorrect playback message displayed Message is longer than LCD can display SAT RADIO No Sound Incorrect cable connections Check RCA cables Satellite source not available Incorrect cable conne...

Страница 35: ...aged by foreign objects 5 Do not attempt to use a 3 8 cm CD Single disc in this unit either with or without an adaptor as damage to the player and or disc may occur Such damage is not covered by the W...

Страница 36: ...ge Rejection 60dB Frequency Response 50Hz 2 kHz 3dB Monitor Screen Size 7 0 Measured diagonally 16 9 Widescreen 6 06 154 1mm W X 3 42 87mm H Screen Type TFT Liquid Crystal Display LCD active matrix Re...

Страница 37: ...tenance section of your Installation and Operation Manual for additional information regarding the proper use of your product Limitations THE EXTENT OF THE COMPANY S LIABILITY UNDER THIS WARRANTY IS L...

Страница 38: ...Audiovox Electronics Corporation Hauppauge NY 11788 Technical Assistance 1 800 323 4815 www jensen com 2007 Audiovox Ver 032907 Printed in China...

Отзывы: