Jensen VM9022HDN - Touch Screen Double Din MultiMedia... Скачать руководство пользователя страница 32

28

VM9022HDN

MP3/WMA OPERATION

Instructions for TFT control and Insert/Eject are the same for 
DVD and MP3 operation. Please see the DVD/Disc Video 
Operation section for information about these topics.

NOTE: When burning MP3 / WMA files onto a DVD 

disc, use the 2X or 4X burning option, if available. 

This slower burning speed will help eliminate 

buffer errors and increase disc reading reliability. 

Also, use folders when burning large numbers of 

songs / files to a disc for easy music navigation. 

Select the "Disc at Once" option and close your 

disc.

MP3/WMA Media and File 

Requirements

This player allows you to play back MP3 and WMA files 
recorded onto CD-R/RWs, DVD+R/RWs, and DVD-R/RWs. 
For CD-RW discs, please make sure it is formatted using the 
full method and not the quick method to prevent illegal disc 
operation.
Up to 1500 songs/files can be burned onto a disc for a MEGA 
DVD music mix. Do not exceed this number of songs/files or 
disc readability problems may occur.

MP3 Format Compatibility

The file naming formats listed below are compatible with this 
unit:

ISO 9660 – file name: 12 characters, file extension: 3 
characters

ISO 9660 – file name: 31 characters, file extension: 3 
characters

Joliet – 64 characters

If the file or folder name does not conform to ISO 9660 file 
system standards, it may not be displayed or played back 
correctly. Use the following settings when compressing audio 
data for your MP3 disc:

Transfer Bit Rate: 128kbps

Sampling Frequency: 48kHz

NOTE: When recording MP3 up to the maximum 

disc capacity, disable additional writing. For 

recording on an empty disc up to maximum disc 

capacity, use the "Disc at once" setting.
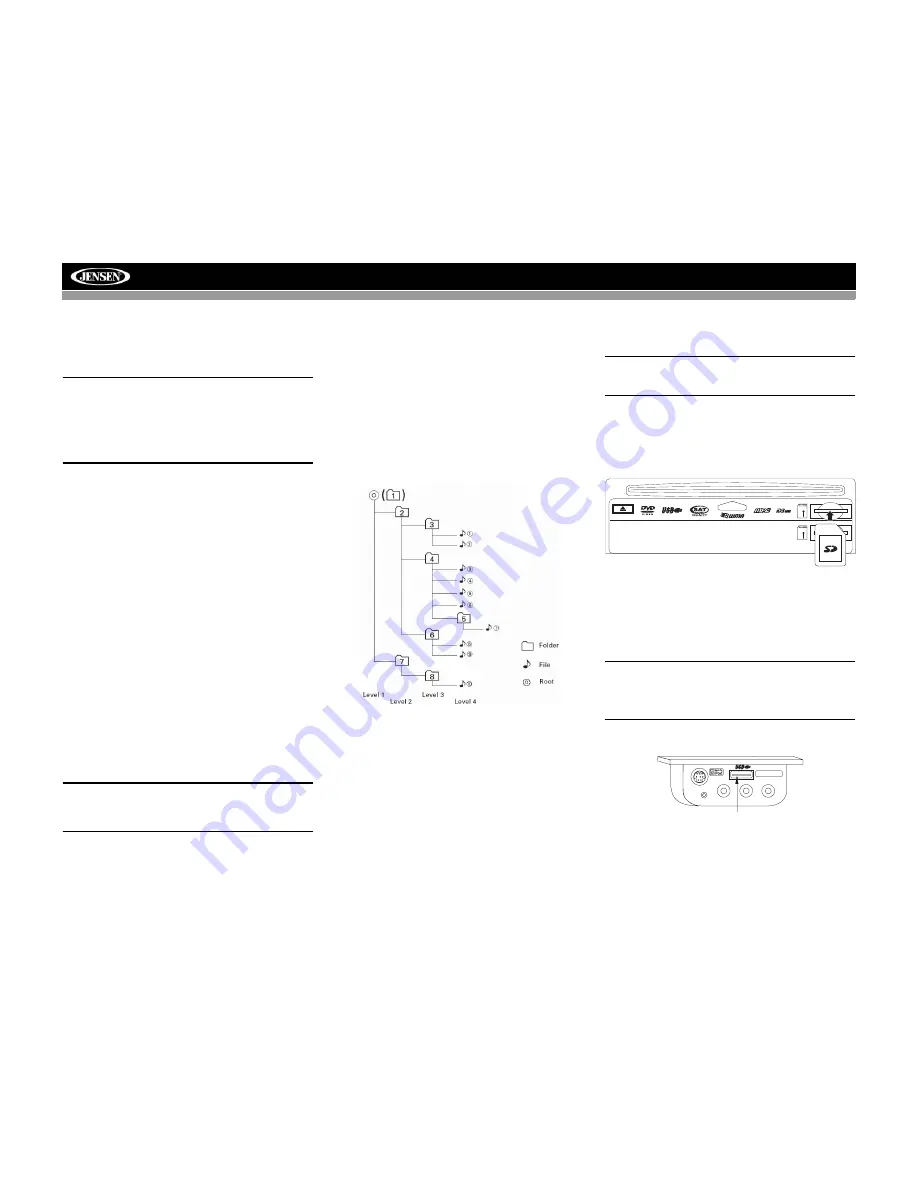
MP3 Playing Order

When selected for play, files and folders (Folder Search, File 
Search or Folder Select) are accessed in the order they were 
written by the CD writer. As a result, the order in which they 
are expected to be played may not match the order in which 
they are actually played. You may be able to set the order in 
which MP3/WMA files are to be played by writing them onto a 
medium such as a CD-R with their file names beginning with 
play sequence numbers such as "01" to "99".
For example, a medium with the following folder/file hierarchy 
is subject to Folder Search, File Search or Folder Select, as 
shown below.

The VM9022HDN player will only recognize three folder 
levels and does not display folders containing only other 
folders. In the example above, the unit will display folders 3, 
4, 6, and 8, but not 2 and 7 since they do not contain any 
tracks directly. Folder 5 is not recognized at all since it is at 
the fourth level.

Loading an SD Card

NOTE: The VM9022HDN will support up to 4GB SD 
Cards. SD Cards larger than this (SDHC Cards) will not 
be recognized.

To Insert an SD card, you must first press the 

OPEN

 button 

(1) on the control panel or the 

OPEN/CLOSE

 button on the 

remote control to reveal the SD card slot (21). Insert the SD 
card into the card slot and the unit will read the audio media 
files on the card automatically.

To remove the card, first press the 

SRC

 button (6) to switch to 

another mode and stop SD playback. Grasp the SD card and 
pull it straight out. Most cards have a thin recess that helps 
with removal.

Loading a USB Device

NOTE: The USB port will recognize most USB flash 
memory devices, as well as portable hard drives with 
audio / video files. The hard drive must be formatted to 
FAT32. The head unit operating system does not support 
NTFS file structure.

1.

Locate the USB jack located on the MediaLink

4

.

2.

Insert the USB device into the USB connector. The unit 
will read the audio media files on the USB device 
automatically.

NAV/MAP

UP

UP

VIDEO

LEFT

RIGHT

3.5mm - Audio

MediaLink

Type A USB Connector   

Содержание VM9022HDN - Touch Screen Double Din MultiMedia...

Страница 1: ...280 Watts Peak 60w x 4 40w x 1 VM9022HDN Installation and Operation Manual video...

Страница 2: ......

Страница 3: ...Indicators 8 Remote Control 10 Using the TFT Monitor 13 Operating Instructions 14 Multi ZONE Operation 16 Setup Menu 17 Tuner Operation 20 Satellite Radio Operation 22 DVD VCD Video Operation 24 DVD C...

Страница 4: ...ii...

Страница 5: ...k4 Under Dash Interface Allows Portable Media Devices to be Connected MediaLink4 Includes the Following Connectivity USB Supports Flash Memory and Hard Drives with Audio Files LinkDirect iPod Connecti...

Страница 6: ...install your VM9022HDN Torx type flat head and Philips screwdrivers Wire cutters and strippers Tools to remove existing radio screwdriver socket wrench set or other tools Electrical tape Crimping too...

Страница 7: ...K SW REVERSE ANT CONT ANT CONT ACC REAR R FRONT L REAR L FRONT R GPS Antenna Rear View Video Camera BLACK MZ7 TFT Touch Screen Sold Separately WIRELESS HEADPHONE OPTIONAL WHITE RED YELLOW WHITE YELLOW...

Страница 8: ...equires Gen 5 5 or earlier photo or video iPod iPhone iPod Touch iPod Classic and iPod Nano with video will only play music files Compatible SAT Tuners 1 XMD1000 requires XMC or XMDJEN100 Cable Kit 2...

Страница 9: ...e problem is corrected 4 Mount the new radio assembly to the dashboard or center console using the reverse procedure in step 1 CAUTION For proper operation of the CD player the chassis must be mounted...

Страница 10: ...m ring will snap into four holes on top and bottom of the mounting sleeve Installing the MediaLink External AV Connector The MediaLink allows you to connect a variety of external devices including a V...

Страница 11: ...n the screen to enter the SETUP menu 2 Touch RATING to view the RATING sub menu An open lock icon to the right of the Password field indicates that a user password had not yet been entered 3 Touch the...

Страница 12: ...ch the source audio will resume 7 WIDE PIC Press to adjust the display aspect of the picture to one of three settings CINEMA NORMAL or Standby screen off Touch the screen to turn Standy mode off NOTE...

Страница 13: ...ne frequency step MENU Mode Press once to move the cursor up 16 Press once for disc insertion ejection Press and hold to reset core mechanism position 17 TFT Display 18 REAR Select rear zone source Al...

Страница 14: ...ront to rear zone move the F R switch 32 located on the right side of the controller 29 3 4 5 9 6 7 26 27 15 16 34 33 19 32 23 24 31 30 8 35 1 2 10 13 28 25 11 12 14 20 18 17 22 21 NOTE Your remote co...

Страница 15: ...ying DVD or Photo Zooms in Navigates the preset station list Navigates list window Navigates the preset station list Navigates list window PRESET 12 Zooms out when playing DVD or Photo Zooms out Navig...

Страница 16: ...IN EMA or Standby Selects display mode CIN EMA or Standby 1 2 3 4 5 6 7 8 9 0 Numeric Keypad 29 Directly accesses chapter 1 18 selects preset for current band Directly accesses track 1 6 selects prese...

Страница 17: ...tops the monitor returns to its original input mode Aspect Ratio Press the WIDE button 28 on the remote control or WIDE PIC button 7 on the monitor to adjust the aspect ratio as follows only active wi...

Страница 18: ...er for detailed installation information SWC Functions The following controls are available for most vehicles 1 Vol Up 2 Vol Down 3 Mute 4 Seek Up Next Track Preset Up 5 Seek Down Previous Track Prese...

Страница 19: ...on the left side of the screen provides immediate access to the Equalizer Rear Zone screen view and PIP Picture in Picture features EQ Touch to view Spectrum Analyzer Equalizer REAR Touch to view the...

Страница 20: ...ns You can also use the remote control The VM9022HDN remote controls both the front and rear zones To switch from front to rear zone move the F R switch 32 located on the right side of the remote cont...

Страница 21: ...d PM 24 Hour Clock displays 24 hour time up to 23 59 RADIO RADIO SETUP RDS Rating Hardware P VOL TS Cal General Language Audio Back Clock Mode 12 Hour Clock Adjust 04 31 AM Video Input AUTO Beep On Sp...

Страница 22: ...option After entering calibration mode a crosshair appears in a corner quadrant of the screen To begin calibration press and hold the crosshair for one second until it moves to the next quadrant Conti...

Страница 23: ...19 VM9022HDN Exiting the System Setup Menu To exit setup mode and resume normal playback press the SETUP button 31 on the remote control or touch the BACK button on the screen...

Страница 24: ...to select Auto Analog or Digital tuning mode 22 HD Radio station indicator 23 Auto memory scan Switching to HD Radio Reception Touch the top left corner of the screen the RADIO circle to view the SOU...

Страница 25: ...tations Six numbered preset buttons store and recall stations for each band All six stored stations P1 P6 for the current band appear on the screen Storing a Station 1 Select a band if needed then sel...

Страница 26: ...e following bands SAT1 SAT2 or SAT3 indicated in the top left corner of the TFT screen Six numbered preset buttons store and recall stations for each band All six stored stations P1 P6 for the current...

Страница 27: ...s While in Search Mode to switch between Channel and Category search modes press the CH or CAT buttons on the touch screen Use the scroll bar and arrows on the touch screen to view the next previous p...

Страница 28: ...e button on the screen to fast forward Keep pressing and releasing the button to increase the rate from 2X to 4X 6X and 8X Press the joystick Enter button 18 on the remote control or touch the play bu...

Страница 29: ...l to choose a language Changing Subtitle Language If you are watching a disc recorded in multiple languages with subtitles press the SUBTITLE button 9 on the remote control to choose the language in w...

Страница 30: ...Number of subtitle languages available on the disc maximum of 32 Number of angles provided maximum of 9 Aspect ratios available LB stands for Letter Box and PS stands for Pan Scan In the example on th...

Страница 31: ...spend or resume disc playback Moving Through Tracks Press the button 19 on the remote control or on screen or use the button on the joystick to advance to the next track on the disc Press the button 1...

Страница 32: ...Select are accessed in the order they were written by the CD writer As a result the order in which they are expected to be played may not match the order in which they are actually played You may be...

Страница 33: ...onto a DVD disc use the 2X or 4X burning option if available This slower burning speed will help eliminate buffer errors and increase disc reading reliability Also use folders when burning large numbe...

Страница 34: ...option Press the button 14 on the remote control or the button 18 on the joystick or touch the MENU button on screen to return to the previous menu Fast Forward Fast Reverse Press and hold the or but...

Страница 35: ...e desired track file using the on screen number pad Press the Enter arrow button to tune to the selected station To exit the screen without changing the station touch Exit To clear your entry and star...

Страница 36: ...e from the head unit turn the Bluetooth connectivity off on the mobile phone Phone Book direct searching through the head unit is only available if the mobile phone supports Phone Book Download If the...

Страница 37: ...icrophone functionality Making an Outgoing Call NOTE Press the button from the main Bluetooth screen to automatically dial the last call received 1 Touch the button to open the direct dial screen 2 Us...

Страница 38: ...code referring to Bluetooth Sub menu Features on page 18 NOTE Please quit A2DP mode before attempting to make a phone call as unexpected results may occur depending on your mobile phone model The VM90...

Страница 39: ...is shorted Check speaker contact Tel Mute malfunction MUTE wire is grounded Check that the MUTE connection is not grounded and that it s properly insulated Unit resets itself when engine is off Incorr...

Страница 40: ...d files Incorrect playback message displayed Message is longer than screen can display SAT RADIO No Sound Incorrect cable connections Check RCA cables Satellite source not available Incorrect cable co...

Страница 41: ...damaged by foreign objects 5 Do not attempt to use a 3 8 cm CD Single disc in this unit either with or without an adaptor as damage to the player and or disc may occur Such damage is not covered by th...

Страница 42: ...gnal to Noise Ratio 1 kHz 50dB Image Rejection 60dB Frequency Response 50Hz 2 kHz 3dB Monitor Screen Size 6 5 Measured diagonally 16 9 Widescreen 6 1 155mm W X 3 51 89 2mm H Screen Type TFT Liquid Cry...

Страница 43: ...rom your selected location A to location B using location information obtained from a Global Navigation Satellite System GNSS A GNSS consists of a set of satellites that transmit high frequency radio...

Страница 44: ...does not include analyze process consider or reflect any of the following a Legal restrictions such as vehicular type weight height width load and speed restrictions b Road slope or grade bridge heig...

Страница 45: ...ly determines the time through the GPS signal However you must set your time zone Select your time zone from the list You can change the time zone later see General Settings on page 52 Press the confi...

Страница 46: ...ap of a different region set the route options e g choose to avoid or allow toll roads or ferries or change the volume see Settings Menu on page 52 Map Tracking and Browsing The map is the core compon...

Страница 47: ...fies your current position The red arrow will indicate the direction of your next turn The upcoming maneuver is also visualized in the upper left corner along with the distance to that turn When you c...

Страница 48: ...OK button to display a list of search results from which you can choose If at any point you want to backspace and delete characters press the backspace button on screen To add a space press the space...

Страница 49: ...ar your current position the default or at any other location Browse POIs 1 From the main menu press POI Search The POI Search window will be displayed 2 Select an area for the POI search Although the...

Страница 50: ...Enter screen will appear 2 Enter the search keyword at least three characters and press the OK button A list of POIs beginning with the search keyword appears on the screen If there are no POIs contai...

Страница 51: ...ter 15 entries the oldest destination will be deleted and the newest entry added to the top of the list Recent addresses cannot be deleted manually Choosing a Location from your Address Book 1 From th...

Страница 52: ...te will be recalculated and the previous route will be discarded for the given distance Turn by Turn Opens the list of the waypoints turns along your route Save Save your present position as a favorit...

Страница 53: ...U button in the bottom right hand corner of the screen The following options are available To begin navigation press Start Navi The display will switch to the navigation map To simulate the planned ro...

Страница 54: ...r work or home press Home or Work and then choose one of the following options To return to the previous screen select Back Select Address to open the Find Address screen and enter the address see Fin...

Страница 55: ...kmark name screen and rename the selected bookmark To erase the current saved location select Delete To erase all saved locations select Delete all NOTE All user information such as settings bookmarks...

Страница 56: ...he previous screen General Settings Select General Settings to modify the following options Press Language to view the Language screen Press the USA English icon and then select one of the following v...

Страница 57: ...map with the vehicle direction always pointing up The map will rotate and move accordingly during navigation while the green arrow representing the vehicle stays up and still North Up This mode will...

Страница 58: ...nto account the actual distance of the route without regard to the types of roads or streets or their posted speed limits While the Shortest Distance option is an obvious calculation the Fastest Time...

Страница 59: ...ficial postal address differs from the address you are looking for In that case search for a known address nearby and browse the map I cannot get a good signal Poor antenna placement If you have probl...

Страница 60: ...56 VM9022HDN Navigation Module...

Страница 61: ...tenance section of your Installation and Operation Manual for additional information regarding the proper use of your product Limitations THE EXTENT OF THE COMPANY S LIABILITY UNDER THIS WARRANTY IS L...

Страница 62: ...Audiovox Electronics Corporation Hauppauge NY 11788 Technical Assistance 1 800 323 4815 www jensen com 2008 Audiovox Ver 060108 Printed in China...

Страница 63: ......

Страница 64: ...e and are subject to eMusic s Terms of Use eMusic is a registered trademark of eMusic com Inc in the U S A and other countries iPod is a registered trademark of Apple Inc Apple is not a partner sponso...

Отзывы: