background image


E-9 

CONNECTING TO A COMPUTER FOR RECORDING 

Before getting start, please install the “ AUDACITY ” recording software onto your 
computer. Below is an example using a computer with Microsoft XP and the Audacity 
software installed. For other Windows OS or Mac OS, please visit Audacity website for 
details. 

http://audacity.sourceforge.net/ 


INSTALLING THE AUDACITY SOFTWARE


1.  Insert the Audacity disc (included) into the CD drive of your computer. 
2.  Click on My computer on the desktop. 
3.  Double click CD drive to view the contents of the CD and select “Windows” under 

“Audacity” folder. 

4.  Open “Windows” folder and select “Audacity 2.0.3 (Windows 2000, XP, Vista, 7, 8)”. 
5.  Double click Audacity set up icon with file name “audacity-win-2.0.3” to install the 

Audacity software according to the instruction, read license agreements of Audacity 
before installation. 

NOTE: 

Free software (AUDACITY) licensed under the GNU general public license (GPL). 
More information as well as open source code can be found on the provided CD or on 
the website at: http://audacity.sourceforge.net/ 


INSTALL THE USB DRIVE   

1.  Use the included USB cable to connect the turntable to your computer. 
2.  Your computer will detect the JTA-470 as a “USB PnP Audio Device” & start to install 

USB drivers for it automatically. 

3.  Waiting for the installation complete until your computer shows a pop up a message 

that it is installed properly and ready to use.   


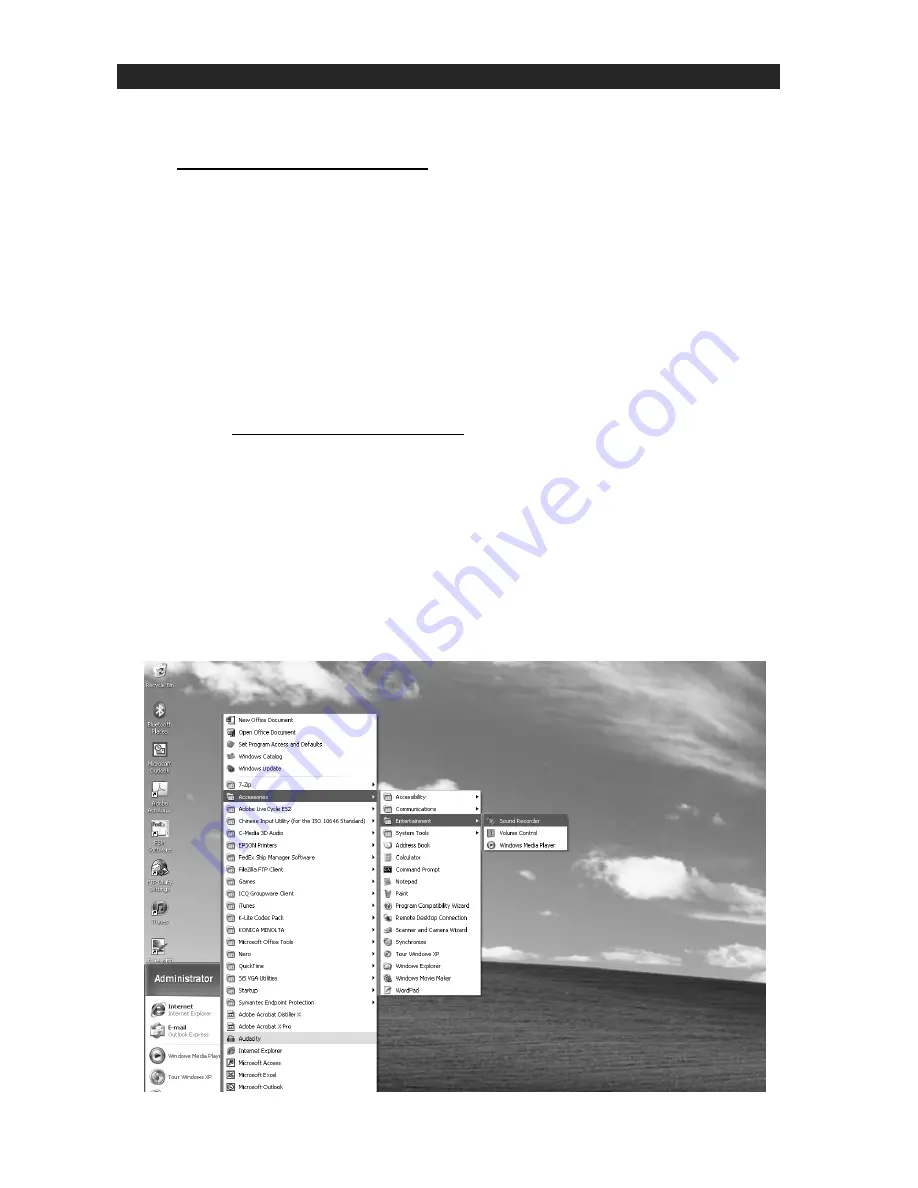
SET RECORDING INPUT LEVEL (USING A WINDOWS XP COMPUTER) 

1.  Click the “Start“ in the left corner of your computer 
2.  Select “All Programs“ 

 “Accessories”


“Entertainment“

 “Sound Recorder“ to 

open the sound record interface. 


Содержание JTA-470

Страница 1: ...Professional 3 Speed Stereo Turntable with Speed Adjustment USER MANUAL JTA 470 PLEASE READ THIS USER MANUAL COMPLETELY BEFORE OPERATING THIS UNIT AND RETAIN THIS BOOKLET FOR FUTURE REFERENCE ...

Страница 2: ...blades with one wider than the other A grounding type plug has two blades and a third grounding prong The wide blade or the third prong is provided for your safety If the provided plug does not fit into your outlet consult an electrician for replacement of the obsolete outlet 10 Protect the power cord from being walked on or pinched particularly at plugs convenience receptacles and the point where...

Страница 3: ...g conditions a When the power supply cord or plug is damaged b If liquid has been spilled or objects have fallen into the product c If the product has been exposed to rain or water d If the product does not operate normally by following the operating instructions Adjust only those controls that are covered by the operating instructions as an improper adjustment of other controls may result in dama...

Страница 4: ...ct the interference by one or more of the following measures Reorient or relocate the receiving antenna Increase the separation between the equipment and receiver Connect the equipment into an outlet on a circuit different from that to which the receiver is connected Consult the dealer or an experienced radio TV technician for help CAUTION Changes or modifications not expressly approved by the par...

Страница 5: ...h a safe level Start your volume control at a low setting Slowly increase the sound until you can hear it comfortably and clearly and without distortion Once you have established a comfortable sound level Set the dial and leave it there Taking a minute to do this now will help to prevent hearing damage or loss in the future After all we want you listening for a lifetime We Want You Listening For a...

Страница 6: ...NER 8 COUNTER WEIGHT 9 TURNTABLE SPEED SELECTOR 10 PITCH CONTROL 11 RECORD SIZE SELECTOR 12 RCA LINE OUT JACKS 13 USB PORT FOR COMPUTER CONNECTION 14 AC POWER CORD 15 AUX IN JACK Caution Usage of controls or adjustments or performance of procedures other than those specified herein may result in hazardous radiation exposure This unit should not be adjusted or repaired by anyone except qualified se...

Страница 7: ... rotate the COUNTER WEIGHT 8 counter clockwise and it will begin to move in towards the pivoting hub of the tone arm The numbers shown on the COUNTER WEIGHT 8 will increase and this increases the weight applied to the stylus needle when playing a record 4 Adjust the COUNTER WEIGHT 8 for the desired tracking force applied to the stylus needle and so the needle does not skip while playing a record N...

Страница 8: ...ate Position the tone arm over the desired track on the record 8 Press the CUE BUTTON 3 DN position again and the tone arm will go down slowly on the record and start playing the selected track 9 At the end of record the tone arm will return to the rest position automatically 10 To stop the record manually lift the tone arm from the record and return it to the rest Play suspension Press the CUE BU...

Страница 9: ...f the cable 2 Plug one end into the AUX IN JACK 15 on the JTA 470 and the other end of the cable into the Line out Jack or Headphone Jack of your external audio device The JTA 470 will switch to AUX mode automatically 3 Turn on the JTA 470 and the connected it to your home music system 4 Start playing the device you plugged into the AUX IN JACK 15 5 Slowly adjust both the volume controls of your h...

Страница 10: ...audacity win 2 0 3 to install the Audacity software according to the instruction read license agreements of Audacity before installation NOTE Free software AUDACITY licensed under the GNU general public license GPL More information as well as open source code can be found on the provided CD or on the website at http audacity sourceforge net INSTALL THE USB DRIVE 1 Use the included USB cable to con...

Страница 11: ...ct USB PnP Audio Device as Default device of sound recording 5 Click the Volume button under the Sound recording tab to open Recording Control interface 6 Adjust the line in volume to a level without distortion You can play a record on the turntable and use the Sound Recorder to record a short clip of music for testing The sound wave will show on the interface screen when recording ...

Страница 12: ...ttp audacity sourceforge net 1 Run the Audacity from the Windows start menu or double click the Audacity icon on your computer desktop 2 The Audacity main screen appears You will find the Record Play Pause Stop Skip to Start and Skip to End control buttons here Use the File Edit View Transport Tracks Generate Effect and Analyze menus from your computer screen to Save Export or Edit the music 3 Cli...

Страница 13: ... Input and Output Volume bars 5 Click the record button to start recording left and right tracks will show on your computer screen If you cannot see the sound waves appear on the Interface when recording adjust the Input volume bar Output Volume Input Volume ...

Страница 14: ...f you want to encode your recorded music to MP3 format you need to download the LAME MP3 encoder either in the CD provided or under the page Other Audacity Downloads for Windows of the website http audacity sourceforge net INSTALL THE MP3 ENCODER 1 Insert the included CD into your computer and select Audacity 2 0 Windows 2000 XP Vista 7 8 under Windows folder 2 Open the folder and select Plug ins ...

Страница 15: ...power source when cleaning The finish on the unit may be cleaned with a dust cloth and cared for as other furniture Use caution when cleaning and wiping the plastic parts If the cabinet becomes dusty wipe it with a soft dry dust cloth Do not use any wax or polish sprays on the cabinet If the front panel becomes dirty or smudged with fingerprints it may be cleaned with a soft cloth slightly dampene...

Страница 16: ...ion Unit is ON but there is low or no volume Unit is not connected to external Hi Fi Amplifier Connect the external Hi Fi Amplifier Sound is distorted Volume level is set too high Decrease the volume SPECIFICATION AC Power AC 120V 60Hz 5 Watts System Requirement Windows 2000 XP Vista 7 8 Mac OS X 10 4 10 7 5 SPECTRA GREEN NOTICE At Spectra environmental and social responsibility is a core value of...

Страница 17: ...lure to provide reasonable care and necessary maintenance as outlined in the user manual 3 Warranty of all SPECTRA products applies to residential use only and is void when products are used in a nonresidential environment or installed outside the United States This warranty gives you specific legal rights and you may also have other rights which vary from state to state TO OBTAIN SERVICE please r...

Отзывы: