background image


E-6 

RADIO OPERATION 

 
1.  Rotate the FUNCTION SELECTOR (#4) to select the desired band (AM or FM). The 

dial scale LED will light up 

2.  Adjust the TUNING KNOB (#5) to tune in the station you want to listen to. 
3.  Adjust the POWER/VOLUME ON/OFF SWITCH (#2) to the desired volume level. 
4.  To turn off the Radio, rotate the POWER/VOLUME ON/OFF SWITCH (#2) fully 

counter clockwise to the Off position. 


Hints for best reception:

-  AM  :  The  receiver  has  a  built-in  AM  bar  antenna.  If  AM  reception  is  weak,  slightly 

rotate or change the position of the unit will usually improve the AM reception. 

-  FM  :  The  receiver  has  a  build-in  FM  ANTENNA  (#19)  hanging  at  the  rear  cabinet. 

This wire should be totally unraveled and extended for best reception. 


PHONO OPERATION 


Please Note - Before Use 

-

  Remove the stylus protector. 

-

  Be sure that the tone arm is unlocked and 

free to move from the tone arm rest prior to 
operating. Lock the tone arm in place again 
when not in use. 

 
1.  Rotate the FUNCTION SELECTOR (#4) to select to the Phono position 
2.  Raise the turntable DUST COVER (#16). 
3.  Place a record on the TURNTABLE PLATTER (#8), use the 45 RPM ADAPTER (#9) if 

required. 

4.  Set the SPEED SELECTOR (#13) to the proper position depending on the record to 

be played. 

5.  Lift the tone arm from the rest by using the LIFT LEVER (#10) 

and slowly move it over the record. The TURNTABLE 
PLATTER (#8) will start to rotate. 

6.  Place the TONE ARM (#15) to the desired position of the 

record. 

7.  Adjust the volume to the desired level. 
8.  At the end of record, the platter will automatically stop spinning. 

Lift the tone arm from the record and return it to the rest. 

9.  To stop playing manually, lift the tone arm from the record and return it to the rest. 
 

NOTES:


Certain types of records may have an auto-stop area outside the preset limit, so the 
turntable may stop before the last track finishes. If this occurs, set the AUTO-STOP 
SWITCH 

(#12)

 to the “OFF” position. This allows the record to play to the end, but please 

note that it will not stop automatically. You must manually raise the tone arm and place it 
back in the rest and then turn off the power to stop the turntable from spinning. 


PITCH ADJUST 

The PITCH ADJUST (#3) allows you to fine tune the playing speed of the record once 
the  correct  speed  (33/45/78  RPM)  is  chosen.  Slide  the  Pitch  Adjust  Control  to  slightly 
increase or decrease the speed of the turntable if necessary.


Содержание JTA-300

Страница 1: ...3 SPEED STEREO TURNTABLE PLAYER WITH AM FM RADIO USER MANUAL JTA 300 PLEASE READ THIS USER MANUAL COMPLETELY BEFORE OPERATING THIS UNIT AND RETAIN THIS BOOKLET FOR FUTURE REFERENCE...

Страница 2: ...des with one wider than the other A grounding type plug has two blades and a third grounding prong The wide blade or the third prong is provided for your safety If the provided plug does not fit into...

Страница 3: ...ersonnel under the following conditions a When the power supply cord or plug is damaged b If liquid has been spilled or objects have fallen into the product c If the product has been exposed to rain o...

Страница 4: ...gital device pursuant to Part 15 of the FCC Rules These limits are designed to provide reasonable protection against harmful interference in a residential installation This equipment generates uses an...

Страница 5: ...r without annoying blaring or distortion and most importantly without affecting your sensitive hearing Sound can be deceiving Over time your hearing comfort level adapts to higher volumes of sound So...

Страница 6: ...ded 2 Please refer to CONNECTING TO A COMPUTER FOR RECORDING section of this manual for detail LOCATION OF CONTROLS 1 POWER INDICATOR 2 POWER VOLUME ON OFF SWITCH 3 PITCH ADJUST 4 FUNCTION SELECTOR 5...

Страница 7: ...R 8 use the 45 RPM ADAPTER 9 if required 4 Set the SPEED SELECTOR 13 to the proper position depending on the record to be played 5 Lift the tone arm from the rest by using the LIFT LEVER 10 and slowly...

Страница 8: ...OWER ON OFF SWITCH 2 to turn off the system when you finish listening Don t forget to switch off the power on your external device as well LINE OUT CONNECTION You can connect this unit to an external...

Страница 9: ...ACITY licensed under the GNU general public license GPL More information as well as open source code can be found on the provided CD or on the website at http audacity sourceforge net INSTALL THE USB...

Страница 10: ...USB PnP Audio Device as Default device of sound recording 5 Click the Volume button under the Sound recording tab to open Recording Control interface 6 Adjust the line in volume to a level without di...

Страница 11: ...tp audacity sourceforge net 1 Run the Audacity from the Windows start menu or double click the Audacity icon on your computer desktop 2 The Audacity main screen appears You will find the Record Play P...

Страница 12: ...e sure the usb Turntable is connected then re start Audacity Software and try again 4 Adjust the input and output volume by sliding the Input and Output Volume bars 5 Click the record button to start...

Страница 13: ...de your recorded music to MP3 format you need to click the Download in POP UP window to download the LAME MP3 encoder either in the CD provided or under the page Other Audacity Downloads for Windows o...

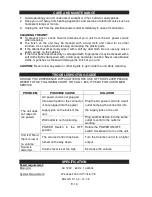
Страница 14: ...nish of your unit CAUTION Never allow any water or other liquids to get inside the unit while cleaning TROUBLESHOOTING GUIDE SHOULD YOU EXPERIENCE DIFFICULTIES IN THE USE OF THIS PLAYER PLEASE REFER T...

Страница 15: ...re dedicated to continuous implementation of responsible initiatives with an aim to conserve and maintain the environment through responsible recycling Please visit us at http www spectraintl com gree...

Страница 16: ...ure to provide reasonable care and necessary maintenance as outlined in the user manual 3 Warranty of all SPECTRA products applies to residential use only and is void when products are used in a nonre...

Отзывы: