background image

MS9903TT_ib080503.p65

5/8/2003, 11:44

30

MS9903TT_ib080503.p65

5/8/2003, 11:44

1

13.

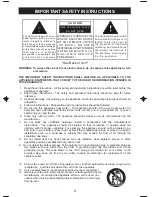
Unplug this apparatus during lightning storms or when unused for a long periods of time.

14.

Power Sources - The appliance should be connected to a power supply only of the type

described in the operating instructions or as marked on the appliance. Do not overload wall
outlet.

15. Wall and Ceiling Mounting - The appliance should be mounted to a wall or ceiling only as

recommended by the manufacturer.

16. Power Lines - An outdoor antenna should be located away from power lines.

17. Object and Liquid Entry - Care should be taken so that objects do not fall and liquids are not

spilled into the enclosure through openings.

18. Refer all servicing to qualified service personnel. Servicing is required when the apparatus has

been damaged in any way, such as power-supply cord or plug is damaged, liquid has been
spilled or objects have fallen into the apparatus, the apparatus has been exposed to rain or
moisture, does not operate normally, or has been dropped.

19. Servicing - The user should not attempt to service the appliance beyond that described in the

operating instructions. All other servicing should be referred to qualified service personnel.

CAUTION:
TO PREVENT ELECTRIC SHOCK, MATCH WIDE BLADE OF
PLUG TO WIDE SLOT. FULLY INSERT THE PLUG TO MAIN
POWER SOCKET.

CLASS 1 LASER PRODUCT

CLASS 1 LASER PRODUCT

APPAREIL

LASER DE CLASSE 1

PRODUCTO LASER DE CLASE 1

CAUTION

INVISIBLE LASER RADIATION

WHEN OPEN AND INTERLOCKS

DEFEATED.

AVOID EXPOSURE TO BEAM

This product contains a low power Laser Device.

Note:

ON PROTECTION AGAINST LASER ENERGY EXPOSURE
-

-
-

-

-

This product complies with DHHS Rule 21 Subchapter J at date of manufacture.

Follow the advice below for safe and appropriate operation.

As the laser beam used in this compact disc player is harmful to the eyes, do not

attempt to disassemble the casing.

Stop operation immediately if any liquid or solid object should fall into the cabinet.
Do not touch the lens or poke at it. If you do, you may damage the lens and the player

may not operate properly.

Do not put anything in the safety slot. If you do, the laser diode will be ON when the

CD door is still open.

This unit employs a laser. The use of controls or adjustment or performance of

procedures other than those specified here may result in exposure to hazardous
radiation.

3

Содержание JMC-1000

Страница 1: ...1000 HOME AUDIO SYSTEM WITH 3 CD CHANGER BELT DRIVE TURNTABLE DUAL CASSETTE DECK AND REMOTE CONTROL PLEASE READ THIS OPERATING MANUAL COMPLETELY BEFORE OPERATING THIS UNIT AND RETAIN THIS BOOKLET FOR...

Страница 2: ...ume control at a low setting Slowly increase the sound until you can hear it comfortably and clearly and without distortion Set the dial and leave it there Taking a minute to do this now will help to...

Страница 3: ...ce should not be used near water for example near a bathtub washbowl kitchen sink laundry tub in a wet basement or near a swimming pool and the like 6 Clean only with dry cloth The appliance should be...

Страница 4: ...ibed in the operating instructions All other servicing should be referred to qualified service personnel CAUTION TO PREVENT ELECTRIC SHOCK MATCH WIDE BLADE OF PLUG TO WIDE SLOT FULLY INSERT THE PLUG T...

Страница 5: ...d in accordance with the instructions may cause harmful interference to radio communications However there is no guarantee that interference will not occur in a particular installation If this equipme...

Страница 6: ...uct is designed to operate on normal 120V 60Hz AC only Connecting this system to any other power supply could result in damage to the unit which is not covered by your warranty You will note that this...

Страница 7: ...However certain types of oil based furniture polishes wood preservatives or cleaning sprays may cause the rubber feet to soften and leave marks or a rubber residue on the furniture To prevent any dam...

Страница 8: ...7 2 1 3 4 5 6 7 8 9 10 11 12 13 14 15 16 17 18 19 20 21 22 23 24 25 26 27 28 29 30 31 32 33 34 35 36 FRONT VIEW CONTROL PANEL LOCATION OF CONTROLS AND INDICATORS...

Страница 9: ...LANCE Control 16 Cassette DECK B Door 17 Cassette DECK B Control Keys 18 CD Tray Open Close Button 19 Disc 3 Select Button 20 Disc 2 Select Button 21 Disc 1 Select Button 22 CD Tray 23 Cassette DECK A...

Страница 10: ...9 1 2 3 1 FM Wire Antenna 2 Speaker L R Jacks 3 AC Power Cord BACK VIEW...

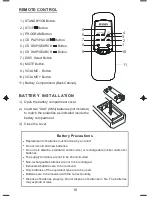
Страница 11: ...C MUTE VOLUME STANDBY ON PROGRAM SKIP SEARCH PLAY PAUSE STOP 1 2 3 4 5 6 7 8 9 10 11 Battery Precautions Replacement of batteries must be done by an adult Do not mix old and new batteries Do not mix a...

Страница 12: ...kers rotate this control to the left or to the right until the volume from both of the speakers sounds the same at your normal listening position FM Mono Hi Speed Dubbing ON OFF Selector This button i...

Страница 13: ...ning press the POWER button to shut the power Off Antenna Information AM The AM antenna is inside the cabinet IF AM reception is unsatisfactory try rotating the entire unit until you find the position...

Страница 14: ...sert an additional disc in the open pocket if desired NOTES Keep the CD disc tray closed when the system is not in use to prevent dirt and dust from entering the CD mechanism Never place more than one...

Страница 15: ...front panel or DISC button on remote control to select the desired disc and then press the PLAY PAUSE button Or press the appropriate disc button DISC 1 DISC 2 DISC 3 on front panel for the disc you...

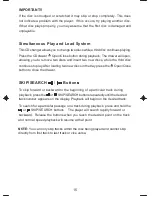
Страница 16: ...o play After loading two new discs in the tray press the Open Close button to close the drawer SKIP SEARCH Buttons s To skip forward or backward to the beginning of a particular track during playback...

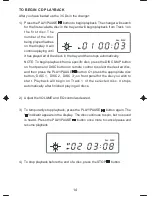
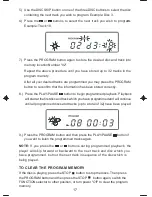
Страница 17: ...utton once The PROGRAM EDIT indicators program 01 disc 01 appears in the display 2 Press the DISC SKIP button or one of the three DISC buttons to select the disc which contains the first track you wis...

Страница 18: ...to begin programmed playback Playback will start at the first disc and track which you have programmed and will continue until all programmed discs and tracks up to a total of 32 have been played NOT...

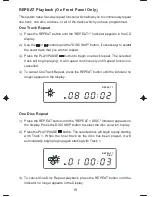
Страница 19: ...begin playing It will repeat continuously until repeat function is cancelled One Disc Repeat 1 Press the REPEAT button until the REPEAT 1 DISC Indicator appears on the display Press the DISC SKIP but...

Страница 20: ...ely 3 To cancel All Discs Repeat playback press the REPEAT button until the Indicator no longer appears in the Display Programmed Repeat Playback You can use the Program and Repeat features together t...

Страница 21: ...ck 2 and so on until it has played the first 10 seconds of every track Then it continues to next disc until all discs has been played 2 To cancel Intro Scan and resume normal playback press the INTRO...

Страница 22: ...PROTECT THE TURN TABLE FROM DAMAGE DURING TRANSPORTATION A SILVER TRANSIT SCREW IS LOCATED AT THE UPPER HAND CORNER OF THE TURNTABLE PLATFORM BEFORE PLAYING PLEASE USE A SCREWDRIVER TO TURN THE TRANS...

Страница 23: ...ualizer setting as desired 7 To pause during playback use the Cue Control lever to lift the Tone Arm from the record To resume playback gently move the Cue Control forward to lower the Tone Arm back o...

Страница 24: ...o begin playback 6 Adjust the VOLUME and EQ controls as desired 7 When the tape ends the Automatic Stop System releases the Play key and shuts off the tape motor Press the Stop Eject key to open the c...

Страница 25: ...CASSETTES 1 Insert prerecorded tapes into both cassette compartments with the tape you want to play first in DECK B 2 Press the Play key of DECK B to begin playback 3 Press Pause key and then Play ke...

Страница 26: ...nsert a good quality blank tape into DECK A with the exposed tape facing down and the full reel on the left side Close DECK A door 2 Select the source you wish to record PHONO TUNER CD or TAPE Tape Du...

Страница 27: ...e tab opening with a piece of cellophane tape This will allow the Record key to function again CASSETTE CARE Two common causes of trouble experienced when using cassettes are 1 Tape jamming Leading to...

Страница 28: ...an with a soft cloth or cotton pad dampenedin isopropylalcohol or special tape head cleaner DECK A DECK B If the cassette feels tight while performing operation shown see Fig 2 the tape may be jamming...

Страница 29: ...ave absolutely no effect on reproduction quality Clean the disc periodically with a soft lint free dry cloth Never use detergents or abrasive cleaners to clean the disc If necessary use a CD cleaning...

Страница 30: ...g the AC cord into a wall outlet Plug another device into the same outlet to confirm the outlet is working Slightly rotate the unit for the best reception Radio will resume normal function in 1 2 seco...

Страница 31: ...vice When returning the unit please remove the battery to prevent damage to the unit in transit and or from possible battery leakage We are not responsible for battery returned with the product or for...

Отзывы: