background image

iPod

®

 OPERATION

This unit is equipped with an iPod

®


ready function that will allow you to control your iPod (if 

compatible) using the control panel buttons. This unit is made for the following iPod models:

iPod nano 5G

iPod nano 6G

iPod classic

iPhone4

iPhone4S

iPod touch 3G

iPod touch 4G

NOTE: Earlier model iPod’s are not supported because they do not implement the 

required control protocol. Also, the iPod Shuffle is not supported because it does not 

utilize the 30-pin Apple iPod Connector. These unsupported iPod models may be 

connected to the radio using one of the Auxiliary Inputs.

Accessing iPod Mode

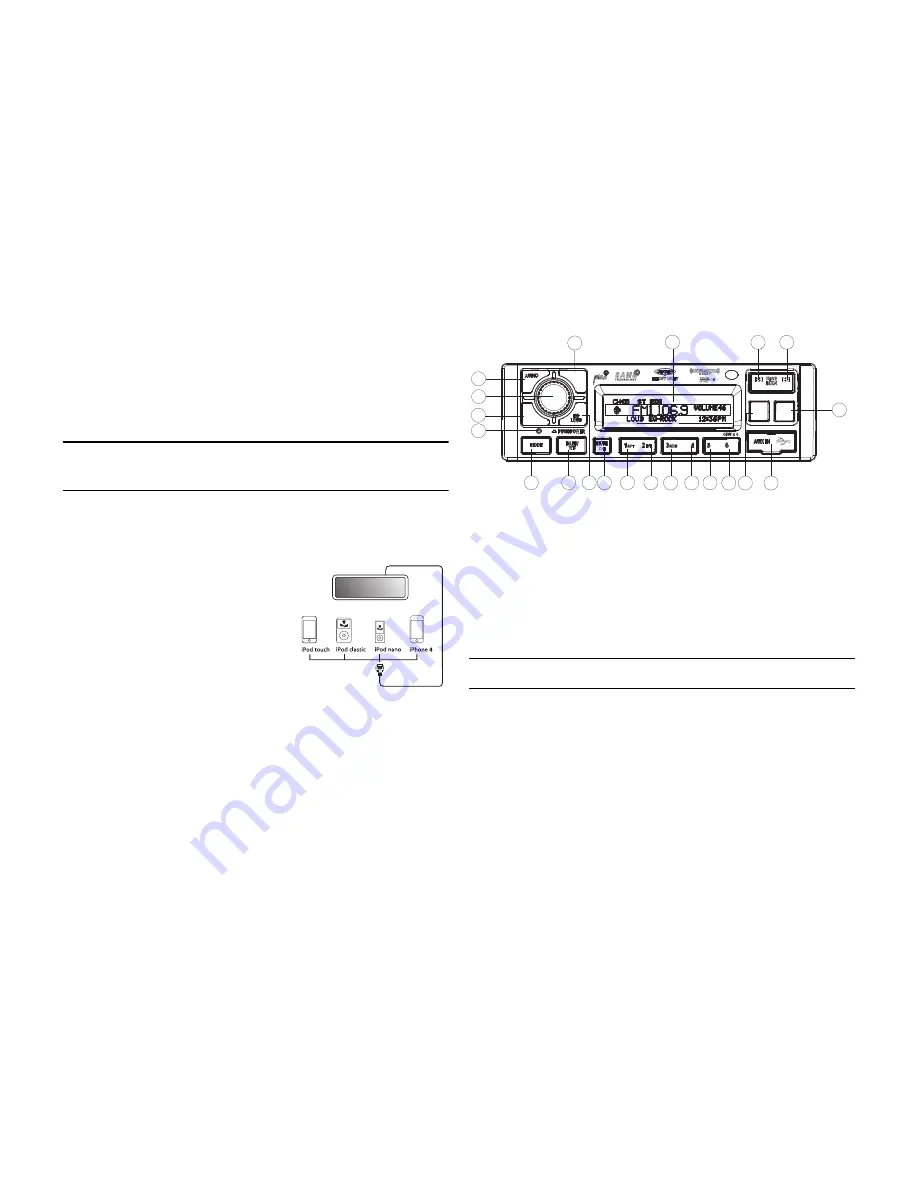
Connect a supported iPod or iPhone to the front panel USB connector. The iPod icon 
illuminates in the bottom left corner of the LCD whenever an iPod or iPhone is attached to the 
USB connector. Music playback begins automatically.
To enter iPod mode from any other source, press the 

MODE

 button (4) until “iPod” appears on the display. If 

the user connects an iPod containing no songs, the 
radio will display a message stating “No Songs” when 
it enters iPod mode.

Turning the iPod On/Off

The iPod power turns on automatically when an iPod 
is connected to the front panel USB connector, as long 
as the vehicle ignition is turned on. You can turn the 
iPod off by disconnecting it or by turning the ignition 
off. When the ignition is turned off, the iPod will pause 
and then enter sleep mode after 2 minutes. While the 
iPod is connected, the power cannot be turned on or off from the iPod itself.

Controlling Playback

Pausing Playback

During playback, press the

 MUTE/>||

 button (17) to pause the iPod player. “Pause” will appear 

on the LCD. Press 

MUTE/>||

 again to resume playback.

Repeat Play

During playback, press the 

1/RPT

 button (8) to repeat the current song. “RPT” will appear on 

the LCD. Press 

1/RPT

 again to stop repeat playback. 

Random Play

During playback, press the 

3/RDM

 button (5) to play all songs in the current category in 

random order. Random play will begin once the current song has finished playing. “RDM” will 
appear on the LCD. Press 

3/RDM

 again to stop random playback.

Selecting Tracks

During playback, press the 

TUNE/SEEK |<< / >>|

 buttons (18, 19) to play the previous or next 

track in the current category. Press the 

TUNE/SEEK |<<

 button (18) once to play the song from 

the start position or press 

TUNE/SEEK |<<

 twice to play the previous track. Pressing the 

TUNE/SEEK |<<

 button (18)


during the first 2 seconds of a track will play the previous track. 

After 2 seconds, this action returns to the beginning of the current track.

Press and hold

 the 

TUNE/SEEK |<< / >>|

 button (18, 19) to fast reverse/forward the song. 

NOTE: If you press and hold the TUNE/SEEK |<< / >>| button to change the current song 

to the previous/next song, you will exit fast reverse/forward mode. 

Playlist Search

Press the 

PTY/CAT/MENU

 button (2) to access Playlist selection mode. While in Category 

mode, press the 

TUNE/SEEK |<< / >>|

 buttons (18, 19) to choose file search by Playlist, Artist, 

Album, Genre, Song, Audiobook or Podcast. Press the 

INFO/ENTER

 button (16) to select the 

search mode. Use the 

TUNE/SEEK |<< / >>|

 buttons to search the available files on the iPod. 

Press the 

INFO/ENTER

 button to play the selected song or file.

Alternate Display Mode

Press the 

DISP/SCROLL

 button (12) to change the display information between single and 

double line text display. 

HEAD UNIT

to USB Connector

iPod Cable

CAT-

CAT+

DN

UP

INFO

ENTER

INFO

ENTER

PTY/CAT

MENU

PTY/CAT

MENU

DISP

SCROLL

DISP

SCROLL

AS/PS

JHD1630

3

2

4

5

11 17

6

13

7

14

8

16

9

15

10

12

1

18

21

19

20

Содержание JHD1630

Страница 1: ...Heavy Duty Radio Guide d installation et d op ration CAT CAT DN UP INFO ENTER INFO ENTER PTY CAT MENU PTY CAT MENU DISP SCROLL DISP SCROLL AS PS JHD1630 iPhone iPod iPod classic iPod nano iPod shuffl...

Страница 2: ...respectively and has been certified by the developer to meet Apple performance standards Apple is not responsible for the operation of this device or its compliance with safety and regulatory standar...

Страница 3: ...t Pop Classical Rock Electronic Bass Treble Balance and Fader Controls Output Power 45W x 4 Clock 12 24 Hour Selectable Public Announcement PA Feature with Optional Microphone sold separately IR Wirel...

Страница 4: ...ed Parking in direct sunlight can produce very high temperatures inside your vehicle Give the interior a chance to cool down before starting playback Use the Proper Power Supply This product is design...

Страница 5: ...y inserted into the dashboard opening bend as many of the tabs outward as necessary to firmly secure the sleeve to the dashboard 4 Place the radio in front of the dashboard opening so the wiring can b...

Страница 6: ...JHD1630 4 WARNING Do not connect the 12VDC ACC switched wire to the battery This wire MUST be connected to the Accessory Ignition wire or a 12 volts switched power source WIRING...

Страница 7: ...eted function buttons do not operate error symbol on the display Use a ball point pen or thin metal object to press the RESET button 20 This may be necessary should the unit display an error code Audi...

Страница 8: ...Code 5 _ _ _ _ _ _ SAME Code 6 _ _ _ _ _ _ SAME Code 7 _ _ _ _ _ _ Battery Alarm Off On Battery Auto Off Off On Reset System Defaults ENTER Press the INFO ENTER button 16 to return the EEPROM to facto...

Страница 9: ...view the clock set screen Press the INFO ENTER button to move to the next digit Press the TUNE SEEK 18 19 buttons to adjust the selected digit When no adjustment is made for five seconds the time will...

Страница 10: ...Scan Select a band Press AS PS 14 to scan stations stored in the current band The unit will pause for 5 seconds at each preset station Press AS PS again to stop scanning when the desired station is r...

Страница 11: ...the last known function mode See System Menu on page 6 to learn how to turn the WB Alert feature on SAME Decoding and Filtering Specific Area Message Encoding SAME data is also broadcast prior to ale...

Страница 12: ...s and hold the INFO ENTER button 16 to enter direct tuning mode 2 Press TUNE SEEK buttons 18 19 to change the first of three digits for the desired channel in the direct entry screen 3 Press the INFO...

Страница 13: ...roblem persists disconnect and reconnect the tuner and then contact your dealer Scrolling Subscription Updated press any key to continue Subscription Updated The radio has detected a change in your Si...

Страница 14: ...irst digit of the new code e Press the INFO ENTER button to move to the next digit f Repeat above steps to enter all 4 digits g Repeat above steps to confirm the new code 8 After setting a new four di...

Страница 15: ...l tracks in the current folder in random shuffled order Press 3 RDM again to stop random play Folder Navigation MP3 Only Press the PTY CAT MENU button 2 to view a list of all songs in the current fold...

Страница 16: ...Press MUTE again to resume playback Repeat Play During playback press the 1 RPT button 8 to repeat the current song RPT will appear on the LCD Press 1 RPT again to stop repeat playback Random Play Du...

Страница 17: ...of additional noise suppressors These can be obtained from most professional mobile electronics retailers Interference Radio reception in a moving environment is very different from reception in a st...

Страница 18: ...imits for a Class B digital device pursuant to Part 15 of the FCC Rules These limits are designed to provide reasonable protection against harmful interference in a residential installation This equip...

Страница 19: ...JHD1630 17...

Страница 20: ...ASA Electronics Corporation www asaelectronics com www jensenheavyduty com 2012 ASA Electronics Corporation v 100512...

Отзывы: