7
Reverse Door Swing
(optional)
The door hinges are factory installed on the right-hand side. If you
want the door to open from the opposite direction, you must
reverse the door.
IMPORTANT: To avoid strain on the hinges, it is recommended
that you use two people to remove the door.
Tools Needed: Phillips screwdriver and a
¹⁄₈
" hex key wrench.
Remove the Door
1. Unplug or disconnect power and remove any items that might
be stored inside.
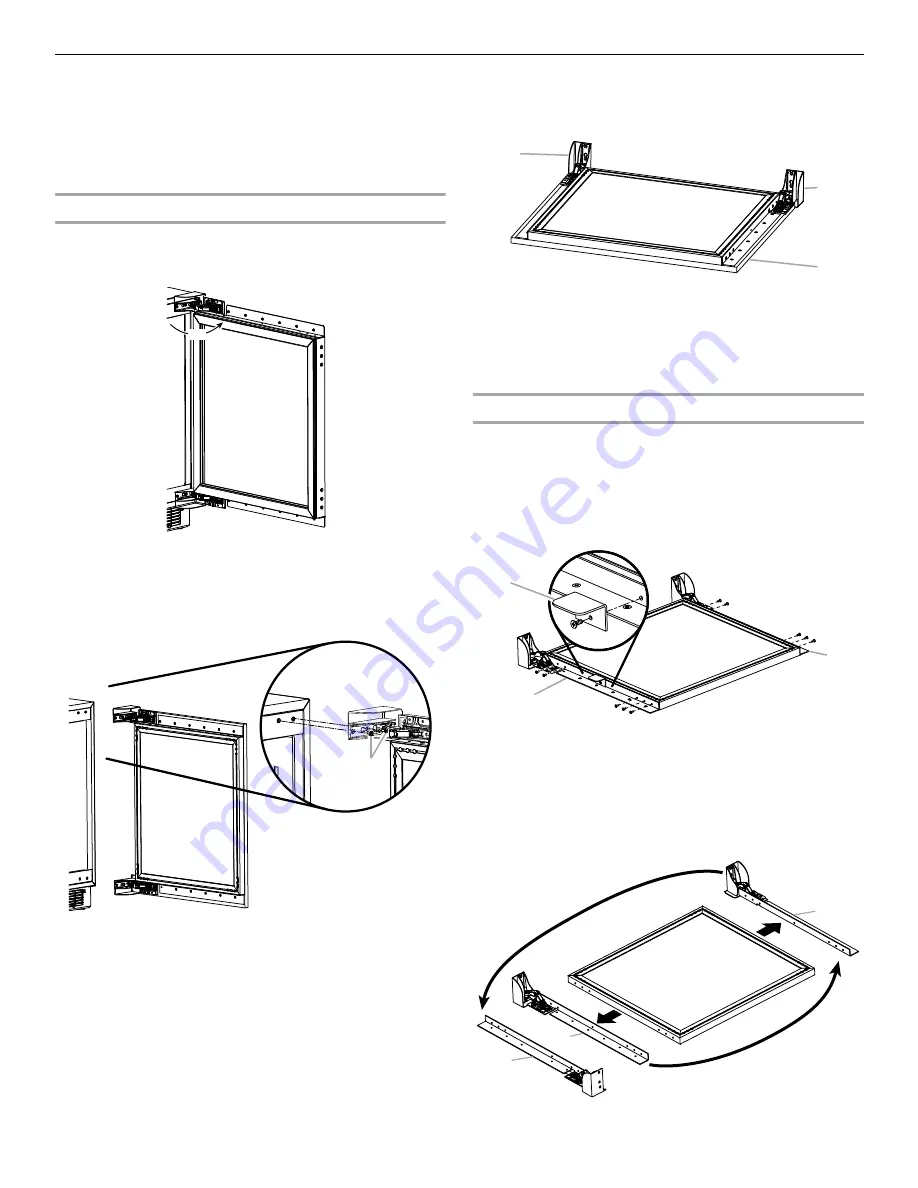
2. Open the door completely to 90°.
3. While one person supports the door, remove the screws
attaching both the top and bottom hinges to the cabinet.
NOTE: After the screws are removed and the door is pulled
away from the cabinet, a plastic spacer, located behind the
bottom hinge, will become free. Set the spacer aside. You will
need this spacer when you reinstall the door.
4. Remove the door from the cabinet and gently lay it on a flat
surface to avoid damaging the covers attached to the top and
bottom hinges.
5. Reinstall the screws into the holes remaining after the hinges
are removed from the cabinet.
6. If a wooden overlay panel has been previously installed,
remove the panel. See “Install Custom Overlay Frame.”
Reverse the Door
1. Remove the screws attaching the black, metal L-beams to the
top and bottom of the door.
2. Remove the screw attaching the metal light switch plate to the
center of the bottom L-beam. Remove the light switch plate.
NOTE: The light switch plate is attached with both a screw
and adhesive tape. It may require some force to remove it
from the L-beam.
3. Remove the two metal, L-beams from the door noting which
L-beam was on the top and which was on the bottom.
4. Move the L-beams to the opposite ends of the door with the
hinges now on the left-hand side (as you are facing the front of
the door).
90˚
A
A. Hinge cover
B. Custom overlay door frame
A. Light switch plate
B. Bottom L-beam
C. Top L-beam
A. Bottom L-beam
B. Top L-beam
B
A
A
C
B
A
A
A
B


