background image

9

WATER SUPPLY REQUIREMENTS

IMPORTANT :


All installations must meet local plumbing code 

requirements.


Connect to potable water supply only.


There is not enough clearance to achieve a flush 

installation if a water shutoff valve is located in the 

wall behind the refrigerator.


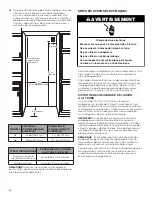
The water shutoff should be located in the base 

cabinet on either side of the refrigerator or some 

other easily accessible area. The water supply line, 

however, must come up through the floor in the gray 

shaded area shown.


A 1/2" (12.7 mm) hole for plumbing should be drilled 

on the floor at least 6" (15.2 cm) from the right- or left-

hand side cabinet and should be no more than  

1" (2.54 cm) away from the back wall. See “Connect 

the Water Supply.”


The water supply connection is made at the front of 

the refrigerator.


If additional tubing is needed, use copper tubing and 

check for leaks. Install the copper tubing only in areas 

where the household temperatures will remain above 

freezing.


Do not use a piercing-type or 3/16" (4.76 mm) saddle 

valve which reduces water flow and also clogs more 

easily.

NOTE :

 Your refrigerator dealer has a kit available with 

a 1/4" (6.35 mm) saddle-type shutoff valve, a union, 

and copper tubing. Before purchasing, make sure a 

saddle-type valve complies with your local plumbing 

codes.

WATER PRESSURE

A cold water supply with water pressure between  

30 psi and 120 psi (207 kPa and 827 kPa) is required to 

operate the water dispenser and ice maker. If you have 

questions about your water pressure, call a licensed, 

qualified plumber.

REVERSE OSMOSIS WATER SUPPLY
IMPORTANT : 

The pressure of the water supply coming 

out of a reverse osmosis system going to the water inlet 

valve of the refrigerator needs to be between  

30 psi and 120 psi (207 kPa and 827 kPa).
If a reverse osmosis water filtration system is connected 

to your cold water supply, the water pressure to the 

reverse osmosis system needs to be a minimum of  

40 psi to 60 psi (276 kPa to 414 kPa).
If the water pressure to the reverse osmosis system is less 

than 40 psi to 60 psi (276 kPa to 414 kPa):


Check to see whether the sediment filter in the 

reverse osmosis system is blocked. Replace the filter if 

necessary.


Allow the storage tank on the reverse osmosis system 

to refill after heavy usage.


If your refrigerator has a water filter, it may further 

reduce the water pressure when used in conjunction 

with a reverse osmosis system. Remove the water 

filter cartridge.

If you have questions about your water pressure, call a 

licensed, qualified plumber.

PRODUCT DIMENSIONS

IMPORTANT :


The depth from the front face of the doors to the 

back of the refrigerator cabinet is 24" (60.96 cm) 

without panels.


The power cord is 84" (213 cm) long.


The water supply connection is made at the bottom 

front of the refrigerator.

TOP VIEW

MODEL 

A

42 

41³⁄₄" (106 cm)

48 

47³⁄₄" (121.3 cm)

Do not use with water that is microbiologically unsafe or 

of unknown quality without adequate disinfection before 

or after the system. Systems certified for cyst reduction 

may be used on disinfected waters that may contain 

filterable cysts.

1"

(2.54 cm) 

6"

(15.2 cm)

6"

(15.2 cm)

6"

(15.2 cm)

A

24"

(61.0 cm)

Содержание JS42NXFXDE

Страница 1: ...ite at www jennair com In Canada call 1 800 JENNAIR 1 800 536 6247 or visit our website at www jennair ca Pour des questions propos des caract ristiques du fonctionnement rendement des pi ces accessoi...

Страница 2: ...I RES INTRODUCTION S CURIT DU R FRIG RATEUR 19 VARIANTES ET ACCESSOIRES MOD LES DE 42 po 20 MOD LES DE 48 po 21 EXIGENCES D INSTALLATION Outils et pi ces 22 Exigences d emplacement 23 Sp cifications l...

Страница 3: ...sages in this manual and on your appliance Always read and obey all safety messages This is the safety alert symbol This symbol alerts you to potential hazards that can kill or hurt you and others All...

Страница 4: ...ors and RISE handles with diamond etched grip Base Model Numbers JS42NXFXDE Panel Kit Model Numbers JBSFS42NHL ACCESSORIES All factory parts are available through your JennAir dealer or by calling Jen...

Страница 5: ...ndles with diamond etched grip Base Model Numbers JS48NXFXDE Panel Kit Model Numbers JBSFS48NHL ACCESSORIES All factory parts are available through your JennAir dealer or by calling JennAir at 1 800 J...

Страница 6: ...or more information OR Panel Kit Installation Requirements for panel kit information Flexible codes approved water supply tubing a ferrule a union and a 1 4 6 35 mm compression fitting PARTS PROVIDED...

Страница 7: ...Dimensions Location must permit top grille removal See Opening Dimensions OPENING DIMENSIONS IMPORTANT The width of the opening Width A from side to side must be as specified for your model for at lea...

Страница 8: ...GROUNDING METHOD A 115 V 60 Hz AC only 15 A or 20 A fused grounded electrical supply is required It is recommended that a separate circuit serving only your refrigerator be provided Use an outlet tha...

Страница 9: ...ave questions about your water pressure call a licensed qualified plumber REVERSE OSMOSIS WATER SUPPLY IMPORTANT The pressure of the water supply coming out of a reverse osmosis system going to the wa...

Страница 10: ...NG DIMENSIONS The location must permit both doors to open to a minimum of 90 Allow 4 11 4 cm minimum space between the side of the refrigerator and a corner wall NOTE More clearance may be required if...

Страница 11: ...AINLESS STEEL PANEL KIT INSTALLATION REQUIREMENTS Refer instructions received with full height door panel kit CUSTOM WOOD PANEL DIMENSIONS AND INSTALLATION REQUIREMENTS Refer instructions received wit...

Страница 12: ...d then lower the right hand side of the refrigerator to the floor 4 Reassemble the trim and top grille after the dolly has been removed from the refrigerator INSTALL ANTI TIP BOARDS IMPORTANT If a sol...

Страница 13: ...g to shutoff valve flush the main water supply line to remove particles and air in the water line Allow enough flow so that water becomes clear Flushing the water line may help avoid filters and or wa...

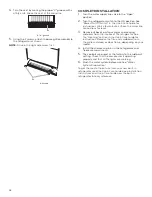
Страница 14: ...djustable wrench Do not overtighten the clamp or the sleeve This will crush the copper tubing 8 Turn off the shutoff valve on the water pipe Coil the copper tubing 9 Connect the flexible codes approve...

Страница 15: ...the adjacent cabinets There is a trim piece taped to each side of the refrigerator Install each trim piece to the side of the refrigerator to which it is taped 1 Remove the tape attaching the trim pie...

Страница 16: ...panels and adjacent cabinets NOTE The installation block is designed to provide accurate spacing for 3 4 1 9 cm 3 8 9 53 mm and 1 8 3 18 mm 1 Place top of cardboard carton or plywood under refrigerato...

Страница 17: ...still flush INSTALL PANELS Refer instructions received with full height door panel kit Armoire kit to install stainless steel Custom Wood Overlay Panels IMPORTANT JennAir is not responsible for the r...

Страница 18: ...packing materials from the interior of the refrigerator See the Cleaning section in the Use Care Guide for instructions Remove the film and cardboard from the grille and doors or door frame depending...

Страница 19: ...Assurez vous de toujours lire tous les messages de s curit et de vous y conformer AVERTISSEMENT DANGER Voici le symbole d alerte de s curit Ce symbole d alerte de s curit vous signale les dangers pot...

Страница 20: ...s de base JS42NXFXDE Num ros de mod le d ensemble de panneaux JBSFS42NHL ACCESSOIRES Toutes les pi ces d usine sont disponibles chez votre marchand JennAir ou en appelant JennAir au 1 800 JENNAIR 1 80...

Страница 21: ...XDE Num ros de mod le d ensemble de panneaux JBSFS48NHL ACCESSOIRES Toutes les pi ces d usine sont disponibles chez votre marchand JennAir ou en appelant JennAir au 1 800 JENNAIR 1 800 536 6247 Au Can...

Страница 22: ...pour ensemble de panneaux pour des informations sur l ensemble de panneaux Tuyau d alimentation en eau flexible approuv par les codes en vigueur virole raccord et raccord de compression de 1 4 po 6 35...

Страница 23: ...lacement d installation doit permettre la d pose de la grille sup rieure Voir la section Dimensions de l ouverture d encastrement DIMENSIONS DE L OUVERTURE IMPORTANT La largeur de l ouverture d encast...

Страница 24: ...V CA 60 Hz reli la terre et prot g par un fusible de 15 A ou 20 A est requis Il est recommand d utiliser un circuit distinct pour alimenter le r frig rateur uniquement Utiliser une prise de courant d...

Страница 25: ...our faire fonctionner le distributeur d eau et la machine gla ons Pour toute question au sujet de la pression de l eau faire appel un plombier qualifi agr ALIMENTATION EN EAU PAR OSMOSE INVERSE IMPORT...

Страница 26: ...lacement d installation doit permettre l ouverture des deux portes un angle minimal de 90 Laisser un espace libre d au moins 4 po 11 4 cm entre le c t du r frig rateur et un mur d angle REMARQUE Un d...

Страница 27: ...NEAUX EN ACIER INOXYDABLE Consulter les instructions re ues avec l ensemble de panneaux de porte pleine grandeur EXIGENCES D INSTALLATION ET DIMENSIONS DES PANNEAUX DE BOIS PERSONNALIS S Consulter les...

Страница 28: ...ncher 4 R installer la garniture et la grille sup rieure apr s avoir retir le chariot du r frig rateur INSTALLATION DE PLANCHES ANTIBASCULEMENT IMPORTANT Si aucun soffite massif n est disponible une p...

Страница 29: ...t d arr t rincer la canalisation d eau principale pour liminer l air et les d bris qui s y trouvent Laisser s couler une quantit d eau suffisante jusqu ce qu elle soit limpide Le rin age de la canalis...

Страница 30: ...s serrer excessivement la bride ou la bague Ceci provoquera l crasement du tube de cuivre 8 Fermer le robinet d arr t de la canalisation d eau Lover le tube de cuivre 9 Raccorder la canalisation flexi...

Страница 31: ...space entre le r frig rateur et les armoires adjacentes Une garniture est fix e par ruban adh sif l int rieur du r frig rateur Installer chaque garniture sur le c t du r frig rateur auquel elle est fi...

Страница 32: ...assurer un espacement pr cis de 3 4 po 1 9 cm 3 8 po 9 53 mm et 1 8 po 3 18 mm 1 Placer le dessus du carton ou du contreplaqu sous le r frig rateur Retirer le chariot 2 Replacer le r frig rateur en li...

Страница 33: ...rieur 50 lb po 5 65 Nm Les pieds de r glage de l aplomb peuvent tre d ploy s un maximum de 1 po 3 18 cm au dessous des roulettes 4 Apr s avoir tabli l aplomb du r frig rateur utiliser de nouveau une...

Страница 34: ...la canalisation d eau la position Ouverte 2 Tourner le commutateur du r frig rateur la position ON marche Voir la section Interrupteur d alimentation marche arr t dans le Guide d utilisation et d ent...

Страница 35: ...35...
Страница 36: ...2019 JennAir All rights reserved Used under license in Canada Tous droits r serv s Utilis sous licence au Canada 07 19 W10779523B...

Отзывы: