background image

15

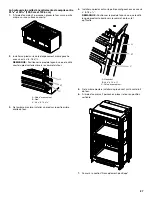
5. The bottom vent and bottom vent trim (required when the 

oven is installed with the feet in the tall position) are shipped 
in the foam packing at the top of the oven. 

To install only the bottom vent, see the following instructions. 
To install both the bottom vent and the bottom vent trim for 
installations with the feet in the tall position, see the 
instructions in Step 6.

Align vent tab (B) with oven frame (A) as shown.

Using one #8-18 x 

³⁄₈

" screw (D) on each side of the vent 

tab (B), fasten the vent securely to the oven.

6. On models with the feet installed in the tall position, the 

bottom vent trim must also be installed. See the following 
instructions to install.

Flex the upper vent piece (C) away from the lower vent 
piece (D) to slide the bottom vent trim (B) between them. 
Some force may be required to flex the upper vent trim (C) 
away from the lower vent trim (D). Some force may also 
be required to flex the bottom vent trim (B) and slide it 
into position. Make sure screw holes are properly aligned 
between the two pieces. See the following illustration. 

Install the bottom vent trim (B) to the lower vent piece (D) 
using two #8-18 x 

¹⁄₄

" screws on each side.

NOTE: On 27" (68.6 cm) models, only one #8-18 x 

¹⁄₄

" screw is 

used on each side.

Align vent tab (B) with oven frame (A) as shown.

Using one #8-18 x 

³⁄₈

" screw (E) on each side of the vent 

tab (B), fasten the vent securely to the oven.

7. Replace the oven racks.

8. Replace the oven door. See the “Replace Oven Door(s)” 

section.

9. Check that the door is free to open and close. If it is not, 

repeat the removal and installation procedures. See the 
“Prepare Built-In Oven” section.

10. Repeat for lower oven door.

11. Reconnect power.

12. The display panel will light briefly, and “PF” should appear in 

the display.

13. If the display panel does not light, reference the “Warranty” 

section of the Use and Care Guide.

Install Warming Drawer Deflector Kit (Only 

for Ovens Installed Above Warming 

Drawers)

On single and double oven models installed above a warming 
drawer, a warming drawer deflector kit must be installed. See the 
“Tools and Parts” section for information on ordering.

Parts Supplied in Deflector Kit

A. Oven frame
B. Vent tab

C. Oven vent
D. #8-18 x 

³⁄₈

" screws

A. #8-18 x 

¹⁄₄

" screw

B. Bottom vent trim

C. Upper vent piece
D. Lower vent piece

A

C

D

B

D

B

A

C

B

D

C

A. Oven frame
B. Vent tab

C. Oven vent

D. Bottom vent trim

E. #8-18 x 

³⁄₈

" screw

A. Phillips head screws (4)

only 2 screws for 27" (68.6 cm) size

B. Warming drawer deflector (1)

A

C

D

B

E

B

A

Содержание JJW2427DS

Страница 1: ...ns Installed Above Warming Drawers 15 Complete Installation 16 S CURIT DU FOUR ENCASTR 17 EXIGENCES D INSTALLATION 17 Outillage et pi ces 17 Exigences d emplacement 18 Sp cifications lectriques 21 INS...

Страница 2: ...0 76 2 cm kit Order Part Number W10752681A for black 30 76 2 cm kit Order Part Number W10752683A for stainless steel 30 76 2 cm kit To order see the Assistance or Service section of the Use and Care G...

Страница 3: ...lbs 70 kg for 30 76 2 cm models Floor must be able to support a double oven weight of 251 lbs 114 kg for 27 68 6 cm models or 288 lbs 131 kg for 30 76 2 cm models IMPORTANT To avoid damage to your cab...

Страница 4: ...tertop C 5 13 3 cm bottom of cutout to floor D 28 72 4 cm cutout width E 28 71 2 cm min cutout height A B C D E 27 68 6 cm models A 27 68 6 cm min cabinet width B 2 5 5 cm top of cutout to bottom of u...

Страница 5: ...from back of control panel to start of strain relief G 66 167 6 cm flexible conduit length C B A E D G F 27 68 6 cm models A 27 68 6 cm min cabinet width B 2 5 5 cm top of cutout to bottom of upper ca...

Страница 6: ...at 240 volts 5 4 to 7 4 kW at 208 volts require a separate 40 amp circuit Models rated at 4 8 kW and below at 240 volts 3 6 kW and below at 208 volts require a separate 20 amp circuit A circuit break...

Страница 7: ...ocate the oven door hinge locks in both corners of the oven door and then rotate the hinge locks toward the oven door to the unlocked position If the door hinge lock is not rotated fully see illustrat...

Страница 8: ...r locked position 6 Close the oven door 7 When the hinges are properly installed and the door closed there should be an even gap between the door and the control panel If one side of the oven door is...

Страница 9: ...rical Connection section Cutout Height is Between 28 and 29 72 8 cm and 74 8 cm 1 Using 2 or more people place the oven on its back on a covered surface 2 Remove the foot from the right front spacer b...

Страница 10: ...talled in a cutout height between 48 and 52 124 1 cm and 132 6 cm Refer to the following instructions to position the feet for the size of your cabinet cutout Cutout Height is Between 48 50 124 1 cm a...

Страница 11: ...n the same manner install a foot on the right rear of the oven 4 Install a front foot on the left front spacer using a 8 18 x screw NOTE Position the foot so the long side of the foot is facing toward...

Страница 12: ...en 3 In the same manner install a foot on the right rear of the oven 4 Install a front foot on the left front using a 8 18 x screw NOTE Position the foot so the long side of the foot is facing toward...

Страница 13: ...wires C together using a UL listed wire connector 3 Untwist white wire from green or bare ground wire coming from the oven 4 Connect the 2 white wires F together using a UL listed wire connector 5 Co...

Страница 14: ...en into the cabinet Do not push against the outside edges 2 Push against the seal area of the front frame to push the oven into the cabinet until the back surface of the front frame touches the front...

Страница 15: ...ing two 8 18 x screws on each side NOTE On 27 68 6 cm models only one 8 18 x screw is used on each side Align vent tab B with oven frame A as shown Using one 8 18 x screw E on each side of the vent ta...

Страница 16: ...3 Dispose of recycle all packaging materials 4 For oven use and cleaning read the Use and Care Guide Check Operation of Single and Double Ovens 1 Turn on power 2 At first use set up the clock and any...

Страница 17: ...de 30 76 2 cm Commander la pi ce W10752681A pour l ensemble noir de 30 76 2 cm Commander la pi ce W10752683A pour l ensemble en acier inoxydable de 30 76 2 cm Pour commander voir la section Assistanc...

Страница 18: ...our les mod les de 30 76 2 cm Le plancher doit pouvoir supporter le poids d un four double de 251 lb 114 kg pour les mod les de 27 68 6 cm ou 288 lb 131 kg pour les mod les de 30 76 2 cm IMPORTANT Afi...

Страница 19: ...ur de l ouverture d coup e 28 72 4 cm E Hauteur de l ouverture d coup e 28 71 2 cm min A B C D E Mod les de 27 68 6 cm A Largeur du placard 27 68 6 cm min B 2 5 5 cm entre le sommet de l ouverture d c...

Страница 20: ...F Mod les de 27 68 6 cm A Largeur du placard 27 68 6 cm min B 2 5 5 cm entre le sommet de l ouverture d coup e et la porte du placard sup rieur C 14 37 5 cm entre le bas de l ouverture d coup e et le...

Страница 21: ...endant de 40 A Un mod le de 4 8 kW ou moins 240 volts 3 6 kW ou moins 208 volts doit tre aliment par un circuit ind pendant de 20 A On recommande d utiliser un disjoncteur Raccorder l appareil directe...

Страница 22: ...t aussi utiliser les corni res de l emballage 2 Ouvrir la porte du four 3 Identifier les loquets de charni re de la porte du four dans les deux angles de la porte faire pivoter les loquets de charni r...

Страница 23: ...soit compl tement ouverte Si la porte du four ne s ouvre pas compl tement un angle de 90 r p ter les tapes 1 3 5 Identifier les loquets de charni re de la porte du four dans les angles de la porte fa...

Страница 24: ...ent lectrique La hauteur de la cavit d encastrement est comprise entre 26 et 27 68 4 cm et 70 3 cm 1 l aide d au moins 2 personnes placer le four sur sa partie arri re sur une surface couverte 2 Retir...

Страница 25: ...ur en position verticale 7 Passer la section Raccordement lectrique Fours doubles En modifiant le positionnement des pieds du four on peut installer un four double dans une cavit d encastrement d une...

Страница 26: ...t du four 3 De la m me mani re installer un pied sur la partie arri re droite du four 4 Installer un pied avant sur la cale d espacement avant gauche avec une vis n 8 18 x REMARQUE Positionner le pied...

Страница 27: ...du four 3 De la m me mani re installer un pied sur la partie arri re droite du four 4 Installer un pied avant sur la partie avant gauche avec une vis n 8 18 x REMARQUE Positionner le pied de fa on ce...

Страница 28: ...erminer l installation correspondant votre type de raccordement lectrique Tableau des options de raccordement lectrique Fours doubles Fours simples AVERTISSEMENT Risque de choc lectrique D connecter l...

Страница 29: ...codes locaux autorisent un tel raccordement 1 Connecter ensemble les 2 conducteurs noirs C avec un connecteur de fils homologation UL 2 Connecter les 2 conducteurs blancs D et le conducteur vert ou n...

Страница 30: ...vis 5 L vent inf rieur et la garniture de l vent inf rieur n cessaires lorsque le four est install avec les pieds en position haute sont livr s dans l emballage en mousse situ sur le dessus du four P...

Страница 31: ...vement et PF devrait appara tre sur l affichage 13 Si le tableau d affichage ne s allume pas consulter la section Garantie du guide d utilisation et d entretien Installationdel ensembleded flecteurdu...

Страница 32: ...ou LOWER BROIL cuisson au gril four inf rieur 4 R gler la temp rature 5 Appuyer sur START mise en marche Si le s four s ne fonctionne nt pas contr ler ce qui suit Les fusibles du domicile sont intact...

Отзывы: