background image

U

SING

 Y

OUR

 C

OOKTOP

 S

URFACE

 C

ONTROLS

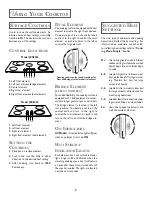
3

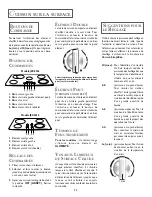
Use to turn on the surface elements.  An
infinite choice of heat settings is available
from 

Lo

 to 

Hi

.  The knobs can be set on or

between any of the settings.

C

ONTROL

 L

OCATIONS

1.

Left front element

2.

Left rear element

3.

Right rear element

4.

Right front element (dual element)

D

UAL

 E

LEMENT

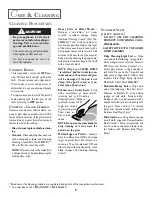
The cooking surface is equipped with a dual
element located in the right front position.
To operate, push in on the control knob
and turn to the right to control the small
element, or push in and turn to the left to
control the large element.

S

UGGESTED

 H

EAT

S

ETTINGS

The size, type of cookware and cooking
operation will affect the heat setting.  For
information on cookware and other fac-
tors affecting heat settings, refer to 

“Cook-

ing Made Simple”

 booklet.

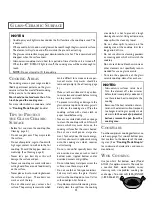
Hi:

Use to bring liquid to a boil.  Always
reduce setting to a lower heat when
liquids begin to boil or foods begin
to cook.

6-8:

(medium high) Use to brown meat,
heat oil for deep fat frying or saute-
ing. Maintain fast boil for large
amounts of liquids.

4-6:

(medium) Use to maintain slow boil
for large amounts of liquids and for
most frying operations.

2-4:

(medium low) Use to continue cook-
ing covered foods  or steam foods.

Lo:

(low) Use to keep foods warm and
melt chocolate and butter.

1.

Left front element

2.

Left rear element (bridge element)

3.

Center element

4.

Right rear element

5.

Right front element (dual element)

Model JEC8536

Model JEC8430

HI

LO

8

2

6

4

OFF

HI

LO

HI

LO

8

OFF

2

4

2

4

6

B

RIDGE

 E

LEMENT

(

SELECT


MODELS

)

For added flexibility, the cooking surface is
equipped with a bridge element to accom-
modate longer gourmet pans and skillets.
The bridge element is located in the left
rear position. To operate, push in on the
control knob and turn to the right to
control the small element, or push in and
turn to the left to control the bridge ele-
ment.

S

ETTING


THE

C

ONTROLS

1.

Place pan on surface element.

2.

Push in and turn the knob in either
direction to the desired heat setting.

3.

After cooking, turn knob to 

OFF

.

Remove pan.

O

N

 I

NDICATORS

All Models 

 - A red indicator light will glow

when any element is turned 

ON

.

H

OT

 S

URFACE

I

NDICATOR

 L

IGHTS

Each element has a hot surface indicator
light. A light will be illuminated when the
matching cooking area is hot. It will remain
on, even after the control is turned off, until
the area has cooled. The lights are located
near the control knobs.

Drawing shows control knob markings for
Dual and Bridge (select models) elements

Содержание JEC8430ADS

Страница 1: ...o A 08 02 Part No 8111P441 60 74007265 2002 Maytag Appliances Sales Co Litho U S A Important Safety Instructions 1 2 Using Your Cooktop 3 4 Care Cleaning 5 Before You Call for Service 6 Warranty 7 Gui...

Страница 2: ...g conventional cookware Do not use any devices or accessories that are notspecificallyrecommendedinthismanual Do not use eyelid covers or stove top grills The use of devices or accessories that are no...

Страница 3: ...P FAT FRYERS Use extreme caution when moving the grease panordisposingofhotgrease Allowgreaseto cool before attempting to move pan HEATING ELEMENTS NEVERtouchsurfaceelementsorareas near elements Heati...

Страница 4: ...rations 2 4 mediumlow Usetocontinuecook ing covered foods or steam foods Lo low Use to keep foods warm and melt chocolate and butter 1 Left front element 2 Left rear element bridge element 3 Center el...

Страница 5: ...h can be difficult to remove or leave per manent marks Any marks should be removed promptly See Cleaning page 5 Make sure the surface and the pan bot tomarecleanandsmoothbeforeturning on to prevent sc...

Страница 6: ...FF posi tion Pull each knob straight up from the shaft Do not remove seal under knob Wash knobs in warm soapy water or dishwasher do not use abrasive cleaners or materials To replace each knob match f...

Страница 7: ...OU CALL FOR SERVICE GLASS CERAMIC SURFACE SHOWS WEAR 1 Tiny scratches or abrasions Make sure cooktop and pan bottom are clean Do not slide glass or metal pans across top Make sure pan bottom is not ro...

Страница 8: ...llowing a Improper installation delivery or maintenance b Any repair modification alteration or adjustment not authorized by the manufacturer or an authorized servicer c Misuse abuse accidents or unre...

Страница 9: ...SSON LECTRIQUES JENN AIR GUIDE DE L UTILISATEUR GUIDE DE L UTILISATEUR Instructions de s curit importantes 9 10 Cuisson sur la surface 11 13 Entretien et nettoyage 14 Avant de contacter un r parateur...

Страница 10: ...ES PARAGRAPHES ET SYMBOLES SUR LA S CURIT AVERTISSEMENT Dangers ou pratiques dangereuses qui POURRAIENT r sulter en de graves blessures ou m me la mort ATTENTION Dangers ou pratiques dangereuses qui P...

Страница 11: ...e l appareil ou sa perfor mance ou r duire la long vit des composants NEJAMAISutiliserdefeuilled aluminiumoudes contenants en aluminium sur la table de cuisson Ilspeuventdevenirtr schauds Utiliserseul...

Страница 12: ...la plupart des op rations de friture 2 4 puissance moyenne basse Pour continuer la cuisson de mets en casseroles ferm es par couvercle ou pour cuire la vapeur Lo min puissance basse Pour fusion de ch...

Страница 13: ...k entre un r cipient et la table de cuisson Ces objets peuvent marquer ou rayer la surface Ne pas glisser de r cipients m talliques sur la table de cuisson br lante Ils pourraientlaissersurleverredesm...

Страница 14: ...ARQUES USTENSILES Pour obtenir des performances de cuisson maximum utiliserdesr cipients fondplat lisse et pais de m me diam tre que l l mentdecuisson VoirdansLaCuisson Simplifi e les recommandations...

Страница 15: ...n linge souple et une ponge Rincer et s cher Pour polir et enlever les marques de doigts faire suivre par une pulv risation de produit pour acier inoxydable Magic Spray Jenn Air mod le A912 produit n...

Страница 16: ...Veiller ce que la surface de la table de cuisson et le fond des ustensiles soient toujours propres Ne pas faire glisser un ustensile de verre ou de m tal sur la surface Veiller ce que le fond de l ust...

Страница 17: ...REMARQUES 16...
Страница 18: ...d Description claire du probl me observ e Preuve d achat facture de vente Les guides d utilisation les manuels de service et les renseignements des pi ces sontdisponiblesaupr sdeMaytagAppliancesSales...

Страница 19: ...R CUBIERTAS DE COCCI N EL CTRICAS JENN AIR GU A DEL USUARIO Instrucciones Importantes sobre Seguridad 19 21 Cocinando en la Cubierta 22 24 Cuidado y Limpieza 25 Antes de Solicitar Servicio 26 Garant a...

Страница 20: ...cendio o la llama INSTRUCCIONES GENERALES Si el electrodom stico est instalado cerca de una ventana se deben tener cuidado para evitar que las cortinas pasen sobre los quemadores NUNCA use este electr...

Страница 21: ...ente como para causar quemaduras Durante y despu s del uso no toque ni deje que las ropas u otros materiales inflamables entren en contacto con los elementos calefactores con las reas cerca de los ele...

Страница 22: ...el filtro y tambi n para evitar incendios de grasa Encienda el ventilador cuando flamee alimentos talescomocerezasflamb debajo de la campana AVISO Y ADVERTENCIA IMPORTANTE SOBRE SEGURIDAD AVISO IMPORT...

Страница 23: ...apados o para cocinar al vapor Lo Seutilizaparamantenerlosalimentos calientes y derretir chocolate y mantequilla 1 Elemento delantero izquierdo 2 Elemento trasero izquierdo elemento puente 3 Elemento...

Страница 24: ...o deslice utensilios de metal a trav s de la cubierta caliente Los utensilios pueden dejar marcas que pueden ser dif ciles de sacar o dejar marcas permanentes Cualquier marca debe ser limpiada inmedia...

Страница 25: ...cabado antiadherente asas de madera tapa parrilla para cocci n al vapor paletas para arroz consejos y recetas Parahacerunpedidollameal1 800 JENNAIR 1 800 536 6247 Lascubiertasdevidriocer micoretienen...

Страница 26: ...ad cubriendo la toalla de papel con envolturadepl stico Restrieguenuevamente y luego lustre con un pa o limpio y seco NOTA Use solamente una esponja LIMPIA HUMEDA quenomarque que sea segura para utens...

Страница 27: ...SUPERFICIE DE VIDRIO CER MICO MUESTRA DESGASTE 1 Ralladuras o abrasiones peque as Aseg rese de que la cubierta y el fondo del utensilio est n limpios No deslice utensiliosdevidrionidemetalatrav sde la...

Страница 28: ...Cer mico Debido a rotura t rmica Elementos Calefactores El ctricos Elemento del asador en las estufas el ctricas Residentes Canadienses Las garant as anteriores cubren solamente aquellos electrodom st...

Отзывы: