background image

I

NSTALLATION

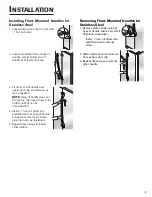
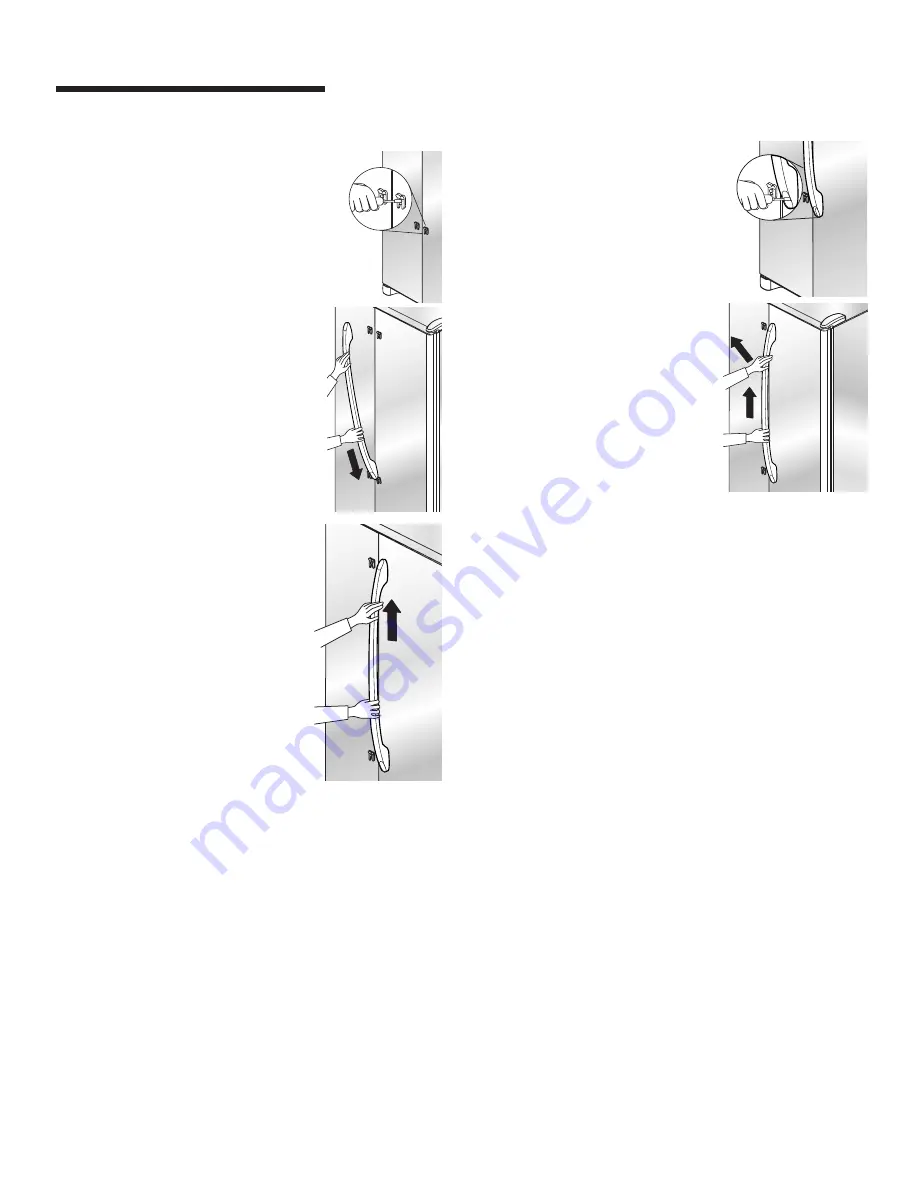
Installing Front-Mounted Handles for
Stainless Steel

1. Loosen lower door clip on door with

1

4

" hex nut driver.

2. Locate predrilled hole at base of

handle, and fit hollow end of
handle over lower door clip.

3. Fit other end of handle over

upper door clip and slide up as
far as possible.

NOTE: 

If top of handle does not

fit over top clip, loosen lower clip
further until fit can be
accomplished.

4. Insert 

1

4

" hex nut driver into

predrilled hole at base of handle
to tighten screw. Insert screw
plug into hole, as illustrated.

5. Repeat above steps to install

other handle.

Removing Front-Mounted Handles for
Stainless Steel

1. Remove plastic button plug at

base of handle with a very small
flat-blade screwdriver.

• Insert 

1

4

" hex nut driver into

predrilled hole to remove
screw.

2. Slide handle down and remove

from bottom door clip.

3. Repeat above steps to remove

other handle.

8

Содержание JCD2295KEP

Страница 1: ...tion 3 9 Temperature Controls 10 12 Fresh Food Features 13 15 Freezer Features 16 Ice and Water 17 19 Water Filter 20 22 Food Storage Tips 23 25 Care and Cleaning 26 29 Operating Sounds 30 Troubleshooting 31 35 Warranty and Service 37 Guide d utilisateur et d entretien 38 Guía de Uso y Cuidado 76 J E N N A I R S I D E B Y S I D E R E F R I G E R A T O R USE CARE GUIDE ...

Страница 2: ...ese numbers below for easy access Model Number _______________________________ Serial Number ________________________________ Date of Purchase______________________________ In our continuing effort to improve the quality and performance of our appliances it may be necessary to make changes to the appliance without revising this guide This appliance is equipped with a three prong grounding plug for...

Страница 3: ...re Guide or published user repair instructions Do not attempt service if instructions are not under stood or if they are beyond personal skill level 13 Always disconnect refrigerator from electrical supply before attempting any service Disconnect power cord by grasping the plug not the cord 14 Install refrigerator according to Installation Instructions All connections for water electrical power an...

Страница 4: ...side If an upright position is not possible lay refrigerator on its back Allow refrigerator to sit upright for approximately 30 minutes before plugging it in to assure oil returns to the compressor Plugging refrigerator in immediately may cause damage to internal parts Glass Panel Doors select models To avoid possible injury product or property damage observe the following When working directly on...

Страница 5: ...nt Tape decorative panels select models securely into place before removing door handles WARNING To avoid property damage observe the following Protect vinyl or other flooring with cardboard rugs or other protective material prior to moving refrigerator Do not adjust refrigerator to be any shorter than 681 2 tall minus hinge and cap Doing so may damage underside components CAUTION Door and Hinge R...

Страница 6: ... Note Add 8 to tubing length needed to reach water supply for creation of service loop Connecting the Water Supply select models To avoid property damage or possible injury follow basic precautions including the following Consult a plumber to connect 1 4 O D copper tubing to household plumbing to assure compliance with local codes and ordinances Confirm water pressure to water valve is between 35 ...

Страница 7: ... door tabs 4 Rotate the handle so that the handle is flat against the door 5 Push the handle down against the upper door tab just enough to allow it to hang unsupported Handle Clip Door Tab 6 Align bottom of handle with lower door tab Press upper handle end to door surface and firmly grasp lower end of handle Gently slide handle upward until bottom of handle settles on door surface then reverse di...

Страница 8: ...ease 3 Repeat instructions 1 2 to remove other handle To Reinstall 1 Repeat in reverse order Door Clip Handle Extensions select models To Install Align and clip handle extension into position on the handle Press the extension over the door retainers To Remove Slide the extension down and unclip from door retainer Euro Handles This handle style is installed at the factory Materials Needed 3 32 alle...

Страница 9: ...top clip loosen lower clip further until fit can be accomplished 4 Insert 1 4 hex nut driver into predrilled hole at base of handle to tighten screw Insert screw plug into hole as illustrated 5 Repeat above steps to install other handle Removing Front Mounted Handles for Stainless Steel 1 Remove plastic button plug at base of handle with a very small flat blade screwdriver Insert 1 4 hex nut drive...

Страница 10: ...ng roller adjustment screw counterclockwise Check with level to verify 1 4 tilt to the back for proper door closure If refrigerator is aligned and stable replace toe grille and hinge covers 7 Replace hinge cover s Position cover into the outer edge of the hinge Swing the cover toward the cabinet and snap it into place 8 Replace the toe grille A B A B 4 Turn both rear adjustment screws B clockwise ...

Страница 11: ...engthy door openings Adjusting the Controls 24 hours after adding food you may decide that one or both compartments should be colder or warmer If so adjust the control s as indicated in the Temperature Control Guide table below See page 23 for instructions on checking compartment temperature Except when starting the refrigerator do not change either control more than one number at a time Allow 24 ...

Страница 12: ...lapsed since the filter was installed A new filter should be installed immediately when the Replace light is illuminated After replacing the filter press and hold the Reset Filter pad for three seconds The Order and Replace lights will go off Vacation Mode The Vacation Mode feature causes the freezer to defrost less frequently conserving energy The Vacation Mode indicator light will illuminate whe...

Страница 13: ...nces mode a short title for the feature will appear in the Freezer temperature display and the feature status will appear in the Fresh Food display 1 Use the Freezer up and down control to scroll through the features 2 When the desired feature is displayed use the Fresh Food up and down control to change the status 3 When changes are complete press the Door Alarm pad for three seconds OR close the...

Страница 14: ...cked scratched or exposed to sudden temperature change CAUTION To Slide Out Elevator Shelf Grasp the front of the shelf and pull forward Push the shelf in to return to original position To Adjust the Elevator Shelf Pull out the knob on the crank handle Rotate the crank clockwise to raise the shelf and counterclockwise to lower the height of the shelf To Remove Elevator Shelf Completely unload the ...

Страница 15: ...oks are firmly seated on the door liner Door Storage ChillKeeper select models The ChillKeeper keeps beverages and other items colder than the rest of the fresh food compartment An air inlet directs air from the freezer into the chiller Controls The chiller control is located on the left side wall of the fresh food compartment Turn the control clockwise for colder temperature To Remove ChillKeeper...

Страница 16: ...ean damp cloth The Automatic Humidity Control system features a unique patented material called Shape Memory Polymer SMP that when laminated to fabric becomes DIAPLEX DIAPLEX is manufactured by Mitsubishi To Remove Drawer Pull drawer out to full extension Tilt up front of drawer and pull straight out To Install Drawer Insert drawer into frame rails and push back into place Storage Drawers Humidity...

Страница 17: ...e Pull out to its full extension Lift up front of basket and remove To Install Slide basket or drawer into cabinet railing Lift up front of basket or drawer and slide to the back of refrigerator Ice Storage Bin select models The Ice Storage Bin is located below the automatic ice maker To Remove Raise ice maker arm to deactivate ice maker Lift front of bin and pull out to its full extension Lift up...

Страница 18: ...ice level or gain access to the ice bin lift open the door on the ice bin After freezer section reaches between 0 to 2 F 18 to 17 C ice maker fills with water and begins operating You will have a complete harvest of ice approximately every three hours Allow approximately 24 hours after installation to receive first harvest of ice Discard ice created within first 12 hours of operation to verify sys...

Страница 19: ...g Do not put fingers hands or any foreign object into dispenser opening Do not use sharp objects to break ice Do not dispense ice directly into thin glass fine china or delicate crystal CAUTION To Use Dispenser Pad Choose water selection from dispenser control panel Press sturdy wide mouthed container against dispenser pad When dispensing crushed ice hold container as close to chute as possible to...

Страница 20: ...ndicator light above button illuminates when the sensor is active To Deactivate Auto Light Press Auto Light button The green indicator light will go out Notes Mode may not be changed while ice dispenser is in operation If dispenser is active for more than five minutes an automatic lock out sensor will shut down power to dispenser area See Dispenser Lock for unlocking information Note When the disp...

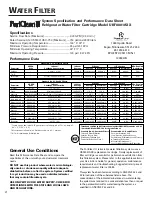
Страница 21: ...nto filter head 3 Rotate gently clockwise until filter stops Snap filter cover closed 4 Reduce water spurts by flushing air from system Run water continuously for two minutes through dispenser until water runs steady During initial use allow about a one to two minute delay in water dispersal to allow internal water tank to fill Additional flushing may be required in some households where water is ...

Страница 22: ...s Taste and Odor Reduction Chlorine Taste Odor Mechanical Filtration Unit Particulate Reduction Class 1 Standard No 53 Health Effects Chemical Reduction Unit Lead Atrazine Lindane Benzene Carbofuran p Dichlorobenzene Mercury Toxaphene Reduction Mechanical Filtration Unit Cyst Turbidity and Asbestos Reduction Tested and certified by NSF International against ANSI NSF Standards 42 53 in models UKF80...

Страница 23: ...ements pursuant to Section 116830 of the Health and Safety Code for the following health related contaminants Microbiological Contaminants and Turbidity Inorganic Radiological Contaminants Cysts Asbestos Turbidity Lead Mercury Organic Contaminants Atrazine Lindane Benzene Carbofuran p dichlorobenzene Toxaphene Rated Service Capacity 750 gal Rated Service Flow 0 78 gpm Conditions of Certification D...

Страница 24: ...eese cream sour cream or yogurt when mold appears Dairy Food Most dairy foods such as milk yogurt sour cream and cottage cheese have freshness dates on their cartons for appropriate length of storage Store these foods in the original carton and refrigerate immediately after purchasing and after each use Frozen Food Storage The freezer compartment of a refrigerator should be kept at approximately 0...

Страница 25: ...ommended 9 to 12 months 8 months cooked 6 months whole peeled Not recommended 6 months 1 month whole Not recommended 6 to 12 months STORAGE TIPS Wrap tightly or cover Check carton date Close tightly Don t return unused portions to original container Don t freeze cream unless whipped Wrap tightly Store in original carton Check carton date Store in original carton Check carton date Wrap tightly Cut ...

Страница 26: ...ays 7 days FREEZER 8 to 10 months 8 to 10 months Not recommended 8 to 10 months Not recommended 12 months 9 months 2 to 6 months 1 month 3 to 4 months 6 to 9 months 1 to 2 months 1 to 2 months 1 to 2 months 1 to 2 months 4 to 6 months 4 months 1 to 2 months 1 to 2 months 4 to 6 months 1 month STORAGE TIPS Do not wash before refrigerating Store in crisper Wrap odorous foods Leave peas in pods Wrap ...

Страница 27: ...ed scouring pads Vinegar based products Citrus based cleaners DO Use 4 tablespoons of baking soda dissolved in 1 quart 1 liter warm soapy water Rinse surfaces with clean warm water and dry immediately to avoid water spots Use warm soapy water and a soft clean cloth or sponge Rinse surfaces with clean warm water and dry immediately to avoid water spots To polish and help prevent finger prints follo...

Страница 28: ...ed in the cleaning instructions every three months This will increase energy efficiency and cooling performance 1 Remove all food and turn the refrigerator OFF 2 Disconnect power to the refrigerator 3 Clean the walls floor ceiling of cabinet interior drawers shelves and gaskets according to the instructions see page 26 4 Dilute mild detergent and brush solution into crevices using a plastic bristl...

Страница 29: ...Section 1 Push up on bottom tabs on light cover Rotate cover up and release tabs 2 Remove light bulb 3 Replace bulb with appliance bulb no greater than 40 watts 4 Insert top tabs of light cover into liner slots and snap bottom tabs into liner slots Upper Freezer Section 1 Remove ice bin by lifting front of bin and pulling out 2 Remove light shield by pressing the upper right side of the shield and...

Страница 30: ...rigerator from its side or back never from its front Be sure the refrigerator stays in an upright position during moving If your refrigerator has a dispenser and there is any possibility that the temperature can drop below freezing where the refrigerator is located the water supply system including the water tank and the water valve must be drained by a qualified servicer CAUTION For short vacatio...

Страница 31: ...ect models B sounds like an electric clock and snaps in and out of defrost cycle Condenser fan D makes this noise while operating Freezer fan C makes this noise while operating Freezer fan C slows to a stop as the freezer door is opened Evaporator E and heat exchanger F refrigerant make this noise when flowing Ice cubes from ice maker drop into ice bucket G Dispenser ice chute H closing Compressor...

Страница 32: ... adjust controls See page 16 to verify drawer positioning Plug in refrigerator See pages 10 11 and 12 to adjust controls Replace any blown fuses Check circuit breaker and reset if necessary Call local power company listing to report outage Unplug refrigerator and transfer food to another refrigerator If another refrigerator is not available place dry ice in freezer section to preserve food Warrant...

Страница 33: ...mal during times of high humidity See pages 10 11 and 12 to adjust controls Reduce time door is open Organize food items efficiently to assure door is open for as short a time as possible Clean according to the chart on page 26 See page 30 Reposition food items and containers to avoid interference with the drawers See page 16 for proper drawer placement See page 9 for details on how to level your ...

Страница 34: ... per square inch is recommended for refrigerators with water filters Change water filter see page 20 Wait 24 hours for ice production to begin or for ice maker to restock after emptied Low water pressure can cause valve to leak Water pressure must be between 35 to 100 pounds per square inch to function properly A minimum pressure of 35 pounds per square inch is recommended for refrigerators with w...

Страница 35: ... per square inch to function properly A minimum pressure of 35 pounds per square inch is recommended for refrigerators with water filters Open saddle valve completely See Temperature Controls pages 10 11 and 12 Freezer temperature should be between 0 to 2 F 18 to 17 C The manufacturer recommends using copper tubing for installation Plastic is less durable and can cause leakage The manufacturer is ...

Страница 36: ...ers Open saddle valve completely See Connecting the Water Supply pages 4 and 5 Self piercing and 3 16 saddle valves cause low water pressure and may clog the line over time The manufacturer is not responsible for property damage due to improper installation or water connection Turn off water supply and remove kinks If kinks cannot be removed replace tubing Change water filter see page 20 Open wate...

Страница 37: ...36 NOTES ...
Страница 38: ...f original purchase through the fifth year the manufacturer will repair or replace at its option free of charge for parts and labor only any part of the sealed refrigeration system consisting of the compressor evaporator condenser drier and connecting tubing and the cabinet liner exclusive of the door liner which fail in normal home use All other costs including mileage transportation trip charge ...

Отзывы: