background image

10

Default Values 

This resets all menu settings and programmed quantities back 

to the default values (with the exception of the language which 

remains as set). 

1. 

Press 

 to enter the menu. Press   or   until the display 

shows 

 DEFAULT VALUES. Press 

 . 

2. 

Press 

 RESET ALL to reset all profiles to the original 

parameters, otherwise select the required profile (e.g. User 1).

3. 

RETURN TO FACTORY SETTINGS? RESET ALL will display. 
Press 

OK

 to confirm or 

ESC

 to leave settings unaltered. 

4. 

FACTORY SETTINGS SET. Press 

OK

 to confirm. 

Customizing Beverages 

The strength and size of drinks can be customized. 

1. 

The profile that is needed to be customized needs to be 

active. A maximum of six profiles are available on the unit. You 

can only select one profile to set at a time. 

2. 

From the homepage, press 

MY

 . Choose the beverage you 

wish to customize in order to access the customizing screen, 
The relative accessories must be inserted. 

3. 

(Beverages with coffee only) CHOOSE COFFEE STRENGTH 
LEVEL will display. Select the required strength by pressing 

 or 

 and press 

OK

 . 

4. 

CUSTOMIZING COFFEE (OR FRESH WATER) SIZE, PRESS 
STOP TO SAVE will display. Preparation begins and the coffee 
system displays the size customizing screen in the form of a 
vertical bar. The star alongside the bar represents the current 
size set. 

5. 

When the amount reaches the minimum size you can set, the 
display shows 

STOP

 . Press 

STOP

 when the required 

quantity in the cup is reached. SAVE NEW SETTINGS? will 
display. Press YES or NO. 

6. 

The application confirms if the values have been saved or 
not (depending on the previous selection). Press 

OK

 . The 

coffee system goes back to the home page. 

NOTE:

 Milk based drinks; the coffee strength is saved first, 

followed by the quantity of milk, then coffee. 

Memorizing Your Personal Profile 

The coffee system allows you to memorize six different profiles, 

each associated with a different icon. In every profile the 

customized MY beverages STRENGTH and SIZE values are 

saved and the order in which all beverages are displayed is based 

on the frequency of selection. 
To select or enter a profile, press on the profile currently in use, 
press   or   until the required profile is displayed, then press on 
the profile. 

NOTE:

 Profile   GUEST: Select this profile to deliver beverages 

with the default settings. The 

MY

 function is not active.

Selecting Coffee Strength

Select the required strength from the homepage by pressing  

 STRENGTH. 

(See “Making Coffee using  

Pre-Ground Coffee”)

EXTRA LIGHT STRENGTH

LIGHT STRENGTH

MEDIUM STRENGTH

STRONG STRENGTH

EXTRA STRONG STRENGTH

CUSTOM STRENGTH (if programmed) / 
STANDARD STRENGTH

After delivering the beverage, the strength setting is reset to the  

MY

value. 

Making Coffee or Espresso Using 

Coffee Beans

IMPORTANT:

 Do not use green, caramelized or candied coffee 

beans as they could stick to the coffee mill and make it unusable. 

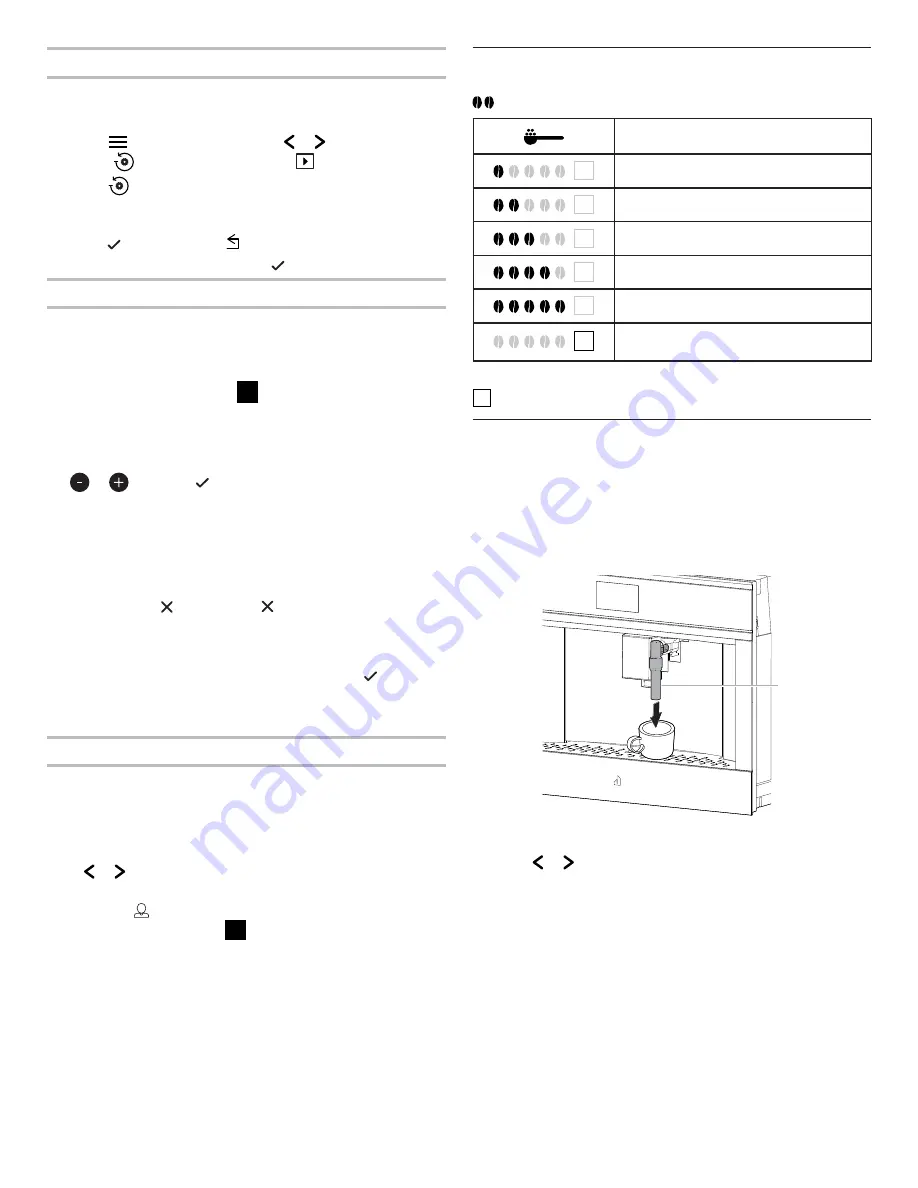
1. 

Fill the beans container with coffee beans. Place a cup under 

the coffee spout.

2. 

Lower the spout so that it is as near as possible to the cup. 

This helps achieve a better cream. 

3. 

Press   or   until the required coffee selection is displayed. 

Then select your required coffee from the home page: 

Espresso, , Coffee, Long, X2 Espresso or Americano. 

4. 

Preparation begins and the display shows the image of 

the selected beverage together with a progress bar which 

gradually fills as preparation proceeds. 

MY

MY

MY

MY

MY

MY

A

A.  Coffee spout

04-Mar-2019 07:49:57 EST | RELEASED

In some European factories the letter "W" of the part code mentioned herein will be automatically

replaced by the number "4000" (e.g. "W12345678" becomes "400012345678")

Содержание 400011325607A

Страница 1: ...jennair ca Guide d utilisation et d entretien Pour des questions propos des caract ristiques du fonctionnement rendement des pi ces accessoires ou d pannage composer le 1 800 JENNAIR 1 800 536 6247 ou...

Страница 2: ...offee Mill 11 Making Coffee using Pre Ground Coffee 12 Making Milk Based Hot Drinks 12 Delivering Hot Water 14 Steam Delivery 14 COFFEE SYSTEM CARE 14 General Cleaning 14 TROUBLESHOOTING 17 ASSISTANCE...

Страница 3: ...and personal injury do not immerse cord plugs or appliance in water or other liquids The appliance is not intended for use by young children or infirm persons without supervision Unplug from outlet w...

Страница 4: ...coffee funnel F Infuser G Coffee guide H Service door I Cup holder tray J Coffee grounds container K Drip tray L Coffee spouts adjustable height M Lights to illuminate cup N Hot water steam connectio...

Страница 5: ...th adjustment and CLEAN function dial B Lid release buttons C Thermal casing D Milk container E Milk intake tube F Adjustable frothed milk spout G Lid with milk frother Water filter not available on t...

Страница 6: ...e water tank 5 Place a container with a minimum capacity of 1 2 cup 100 mL underneath WATER CIRCUIT EMPTY PRESS OK TO START FILLING PROCESS will show on display Press OK to confirm 6 The coffee system...

Страница 7: ...l enable or disable tones that sound when an icon is pressed or an accessory is inserted removed 1 Press to enter the menu 2 Press or until the display shows BEEP 3 Press to enable or disable the soun...

Страница 8: ...ce when the display shows DESCALING NEEDED PRESS OK TO START 45 min To descale immediately press OK and follow the steps 1 REMOVE WATER FILTER will show on the display if present Remove the water filt...

Страница 9: ...E 3 Press Hola Bonjour Ciao Press or until the flag corresponding to the required language is shown and select it Press ESC twice to return to the home page Set Time 1 Press to enter the menu 2 Press...

Страница 10: ...first followed by the quantity of milk then coffee Memorizing Your Personal Profile The coffee system allows you to memorize six different profiles each associated with a different icon In every profi...

Страница 11: ...From the home page select the required size of coffee in the cup by pressing SIZE SMALL SIZE MEDIUM SIZE LARGE SIZE EXTRA LARGE SIZE CUSTOM SIZE if programmed STANDARD SIZE After delivering the bever...

Страница 12: ...one cup of coffee at a time While the coffee maker is making coffee delivery can be interrupted at any time by pressing STOP As soon as delivery has ended to increase the quantity of coffee in the cu...

Страница 13: ...pressing OK 4 After a few seconds preparation begins automatically and an image of the selected beverage appears on the display together with a progress bar which gradually fills as preparation progre...

Страница 14: ...frothed and immerse the hot water steam spout in the liquid 2 Select STEAM from the homepage The corresponding image appears on the display together with a progress bar which fills gradually as prepar...

Страница 15: ...Coffee Spouts Clean the coffee spouts regularly with a sponge or cloth Check that the holes in the coffee spouts are not blocked If necessary remove coffee deposits with a toothpick Cleaning the Pre...

Страница 16: ...cup or other recipient under the frothed milk spout 3 Turn the foam adjustment dial to CLEAN CLEANING MILK CONTAINER PLACE A CUP UNDER THE MILK OUTLET appears on the display together with a bar which...

Страница 17: ...ontainer is dirty Clean the milk container lid as described in the Cleaning the Milk Container section The infuser cannot be extracted The appliance has not been turned off correctly Turn the applianc...

Страница 18: ...the drip tray the grounds container must always be emptied even if it contains a few grounds If this is not done when you make the next coffees the grounds container may fill up more than expected an...

Страница 19: ...n while the coffee mill is in operation If after making at least two coffees delivery is still too slow repeat the correction procedure turning the grinding adjustment dial another click If the proble...

Страница 20: ...low fresh water to drain out of the spout the flow will stop itself automatically If the problem persists make sure the water tank is fully inserted PRESS OK TO START CLEANING PROCESS OR TURN MILK FRO...

Страница 21: ...described in the Descaling section needs to be performed as soon as possible Reminder that the tubes inside the milk container must be cleaned Turn the froth adjustment dial to CLEAN Reminder that the...

Страница 22: ...locate the JennAir designated service company in your area you can also look in your telephone directory Yellow Pages For further assistance If you need further assistance you can write with any quest...

Страница 23: ...er product maintenance or installation installation not in accordance with electrical or plumbing codes or correction of household electrical or plumbing i e house wiring fuses or water inlet hoses 4...

Отзывы: