Jegs 555-81445 Скачать руководство пользователя страница 3

2

Introduction

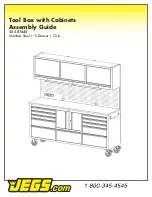
We would like to take this opportunity to thank you   

for purchasing this JEGS 72 in. 11-Drawer Stainless 

Steel Tool Box with Cabinets. We welcome any  

comments or feedback you might have. If you 

have any questions about this product or about 

the installation procedure, please feel free to   

contact us at 1.800.345.4545.

Fingerprint resistant stainless steel construction 

with a 1 

1

/

4

 in. thick worktop. 100 lb. capacity 

drawers with aluminum pull handles and non-

slip liners. Four casters, two fixed and two swivel 

(which include brakes). Come with a heavy- 

duty side handle for comfort and control when  

maneuvering. Supplied with locks and key. 

IMPORTANT

Please read these instructions carefully. 

Note the safe operation requirements,  

warnings, and cautions. Use this product for 

the  purpose for which it is intended.  Failure to 

do so may result in damage and/or personal 

injury, and will void the warranty. Keep these 

instructions in a safe place for future use. 

Safety

•  Locate in a suitable work area.

•  Monitor children near the cabinet.

•  Do not open more than one drawer at a time.

•  Fill from the bottom drawer.

•  If the tool cabinet is filled from the top drawer 

down, it will be top heavy and may fall over. 

•  Do not attempt to lift by the side handles, use 

chains, ropes or other lifting devices. 

•  Do not use the cabinet as a step or climb  

on the drawers.

•  Do not alter the product in any way. 

•  Do not weld on external lock bars or attach 

electrical equipment.

•  Doing so may damage the product and 

cause personal injury.

•  Keep on a level surface

•  When moving the cabinet DO NOT pull it. Push 

the cabinet to prevent injury. 

•  Close and lock the drawers before moving the 

cabinet. If the drawers come open they could 

make the cabinet unstable. 

•  Apply brake when the cabinet is in the desired 

position. 

•  Do not mount on a truck bed or any other 

moving object.

•  Be aware of sharp edges. 

Содержание 555-81445

Страница 1: ...Tool Box with Cabinets Assembly Guide 555 81445 Stainless Steel 11 Drawer 72 in ...

Страница 2: ...r Bottom DESCRIPTION DESCRIPTION DESCRIPTION QTY QTY QTY 10 11 12 13 14 15 16 17 18 Cabinet Door LH Drawer Center Bottom Cabinet Door RH Drawer Liner Narrow Drawer Liner Wide Casters 6 in Fixed Grommet Pegboard Upr Cabinet Support 19 20 21 22 23 24 25 Cabinet Body Bolts Wall Mount Hooks Cabinet Shelves Power Strip Bolt 5 32 in Power Cord 1 1 1 5 5 2 2 1 2 1 40 2 3 1 6 1 1 ...

Страница 3: ...to do so may result in damage and or personal injury and will void the warranty Keep these instructions in a safe place for future use Safety Locate in a suitable work area Monitor children near the cabinet Do not open more than one drawer at a time Fill from the bottom drawer If the tool cabinet is filled from the top drawer down it will be top heavy and may fall over Do not attempt to lift by th...

Страница 4: ...own on a soft mat for protection 3 Fit the swivel locking casters on the handle side of the cabinet using 3 8 in x 1 in bolts Insert the bolts through each caster and into the bottom of the cabinet Tighten securely 4 Repeat for the two rigid casters on the other side of the cabinet Figure 01 Figure 02 Figure 03 UPPER CABINET RAILS Fig 03 1 With the cabinet in the upright position attach the four r...

Страница 5: ...e 1 4 in x 1 2 in bolts per rail UPPER CABINET Fig 05 2 Attach the upper cabinet to the rails with three 1 4 in x 1 2 in bolts per rail SHELF ASSEMBLY Fig 06 1 Insert four hooks per shelf inside the upper cabinet at the desired height Place the shelf on the shelf supports Repeat for the other shelves Figure 06 ...

Страница 6: ...secure to the pegboard Figure 07 Place power strip on back side of pegboard Secure using screws inserted from the front LED LIGHT Fig 08 09 1 The LED light strip is secured to the bottom of the upper cabinet using magnets These magnets are secured in the light s housing 2 Plug the light into the cabinet s power strip Figure 08 Plug light into power strip Figure 08 ...

Страница 7: ...aximum Voltage 125V Cycle 60 Hz Maximum Wattage 1500W USB Output 5VDC Max 2 1A Plug the provided power cord into the power strip socket 110V CIRCUIT REQUIREMENTS This tool chest is pre wired to connect to a power supply circuit that has a verified ground and meets the following requirements Nominal Voltage 110V 115V 120V Cycle 60Hz Phase Single Phase Power Supply Circuit 15 Amps A power supply cir...

Страница 8: ...e It is strongly recommended that you anchor this cabinet Toppling furniture can cause serious injury or death An Anti Tipping kit has been provided with this cabinet to reduce the risk of injury Fig 11 This kit securely attaches the cabinet to a wall or other solid surface using the provided hardware It is important to regularly check that the anchors are securely mounted The stability of cabinet...

Страница 9: ...aterials Keep electrical connections dry Do not use in damp or wet conditions Do not connect devices to power strip that draw more than listed power strip rating Equipment must be used in accor dance with the instructions Power strips are designed for use with low powered loads such as battery char gers Not designed for use with high powered loads such as space heaters or microwaves Do not run cor...

Отзывы: