


Quick Start
- 6 -
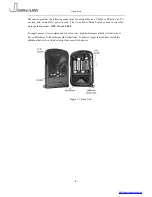
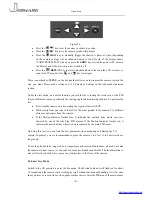
Figure 2.2
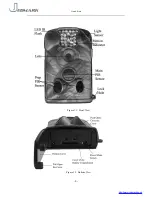
•
Press the
key to set the camera to shoot video clips.
•
Press the
key to set the camera to take still pictures.
•
Press the
SHOT
key to manually trigger the shutter. A photo or video (depending
on the camera setting) will be taken and saved to the SD card. If the display shows
“CARD PROTECTED” when you press the
SHOT
key, switch the power OFF, remove
the SD card and slide its write-protect switch to off.
•
Press the
REPLAY
key to review/playback photos/videos on the LCD screen, or a
connected TV monitor. Use
and
key to navigate.
There is another key,
MENU
, on the keypad that allows you to program the camera to work the
way you want. Please make reference to 3.1 Parameter Settings in the Advanced Operation
section.
Under the test mode, one useful function you would like is testing the work area of the PIR
(Passive Infrared) sensor, specifically the sensing angle and monitoring distance. To perform the
test:
•
First strap the camera on a tree aiming the region of interest (ROI).
•
Walk slowly from one side of the ROI to the other parallel to the camera. Try different
distances and angles from the camera.
•
If the Motion Indicator flashes blue, it indicates the position from where you were
detected by one of the side Prep PIR sensors. If the Motion Indicator flashes red, it
indicates the position from where you were captured by the main PIR sensor.
camera. In general, you are recommended to place the camera 3 to 6 feet (1 to 2 meters) above
the ground.
To avoid potential false triggers due to temperature and motion disturbances, please do not aim
the camera at a heat source (i.e. the sun) or nearby tree branches and limbs. The ideal direction to
aim at is North or South. Also, remove any limbs close to the front of the camera.
2.4 Enter Live Mode
Switch to the ON position to enter the live mode. The Motion Indicator will flash red for about
10 seconds and the camera starts working by itself without any manual handling. It will at once
shoot pictures or record videos when game or other objects enter the PIR area of the main sensor
By doing this test, you can find the best placement when mounting and aiming the Ltl
http://www.jedmark.co.uk


