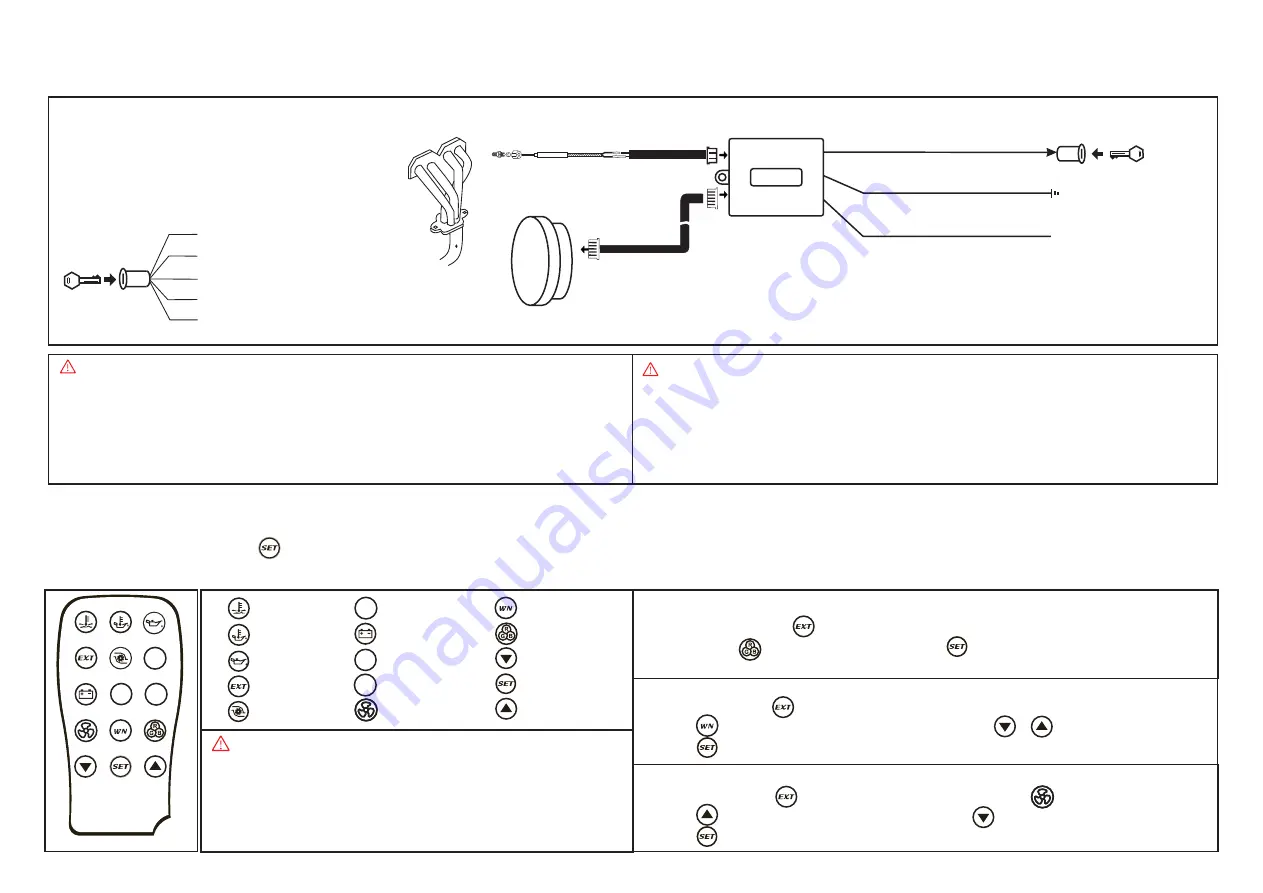
Remote Controller Operation Manual
Made&Design in Taiwan
●
Peak Value Show / Clear Setting Function
●
Warning Setting When the EXT. Temp value is Over, the warning will be functional
(
)
1. Please must follow all installations in this manual to ensure safe installation and operation of the product.
2. DO NOT disassemble or reassemble the product. This might cause damage or make them unsafe to use.
When the product is disassembled or reassembled, the Warranty can't be offered.
3. Before installation, please make sure the engine is switched off and the vehicle is stationary.
4. Due to possible injury from contact with a hot engine or exhaust pipe, DO NOT begin installation until the vehicle is cool.
5. When attaching wires for the product, please take care so that the product's wires do not interfere with existing wires.
6. This product is only for use on vehicles with 12V electronic system.
WARNING
1.
2.
Select icon by press
to enter Exhaust Temp Setting Mode.
Then Press
to change the backlight. Press
to save the setting or idle
any button for 5 seconds to leave the setting mode.
CAUTION
Daemon
III
Exhaust
-
Temp. Operation Manual
Gauge Contents :
Gauge*1 / Temp Sensor*1 / Sensor Wire(2pin)*1 / Gauge Wire (6pin)*1 / Power BOX*1 / Gauge Stand*1 / Operation Manual*1 /
(
)
Meter Visor*1 Optional
Gauge
RED: Ignition-Coil
Installation Diagram
Gauge Wire
Sensor Wire
BLACK: Ground
YELLOW: Dimmer 12V
Light (12V)
Accessory
A/C
Ignition-Coil
Motor Starter
Battery
Ignition Switch Diagram
To avoid damage, please ensure the RED wire is attached to the ignition switch that connected to Coil.
1. Please have the remote controller point to the gauge you are going to set up.
2. In setting process, press
directly; the gauge will leave setting mode and save.
3. A “beep” sound will be heard while the new setting is done.
1.
2.
3.
4.
5.
Water Temp
Oil
Pressure
Exhaust Temp
BOOST
Temp
Oil
11.
12.
13.
14.
15.
Warning
Backlight
DOWN
Enter
UP
6.
7.
8.
9.
10.
Air/Fuel Ratio
Voltage
Vacuum
RPM
Function
WARNING
RPM
VAC
A/F
A/F
VAC
RPM
。
Please must follow all installations in this manual to ensure safe installation and operation
of the product. DO NOT disassemble or reassemble the product. This might cause damage
or make them unsafe to use. When the product is disassembled or reassembled, the
Warranty can't be offered. Before installation, please make sure the engine is switched off
and the vehicle is stationary. Due to possible injury from contact with a hot engine or
exhaust pipe, DO NOT begin installation until the vehicle is cool. When attaching wires for
the product, please take care so that the product's wires do not interfere with existing
wires. This product is only for use on vehicles with 12V electronic system.
●
Backlight LED Setting Function
1. Select icon by press
to enter Exhaust Temp Setup Mode.
2. Press
to show Exhaust Temp Warning Value. Then Press
or
to change the setting.
3. Press
to save or idle any button for 5 seconds to leave the setting mode.
1. Select icon by press
to enter Exhaust Temp Setup Mode.
2. Press
to show Exhaust temp Peak Value. Then press
to clear the Peak Value.
3. Press
to save or idle any button for 5 seconds to leave the setting mode.
1. To avoid damage, please make sure using insulating tape or bushing while connection.
2. To avoid damage of sensor wire, please fix the waterproof connector on the vehicle body.
3. Please avoid over bending the sensor steel wire, or the sensor will be broken-down.
Power BOX
Exhaust Temp Sensor
Press
to Enter Peak Setup Mode.


