


JDM
®
AM-FM
RDS Tuner Receiver Module
4
1
2
4
6
8
3
5
7
9
10
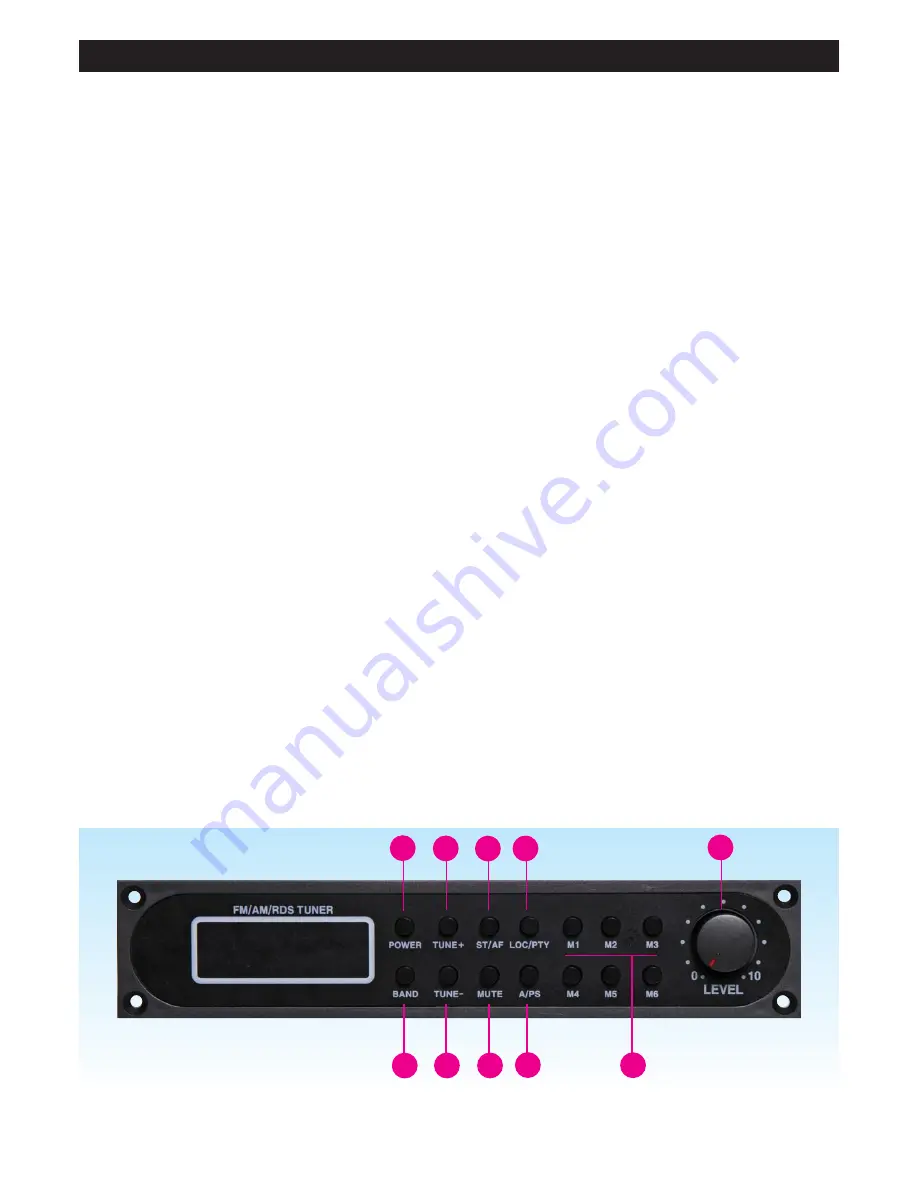
Figure 2:
Front Panel controls
FRONT PANEL CONTROLS (Figure 2)
1. POWER:
Press this to turn the power on to the unit. Press again to switch
it off.
2. VOLUME LEVEL:
Turn this knob clockwise to increase the volume, anti-clockwise
to decrease.
3. BAND:
Press this button to switch between FM and AM band
frequencies for the tuner. The tuner will display
ʻ
FM1
ʼ
,
ʻ
FM2
ʼ
,
ʻ
FM3
ʼ
for the FM frequencies and
ʻ
MW1
ʼ
,
ʻ
MW2
ʼ
for AM
frequencies.
4 & 5. TUNE+, TUNE-
Press this button to adjust the AM/FM frequency either up or
down the band. Pressing briefly activates SEEK tuning mode
wherein the unit will scan the band until a station frequency of
sufficient signal strength is found, and lock on. Pressing one of
these buttons for a longer time puts the unit into manual tune
mode, as shown when the word
ʻ
MANUAL
ʼ
appears on screen.
To manually tune, repeat button presses steps the frequency up
(TUNE+) or down (TUNE-) in 0.05MHz as desired.
At power up, the tuner defaults to alternative frequency (AF)
mode. This can be seen from the
ʻ
AF
ʼ
in the top of the display. In
AF mode, the tuner will search and stop only at stations with
RDS transmission.
Pressing the ST/AF button turns AF off and the tuner will now
scan and stop at all stations regardless of whether or not they
transmit RDS codes. To re-activate the AF function, press the AF
button and
ʻ
AF
ʼ
will again appear at the top of the display.
6. ST/AF:
AF (Alternative Frequency).
Using this button allows the user to know if a searched station
has an RDS signal strength strong enough to display the RDS
information, and for scanning for stations with RDS
transmission.
Upon power up the unit will be in AF mode. If the current station
being displayed has a good RDS signal strength
ʻ
AF
ʼ
will appear
on the LCD in bold. If a poor RDS signal strength or no RDS is
found for the tuned station, the
ʻ
AF
ʼ
marker will flash. In this
situation press the ST/AF button to turn off the flashing symbol.
To re-activate the AF function, press the AF button and
ʻ
AF
ʼ
will
again appear at the top of the display.
When AF is selected and the TUNE+ or TUNE- buttons are
pressed, the tuner will only stop at stations that have an RDS
signal that it can lock on to. See TUNE+, TUNE- for how to tune
using the ST/AF button.
7. MUTE:
Mutes the audio when pressed on, release by pressing again.
ʻ
MUTE
ʼ
appears on display screen when activated.
8. LOC/PTY (Lock / Program Type)
Pressing this button once starts the tuner scanning only for the
RDS program type selected (format or genre, eg Pop, Rock,
News etc). When this button is pressed the RDS program type is
temporarily displayed on screen.
To select another RDS program type, press LOC/PTY button
once and then any of the M1 to M6 memory buttons once. Each
memory button holds up to five RDS program types. The RDS
program types can be accessed in two stages.
Pressing LOC/PTY and then press any of the M1 to M6 buttons
twice to yield two separate codes per button.
To access the other three codes per button, press LOC/PTY
then LOC/PTY again, and then press M1 to M6 from one to
three times.
After pressing the buttons the tuner will scan and lock onto the
selected RDS code type station. If no RDS code type station
exists within range, the tuner will display NO PTY (no program
type).
9. A/PS (Autoscan / Preset store):
Press this button to activate the auto scan feature, which will
scan for the available frequencies and store them in the preset
memories automatically.
10.BUTTONS NUMBERED M1 TO M6:
These buttons provide preset memories for radio station
frequencies (Station Presets). A total of 24 frequencies can be
stored in the preset memory buttons – 18 for FM band (FM1,
FM2, FM3 x 6 each) and 12 for AM band frequencies (MW1,
MW2 x 6 each). Simply choose the band (FM or AM), tune the
frequency (see above) and press and hold a button until a
memory number appears on the right hand side of the display.
This stores the frequency in that memory number.


