JD Williams and Co ASPEN 4+2 DRAWER CHEST Скачать руководство пользователя страница 4

3

70

80

90

100

110

120

0

10

20

30

40

50

60

mm

130

140

150

160

170

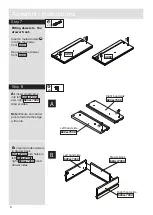
Ruler - Use this ruler to help correctly identify the screws

Please check you have all the fittings listed below

Components 

- Fittings

Note:  The quantities below are the correct amount to complete the assembly, In some case more 

fittings may be supplied than are required.

Tools required

If you have damaged or missing components, call the 

Customer Helpline: 01709 534123


Please turn to back page 

for important information when contacting Customer Helpline.

Cross headed screwdriver

(medium & large )

Small Hammer

Tape Measure

Eye protection

(when using a 

hammer)

Large cam x 6

Code  760001103 

Metal dowel  x 18

Code  760003004 

A

B

C

E

D

F

Small cam x 12

Code  760003005 

8mm screw x 24

Code  700003510

Panel pin x 30

Code  760001012

Panel pin guide x 1 

Code  684004501

Runner x 12

Code  760001040 

H

J

9mm bolt x 12

Code  690001078

K

L

M

N

O

P

7/8” CSK Screw x 4

Code  690001018 

M4x20 Bolt x 10

Code  700002006

Assembly Screw x 4

Code  690001075

Pine Glide Foot x 4

Code  720006001

Timber Knob x 10

Code  640031118 

O

White Glide Foot x 4

Code  720365001

P

Ceramic Knob x 10

Code  640006001

IMPORTANT: Depending on the colour variation you purchased this unit in, you will have 

one of the handles and glide feet shown above.

Wooden Dowel x 4

Code  770001006

Bradawl

Q

Support bracket x 1

Code  760001901

1/2 inch roundhead

Screw x 2

Code  690001099

R

Содержание ASPEN 4+2 DRAWER CHEST

Страница 1: ...se instructions fully before starting assembly If you need help or have damaged or missing parts call the Customer Helpline 01709 534123 Please turn to back page for important information when contact...

Страница 2: ...niture when moving it do not drag otherwise the joints may be damaged From time to time check that there are no loose screws on this unit This product should not be discarded with household waste Take...

Страница 3: ...rawer Front x4 66 0x15 6cm 4717 Drawer Bottom x 4 61 2x29 8cm 5671 Drawer Bottom x 2 28 7x29 8cm 4883 Divider Panel 32 8x16 0cm 0323 624xx7010 Draw Front Top Right 32 8x15 6cm 4882 Left drawer side x6...

Страница 4: ...ction when using a hammer Large cam x 6 Code 760001103 Metal dowel x 18 Code 760003004 A B C E D F Small cam x 12 Code 760003005 8mm screw x 24 Code 700003510 Panel pin x 30 Code 760001012 Panel pin g...

Страница 5: ...Exploded View 4 4717 5671 Large Drawers x4 622xx7002 622xx7002 623xx7002 624xx7003 4883 4881 622xx7002 623xx7002 623xx7002 624xx7003 624xx7010 4883 4882 4968 0315 0323 8312 5377 0315...

Страница 6: ...l Do not over tighten B B B B B B 4968 Fitting cams and dowels to the end panels A Insert 2 cams to the end panels Insert 2 wooden dowels into the inner holes in end panels 0315 Step 2 A A x4 K 0315 0...

Страница 7: ...illed hole nearest to the edge of the panel Use screws to secure the runner Slide the runner forward revealing the back of the runner The third hole to the back of the runner should now line up with t...

Страница 8: ...er sides Note Ensure cam arrow points towards the edge with hole Left hand side Right hand side 622xx7002 623xx7002 622xx7002 623xx7002 C C C Step 6 A Insert the runner and 2 cams into the right face...

Страница 9: ...7010 Right hand side 623xx7002 5671 4717 C Sit drawer bottom into groove on drawer front Ensure foil on the drawer bottom is facing upwards D Locate grooves in left and right drawer sides around the d...

Страница 10: ...ow points towards the edge with hole Left hand side Right hand side Left hand side Right hand side Drawer Back 622xx7002 624xx7003 623xx7002 622xx7002 623xx7002 622xx7002 623xx7002 623xx7002 624xx7003...

Страница 11: ...h the pre drilled holes in the drawer front and connect to the handle Repeat the above process to complete the assembly of the second small drawer and also the four large drawers M P 4881 4881 4882 48...

Страница 12: ...ews to secure bottom panel to the end panels Step 12 0315 5377 Connect the bottom panel to the end panels Step 10 Connect the dowels in the top panel to the cams in the divider panel Turn cams 180 deg...

Страница 13: ...ted DIAG 3 until they are the same Ensure a tape measure is used to square unit up DIAG 3 DIAG 1 XX XX YY YY XX XX YY YY DIAG 2 XX XX YY YY XX XX YY YY TAPED SIDE TO BACK Step 14 D F D x30 F x1 Attach...

Страница 14: ...the feet to the bottom panel Use a bradawl to mark out the holes for the feet Use 4 screws to attach feet to the bottom panel 5377 L O 5377 L L L L O O O O Stand the unit upright once you have finishe...

Страница 15: ...sed are appropriate to your wall type Locate the bracket to the top panel or to the end panel as close to top as possible We do not specify exact location for the bracket this is left to the customer...

Страница 16: ...Assembly Instructions 15 Step 17 Fit the drawers For this step we recommend you follow the helpful hints on the next page 2nd Hole J x12 J 4881 4882 4717...

Страница 17: ...driver in place push the drawer in until the screwdriver pushes against the panel Remove the screwdriver e f Pull drawer out slowly and line the front hole in the drawer side with the 2nd threaded hol...

Страница 18: ...ou can also e mail your requests to us at customer helpdesk addspacefl co uk Alternatively you can write to us at Customer Service Department Addspace Furniture Limited Braithwell Way Hellaby Industri...

Отзывы: