background image

© 2017 JCM Global Corporation

3

Part No. 960-000194R_Rev. A

GEN5™ Printer

Operator Indicators (LED) And Controls

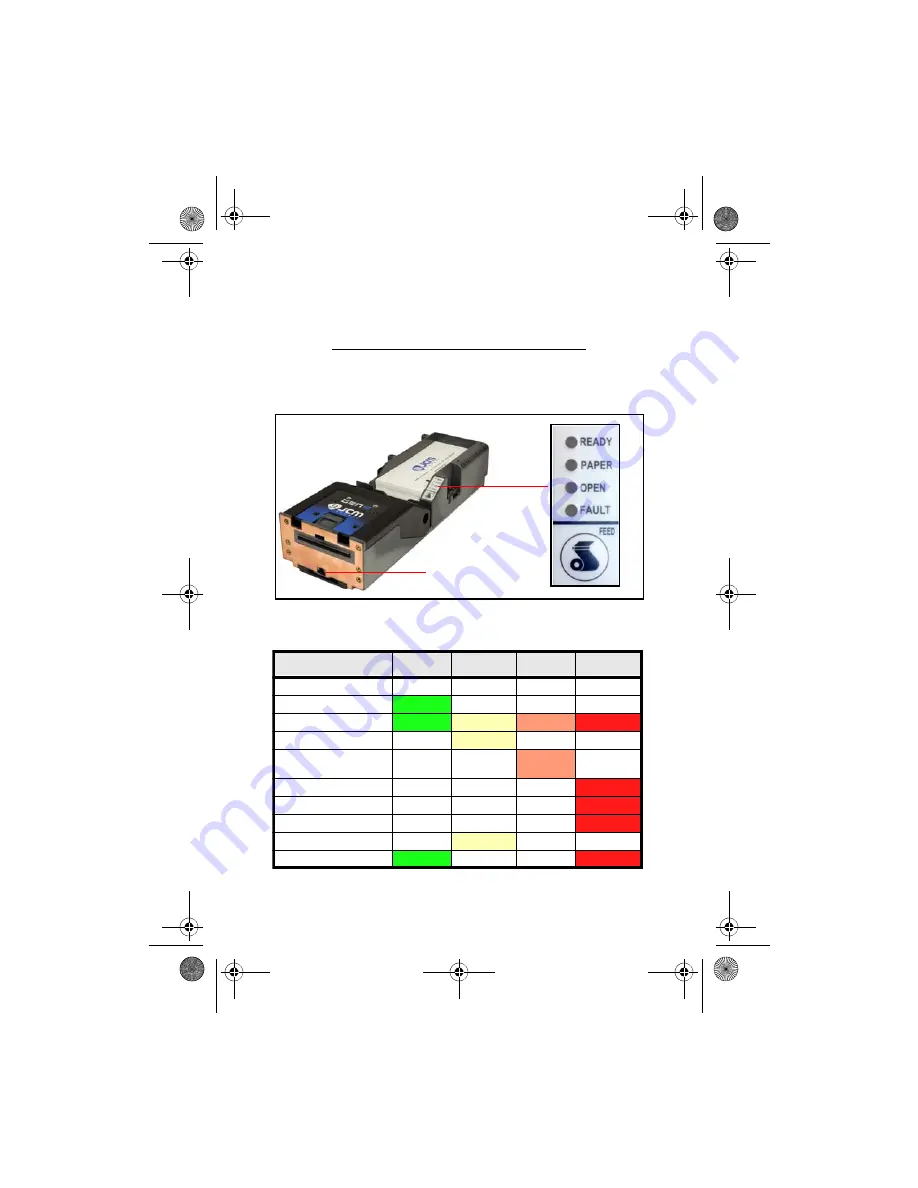
The GEN5 Printer features a Keypad with LED Status Indicators and 

FEED

 Button (Figure 2). Printer Status indicators include a Front 

Bezel Light and the four (4) Keypad LEDs. Refer to Table 1 below 
for GEN5 Keypad LED Status Codes. 

Bezel LED

Connector

 Figure 2 

GEN5 Printer Keypad, LEDs and FEED Button

Table 1 

GEN5 Keypad LED Status Codes

Condition

Ready

Paper

Open

Fault

Powered OFF 

Ready

Blinking

Flushed

Paper Out

Head Up or Ticket 

Module Open

Temperature Error

Voltage Error

Print Head Error

Missing Index Marker

Paper Jammed

Blinking

GEN5_FlipBookRevA_v15.fm  Page 3  Friday, June 30, 2017  9:20 AM

Содержание GEN5 Series

Страница 1: ...echnical Support Division of Customer Service via the email addresses listed below Americas support jcmglobal com Europe Middle East Africa Russia UK support jcmglobal eu Asia Oceania asiasupport jcmg...

Страница 2: ...TROUBLESHOOTING GUIDE Introduction This Quick Reference Guide is designed for use with the GEN5 line of Printers Figure 1 This Guide covers the set up and use of the following Printer PSA 66 ST5 Figur...

Страница 3: ...and the four 4 Keypad LEDs Refer to Table 1 below for GEN5 Keypad LED Status Codes Bezel LED Connector Figure 2 GEN5 Printer Keypad LEDs and FEED Button Table 1 GEN5 Keypad LED Status Codes Condition...

Страница 4: ...lashes three 3 times When the Paper Low Sensor is disabled the RED FAULT LED flashes three 3 times GEN5 DIP SWITCH SETTINGS The GEN5 Printer has a bank of DIP Switches The functionality of the DIP Swi...

Страница 5: ...Ticket can be used to check print quality To print a Configura tion Ticket Figure 3 press the FEED button twice Model Number System Communications Setup Print Control Parameters Amount of Memory Resid...

Страница 6: ...indicates that paper is not loaded in the GEN5 Printer Paper Low Located in the Paper Tray Paper Low indicates that less than two 2 Tickets are detected in the GEN5 Printer Paper Taken Located in the...

Страница 7: ...e the Printer Lid Temperature Operating Temperature exceeds limits Determine cause of high temperature let unit cool down Voltage Power Supply voltage exceeds acceptable range Check cabling apply corr...

Страница 8: ...e JCM Device Firmware Upgrade Downloader JCM DFU Figure 4 2 Make sure the GEN5 Printer is powered ON 3 Connect a USB cable from the PC to the Printer s USB port right side Figure 4 JCM Device Firmware...

Страница 9: ...e Firmware Upgrade Application look for the Printer Detected indicator Figure 5 a in the window 5 Click the Select FIRMWARE button to select the desired Firmware Upgrade file to be downloaded Figure 6...

Страница 10: ...Firmware Upgrade window Figure 7 click on the desired Firmware update file Figure 7 a to be downloaded to the Printer Then click the Open button Figure 7 b to con tinue a b Figure 7 Select the Firmwa...

Страница 11: ...Printer using the BlueWaveDX Tool perform the following steps 1 Create a folder in the root directory of the SD Card named GEN5 System 2 Place the Firmware file for the GEN5 Printer into this new fol...

Страница 12: ...IG OPTION Using the BlueWaveDX Tool the Bar Code format printed by the GEN5 Printer can be changed To do so 1 Connect the BlueWaveDX Tool to the GEN5 Printer with a USB Cable 2 Using the UP and DOWN A...

Страница 13: ...ick the Start Button on the PC Desktop then click on Programs 2 Scroll down to JCM then click the JCM Printer Basic Driver icon The JCM PRINTER BASIC DRIVER Opening Screen appears Figure 9 3 Select th...

Страница 14: ...Basic Driver Main Screen Figure 10 displays three main sections 1 PRINTER CONFIGURATION Figure 10 a 2 COMMANDS Figure 10 b 3 PRINTER STATUS Figure 10 c a c b d Figure 10 JCM Printer Basic Driver Main...

Страница 15: ...Deletes the Firmware on the Printer Feed Feeds one blank Ticket Print Ticket Information Prints a Test Ticket with Printer Information Printer Communication Settings Character Set and a Test Barcode...

Страница 16: ...Cleaning Card will feed into the Slot up to the loading point 6 Press the FEED button to feed the Cleaning Card through the Paper Path 7 Remove the Cleaning Card from the Printer 8 Turn the Cleaning C...

Страница 17: ...ed by the red arrow Figure 11 c and Figure 12 a on page 18 to access the Printer interior 5 Use Non Flammable Compressed Air to blow out excessive dust and dirt from the following areas within the Pri...

Страница 18: ...he Print Head Release Lever Figure 13 a 7 Clean the Print Head Figure 13 b using a Cleaning Swab a b Figure 12 Presenter Assembly a b Figure 13 Print Head Release Lever Print Head Clean Print Head b w...

Страница 19: ...eaning Swab Figure 14 a d e Cleaning Paper Low Sensor b with Cleaning Swab b c b Figure 14 Sensor Locations a Printer Tray Drawer Open Sensor b Ticket Low Paper Low Sensor c Paper Out Index Mark Senso...

Страница 20: ...circumference 10 Close the Print Head Release Lever refer to Figure 13 a on page 18 11 Use a Cleaning Wipe to wipe and clean the Feed Roller Figure 15 b 12 Use a clean dry Micro fiber cloth to wipe ex...

Страница 21: ...g 60 D 40472 D sseldorf Germany Phone 49 211 530 645 60 Fax 49 211 530 645 85 E mail support jcmglobal eu UK Ireland JCM Europe UK Office Unit B Third Avenue Denbigh West Business Park Bletchley Milto...

Страница 22: ...t jcmglobal com Asia and Oceania JCM Gold HK Ltd Unit 1 7 3 F Favor Industrial Centre 2 6 Kin Hong Street Kwai Chung N T Hong Kong Phone 852 2429 7187 Fax 852 2929 7003 E mail asiasupport jcmglobal co...

Отзывы: