


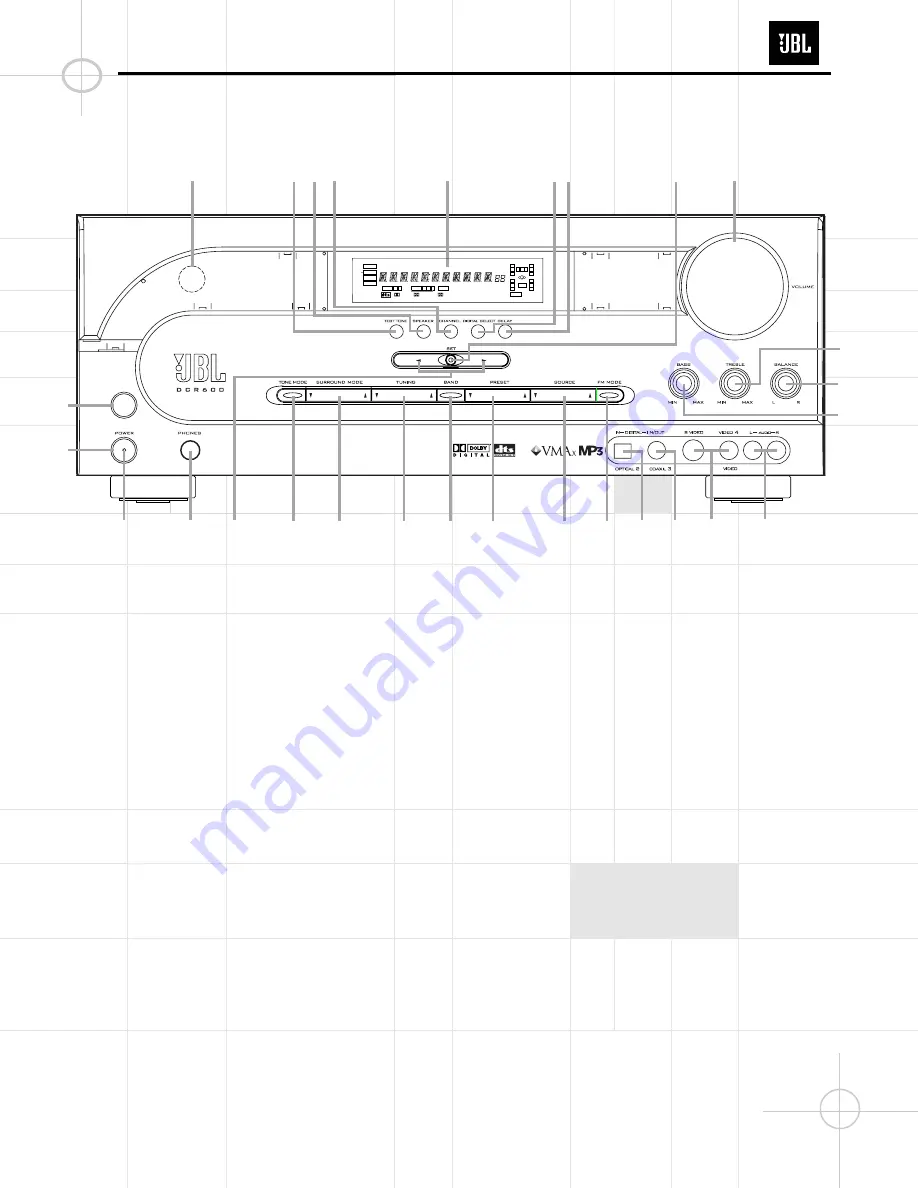
DCR600 Front Panel Controls
1
Main Power Switch:
Press this button to
apply power to the DCR600. When the switch
is pressed in, the unit is placed in a Standby
mode, as indicated by the amber
Power
Indicator
3
surrounding the
System Power
Control
2
. This button MUST be pressed in
to operate the unit. To turn the unit off and
prevent the use of the remote control, this
switch should be pressed until it pops out from
the front panel so that the word “OFF” may be
read at the top of the switch.
NOTE:
This switch is normally left in the “ON” position.
2
System Power Control:
When the
Main
Power Switch
1
is “ON,” press this button
to turn on the DCR600; press it again to turn
the unit off. Note that the
Power Indicator
3
in the center of the switch will turn green
when the unit is on.
3
Power Indicator:
This LED will be illumi-
nated in amber when the unit is in the Standby
mode to signal that the unit is ready to be
turned on. When the unit is in operation, the
indicator will turn green.
4
Headphone Jack:
This jack may be used
to listen to the DCR600’s output through a pair
of headphones. Be certain that the headphones
have a standard 1/4" stereo phone plug. Note
that the main room speakers will automatically
be turned off when the headphone jack is in use.
5
Selector Buttons:
When you are estab-
lishing the DCR600’s configuration settings,
use these buttons to select from the choices
available, as shown in the
Main Information
Display
Ú
.
6
Tone Mode:
Pressing this button enables
or disables the Bass and Treble tone controls.
When the button is pressed so that the words
TONE IN appear in the
Main Information
Display
Ú
, the settings of the
Bass
&
and
Treble
(
controls may be used to adjust the
output signals. When the button is pressed so
that the words TONE OUT appear in the
Main
Information Display
Ú
, the output signal
will be “flat,” without any bass or treble alter-
ation, no matter how the actual
Bass
and
Treble
&(
controls are adjusted.
7
Surround Mode Selector:
Press this but-
ton to change the surround mode by scrolling
through the list of available modes. Note that
depending on the type of input, some modes
are not always available. (See page 52 for
more information about surround modes.)
8
Tuning Selector:
Press the left side of the
button to tune lower-frequency stations and
the right side of the button to tune higher-
frequency stations. When a station with a strong
signal is reached, the
TUNED
indicator
U
will
be illuminated in the
Main Information
Display
Ú
.
To tune manually, tap the button lightly and
note that the tuner will step up one frequency
increment per button press. When the button is
held for a few seconds you will note that the
unit will quickly search the frequency band.
Release it once the fast tuning starts; the tuner
will automatically scan for the next station
with an acceptable signal and then stop.
9
Tuner Band Selector:
Pressing this button
will automatically switch the DCR600 to the
Tuner mode. Pressing it again will switch
between the AM and FM frequency bands.
)
Preset Stations Selector:
Press this
button to scroll up or down through the list or
stations that have been entered into the preset
memory.
1
2
3
4
5
6
7
8
9
… )
!
@
#
$
%
^
&
(
*
Ó
Ô
Ò
Ú
ı
ˆ
Û
Ù
COAXIAL
THEATER
5 CH STEREO HALL 1
3- STEREO
PRO LOGIC
DIGITAL
DTS
DOLBY D
PCM
MP3
NIGHT
OPTICAL
ANALOG
LFE
0
C
L
0
1 2
1 2 3
MEMORY
PRESET
SLEEP
AUTO
5.1 LOGIC 7 CM
VMAx NF
MUTE
TUNED
ST
O
O
R
O
O
LS
O
O
RS
O
O
DCR600
8
Содержание DCR600
Страница 22: ...DCR600 22 ...
Страница 23: ...DCR600 23 J4099100170X ...
Страница 24: ... DCR600 24 ...
Страница 25: ...DCR600 25 ...
Страница 26: ...DCR600 26 ...
Страница 27: ...DCR600 27 ...
Страница 28: ...DCR600 28 ...
Страница 29: ...DCR600 29 ...
Страница 30: ...DCR600 30 ...
Страница 31: ...DCR600 31 ...
Страница 32: ...DCR600 32 ...
Страница 33: ...DCR600 33 ...
Страница 34: ...DCR600 34 ...
Страница 35: ...DCR600 35 ...
Страница 36: ...DCR600 36 ...
Страница 37: ...DCR600 37 ...
Страница 67: ...DCR600 67 ...
Страница 68: ...DCR600 68 ...
Страница 69: ...DCR600 69 ...
Страница 70: ...DCR600 70 ...
Страница 71: ...DCR600 71 ...
Страница 72: ...DCR600 72 ...
Страница 73: ...DCR600 73 ...
Страница 74: ...DCR600 74 ...
Страница 75: ...DCR600 75 ...
Страница 76: ...DCR600 76 ...
Страница 77: ...77 DCR600 ...
Страница 78: ...DCR600 78 ...
Страница 79: ...79 DCR600 ...
Страница 81: ...81 DCR600 ...
Страница 82: ...82 DCR600 ...
Страница 83: ...83 DCR600 ...
Страница 84: ...84 DCR600 ...
Страница 85: ...85 DCR600 ...
Страница 86: ...86 DCR600 ...
Страница 87: ...87 DCR600 ...
Страница 88: ...88 DCR600 ...
Страница 89: ...89 DCR600 ...
Страница 90: ...90 DCR600 ...
Страница 91: ...91 DCR600 ...
Страница 92: ...92 DCR600 ...
Страница 93: ...93 DCR600 ...
Страница 95: ...95 DCR600 ...
Страница 96: ...96 DCR600 ...
Страница 97: ...97 DCR600 ...
Страница 98: ...98 DCR600 ...
Страница 99: ...99 DCR600 ...
Страница 100: ...100 DCR600 ...
Страница 101: ...101 ...
Страница 102: ...102 DCR600 ...
Страница 103: ...103 DCR600 ...
Страница 104: ...104 DCR600 ...
Страница 105: ...105 DCR600 ...
Страница 106: ... DCR600 106 ...
Страница 107: ... DCR600 107 ...
Страница 108: ... DCR600 108 ...
Страница 109: ... DCR600 109 ...
Страница 110: ... 110 DCR600 ...
Страница 111: ... DCR600 111 ...
Страница 112: ...DCR600 112 ...
Страница 113: ...113 ...
Страница 114: ...DCR600 114 ...
Страница 115: ...DCR600 115 ...
Страница 116: ...DCR600 116 ...
Страница 117: ...DCR600 117 ...
Страница 118: ... DCR600 118 ...
Страница 119: ... DCR600 119 ...
Страница 120: ... DCR600 120 ...
Страница 121: ... DCR600 121 ...
Страница 122: ...122 DCR600 Tuner PCB is shown as reference only as it is only available as complete PCB ...
Страница 123: ... DCR600 123 ...
Страница 124: ... DCR600 124 ...
Страница 125: ... DCR600 125 ...


