background image

8

1.2 Front Panel Controls and Indicators

A.  Input Level Controls
B.  Input signal presence is indicated by green illumination of the ring around    


the input level controls

C.  Output Volume Controls
D.  Power Switch
E.  Illuminated ring around the output volume control will light green with signal    


presence while red indicates clipping, i.e. the signal has reached the     


threshold of audible distortion.

F.  Tone Controls - Bass     and Treble    potentiometers on each output channel.
G.  Illuminated ring around the power switch. Green indicates that the unit is 


connected to the AC mains and is in standby. Blue indicates that the unit is  


on and in normal operating mode. 

Figure 1.2 Front View

A

B

C

D

G

E

F

CSM 14

1

2

3

4

Содержание CSM 28

Страница 1: ...CSM 14 CSM 28 Commercial Series Mixer Operation Manual JBL Commercial Series...

Страница 2: ...dy Parkway Sandy UT All Rights Reserved Contents Important Safety Instructions 3 JBL DECLARATION OF CONFORMITY 5 1 0 Welcome 7 1 1 Features 7 1 2 Front Control Panels and Indicators 8 1 3 Rear Panel C...

Страница 3: ...nnect this equipment only to the power source indicated on the equipment rear panel To reduce the risk of fire or electric shock refer servicing to qualified service personnel or equivalent If connect...

Страница 4: ...ix it with gen eral household waste There is a separate collection system for used electronic products in accordance with legislation that requires proper treatment recovery and recycling Private hous...

Страница 5: ...Fluctuations and Flicker in Low Voltage Supply systems Rated Current less than or equal to 16A EN 55022 2010 Limits and Methods of Measurement of Radio Disturbance Characteristics of ITE Radiated Con...

Страница 6: ...6...

Страница 7: ...rol using the JBL CSR V control module 1 1 Features 4 or 8 inputs with 1 or 2 outputs respectively Ideal for commercial and industrial use System may be expanded by adding JBL Commercial Series Mixer...

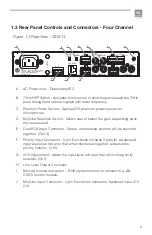
Страница 8: ...lume control will light green with signal presence while red indicates clipping i e the signal has reached the threshold of audible distortion F Tone Controls Bass and Treble potentiometers on each ou...

Страница 9: ...ed input as well as two pins that when shortened together activates the priority function Ch1 G VOX Adjustment allows the input level to be set that will invoke priority override Ch1 H Line Level Outp...

Страница 10: ...ced input as well as two pins that when shorted together activates the priority function Ch 1 5 F Remote Volume Control RJ45 style connector to connect to a JBL CSR V control module 100 240 V 50 60Hz...

Страница 11: ...NE MIC LINE MIC LINE MIC LINE CH 1 VOX CH 5 VOX MONO SUM MONO SUM MONO SUM C E D H I G Line Out Line level output connector for each output channel H Mic Line Input Connector 3 pin Euro block connecto...

Страница 12: ...thout the factory pack WARNING Before you start to set up your unit make sure you read and observe the Important Safety Instructions found at the beginning of this manual 2 2 Installing Your Unit CAUT...

Страница 13: ...sions CSM 14 CSM 28 Figure 2 2 2 Mounting Kit long angle bracket CSM 14 only flat bracket CSM 14 only front angle bracket 218 44 mm 8 6 in 303 4 mm 11 9 in 43 3 mm 1 7 in 436 88 mm 17 2 in 303 4 mm 11...

Страница 14: ...ds the same direction 2 Connect them with the flat bracket using the screws provided 3 Attach the front angle brackets to each side of the front of the assembly using the screws provided 4 Install the...

Страница 15: ...ill be used for the mixer and attach the long angle bracket to the other side at the front using the screws provided 2 Attach the front angle brackets to the other side of the assembly as shown in the...

Страница 16: ...ach the front angle brackets to each side of the front of the unit using the screws provided 2 Install the unit into the cabinet using the rack mount screws through the front angle brackets For detail...

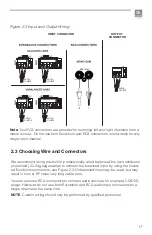
Страница 17: ...tors to connect audio devices for example CD DVD player However do not use both Euroblock and RCA audio input connectors on a single channel at the same time NOTE Custom wiring should only be performe...

Страница 18: ...of a power amplifer such as a JBL Commercial Series Amplifer Figure 2 4 Wiring Audio System Professional audio system 100 240 V 50 60Hz 6W MADE IN MALAYSIA CAUTION TO REDUCE THE RISK OF ELECTRIC SHOC...

Страница 19: ...g procedure when first turning on your system 1 Turn down the level of your audio source 2 Turn down the level controls of the amplifier 3 Power up the mixer The Power ring should change from green to...

Страница 20: ...puts especially when MIC is selected from the MIC LINE switch Failure to do so may cause the amplifier or speaker to go into a protection mode or even cause damage 4 WARNING Never connect the output t...

Страница 21: ...ockwise direction will reduce that level while the full clockwise setting will disable the VOX function 3 5 Priority Muting With CSM 14 Input Channel 1 may be used as a priority channel muting all oth...

Страница 22: ...The Ch 1 Priority switch is closed muting all except Ch 1 input POSSIBLE REASON The power switch is OFF Note that while plugged in the unit will be in standby mode and the power ring will be green un...

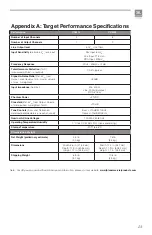
Страница 23: ...50K Phantom Power 27VDC Crosstalk Ref 5Vrms from Output Volume at mid position A weighted 1kHz 70 dB Tone Controls Bass and Treble non detented potentiometers on each channel Bass 10dB 100Hz Treble 1...

Страница 24: ...Line Mic Input Gain Line Mic Input Gain Line Mic CH1 CH2 CH5 CH6 Phantom Power Mic Line Bal Mic Line Bal Mic Line Bal Mic Line Bal CH1 PTT CH5 PTT RCA MONO SUM RCA MONO SUM Gain 1 Gain 2 SPI SPI CH1...

Страница 25: ...25 Tone Control Scaling Tone Control Scaling VCA 1 VCA 2 SW5 SW11 Master 1 Master 2 SPI 1 Clip 1 SPI 2 Clip 2 Bass Treble Bass Treble VCA VCA HPF HPF Line Out 1 Line Out 2...

Страница 26: ...er Service your system installer or retailer On The World Wide Web www jblcommercialproducts com Professional Contacts Outside the USA Contact the JBL Professional Distributor in your area A complete...

Страница 27: ...27...

Страница 28: ...Part Number 5040964 Issue 01 14 JBL Commercial 8760 South Sandy Pkwy Sandy UT 84070 USA 801 566 8800...

Отзывы: