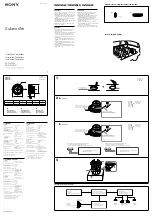
Installing Control 50S/T Subwoofer
Using Included Wall Bracket
1. The Control 50S/T comes with the speaker plate of the wall
bracket pre-attached to the speaker. Ensure that that screws
holding this plate to the speaker are tight.
2. Run the wiring from the power amplifier to the location
desired for mounting the JBL Control 50S/T subwoofer. Also
run the wiring that will connect the subwoofer to the Control
52 satellite speakers.
3. Using a level, secure the wall plate of the mounting
bracket to the wall. Be sure to use appropriate wall anchors
for attaching the bracket plate. Use all five screw holes for
maximum integrity and safety.
(Tapping screws shown. Actual hardware and anchors
utilized may differ, depending on the requirements
of the wall material and structure. Secure and safe
attachment is the responsibility of the installer.)
4. Attach a safety cable (not included) to the 6 mm insert on
the back of the Control 50S/T cabinet using the included 6
mm screw. Prepare to attach the other end of the cable to a
secondary attachment point on the wall.
5. Position Control 50S/T subwoofer toward wall, in the
orientation shown, slightly higher than the on-wall plate, then
slide the Control 50S/T subwoofer downward while maintaining
pressure toward the wall until the two bracket plates engage.
Make sure the retaining spring latches securely into place.
6. Remove the input terminal cover, connect wiring and set
the tap selector rotary switch. Replace input terminal cover,
routing wires through the side opening, dressing the wiring
toward the the back side of the cabinet.
CAUTION: Installation must be
done by qualified persons using
safe rigging standards
.
The installer is responsible for proper selection
and use of mounting hardware, to properly and
safely wall-mount the speakers.
6 mm screw and insert point for
secondary safety cable