


6281'%$57233$1(/&21752/6$1'
5(027(&21752/
3RZHU%XWWRQ
To turn the system on when the soundbar is in the
Standby mode, press the Power button on either the soundbar or
the remote. (The Power indicator will turn blue.) To put the system
in the Standby mode, press either Power button while the system is
on. (The Power indicator will turn amber.) The subwoofer will remain
on for approximately one minute after the soundbar goes into the
Standby mode. If you do not press the Power button, the soundbar
and the subwoofer will both automatically go into the Standby mode
approximately 15 minutes after the audio signal ceases.
NOTE: If you put the soundbar into the Standby mode by pressing
the Power button, you must manually turn it on by pressing the Power
button again. If the system automatically goes into the Standby
mode 15 minutes after the audio signal ceases, it will automatically
turn on whenever the soundbar detects an audio signal at the input
connection that was last used.
0XWH%XWWRQUHPRWHFRQWURORQO\
Press the Mute button to
mute the SB300 system. (The Power indicator flashes blue.) While
the system is muted, press the Mute button again or the Volume Up
button to restore the sound.
NOTE: Momentarily pressing the soundbar’s Power button while the
system is on will mute the system. Momentarily pressing the button
while the system is muted will restore the volume.
Power
Button
Surround-
Mode Button
Volume Up/
Down Buttons
Source Selector
Button
Power
Indicator
Surround-Mode
Indicator
Source
Indicator
6XUURXQG0RGH%XWWRQ
This button turns the SB300 system’s
3-D Surround processing on and off. The Surround Mode indicator
turns blue when 3-D Surround is active, and turns white when 3-D
Surround is not active (normal stereo sound). See
Surround Mode
Buttons, on page 6, for more information. NOTE: The remote control
has individual buttons for the Stereo and 3-D Surround modes.
9ROXPH8S'RZQ%XWWRQV
Press the “+” button to increase the
volume; press the “–” button to decrease the volume.
6RXUFH6HOHFWRU%XWWRQ
This button switches between the sources
connected to the Source 1 (analog) and Source 2 (digital) inputs.
When Source 1 is active, the Source indicator turns white; when
Source 2 is active, the Source indicator turns blue.
NOTE: The remote control has an individual button for each input
source.
On/Off
Stereo
Aux
Input
Vol.+
Vol.–
Mute
Surround
Digital
Input
Power
Button
Source Selector
Buttons
Mute
Buttons
Surround-Mode
Buttons
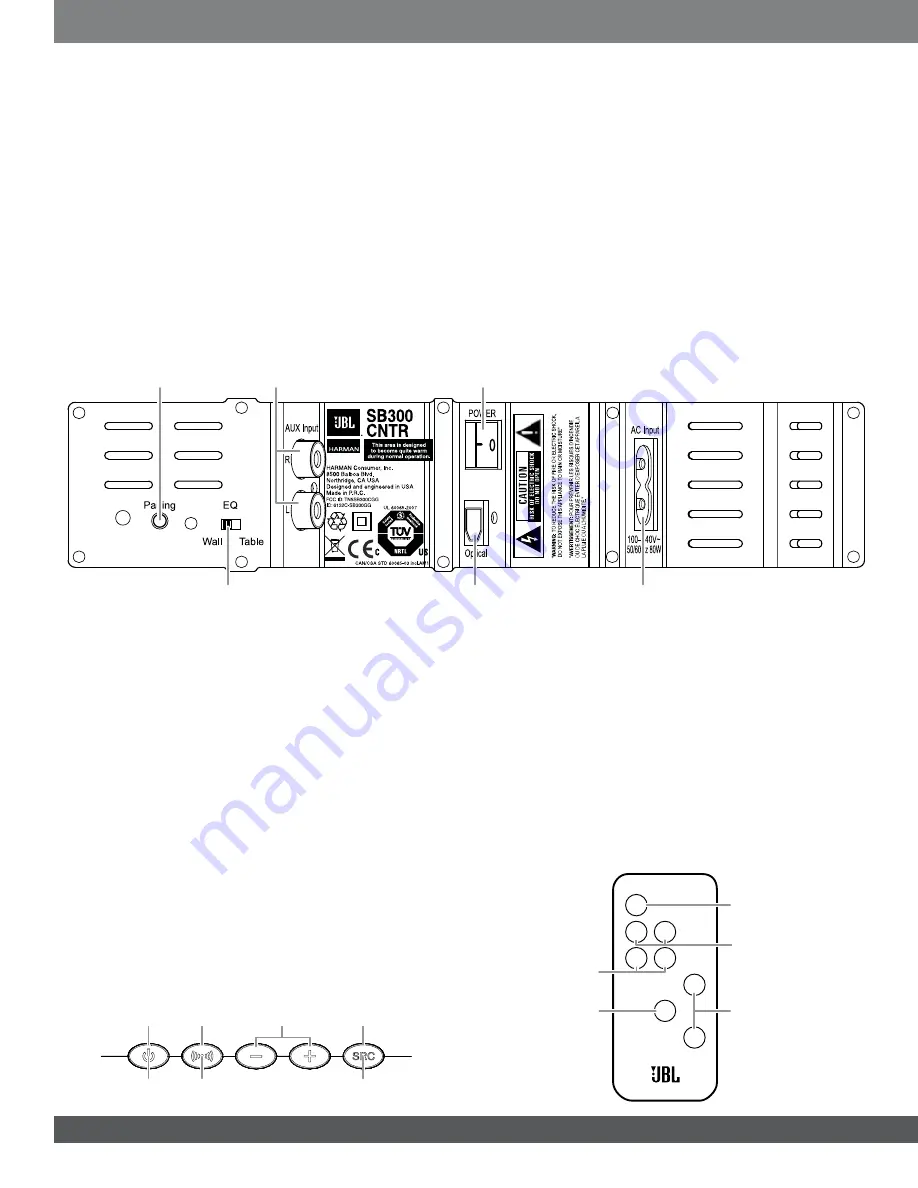
SOUNDBAR REAR-PANEL CONTROLS AND
CONNECTIONS
:LUHOHVV3DLULQJ6ZLWFK
Press this switch to initiate wireless pairing
between the soundbar and the wireless subwoofer. See
Pairing the
Units for Wireless Operation, on page 6, for more information
(46ZLWFK
Use this switch to adjust the soundbar’s bass for either
wall or table mounting. If you’re mounting the soundbar on a wall with
the included wall-mount brackets, set the EQ switch to the “Wall”
position for the most natural-sounding bass performance. If you are
placing the soundbar on a table, set the EQ switch to the “Table”
position for the most natural-sounding bass performance.
$X[,QSXW&RQQHFWLRQDQDORJ
Use the included stereo audio
cable to connect the stereo analog outputs of your TV, DVD player or
cable/satellite tuner here.
2SWLFDO&RQQHFWLRQGLJLWDO
If your TV, DVD player or cable/satellite
tuner has an optical digital output, connect it here.
NOTE: You can connect different source components to the analog
and digital connections.
3RZHU&RUG&RQQHFWRU
Connect the included power cord here. See
Power Connections, on page 5, for more information.
IMPORTANT: Do not connect the power cord to an AC outlet until you
have made and verified all other connections.
3RZHU6ZLWFK
Set this switch to the “On” position to activate the
soundbar. In normal operation, this switch will be left in the “On”
position. See
Turning the Soundbar On and Off, on page 6, for more
information.
If you will not be using the soundbar for an extended period – for
instance, if you’re going on vacation – set the Power switch to the
“Off” position.
Wireless
Pairing Switch
Analog (AUX) Input
Connections
Power
Switch
EQ Switch
Optical Digital Input Connector
Power Cord Connector


