background image

ENGLISH

OPERATION MANUAL

JB SYSTEMS

®

5/44

Q3-USB

Green (R-)

Right channel –

21. USB CONNECTOR:

used to connect the USB turntable to your computer. The unit will be recognized

immediately, no drivers needed.

HOW TO USE THE USB OUTPUT

This USB turntable can be used with any recording software you like. However we suggest downloading the
freeware Audacity software under the terms of the GNU General Public License as published by the Free
Software Foundation. JB Systems

®

is not the creator of this software. This means that we can’t offer any

support for it.

For more information, plug-in downloads, tutorials and user manuals on this software please visit the
Audacity website

(http://audacity.sourceforge.net/).

You can also look for support and help on the Audacity web forum (

http://audacityteam.org/forum/)

Below we just give you some simple steps to put you on the right track:

SETUP:

1. Connect the USB lead of the turntable to your computer
2. Install the Audacity recording software:

Download the latest version of Audacity from

http://audacity.sourceforge.net/

and

save the setup-file on your computer

Double-click the Audacity Setup file

Follow the instructions on your screen

3. Open the Audacity program
4. Go to EDIT then PREFERENCES (or press CTRL+P)

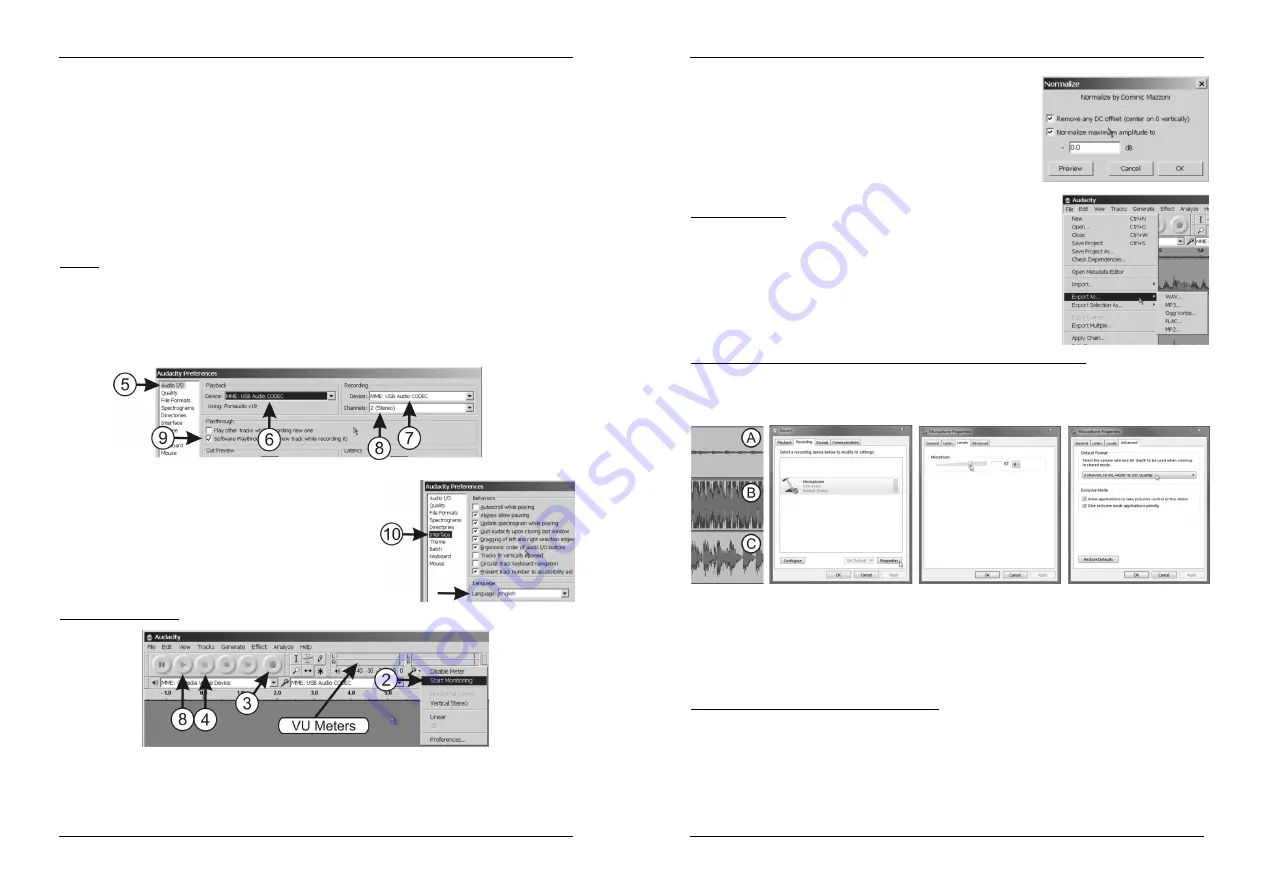
5. Click the AUDIO I/O tab
6. Choose the playback device from the drop down menu that

you want to use as soundcard for playback of your files.

7. Choose USB AUDIO CODEC as recording device from the

drop down menu.

8. Choose CHANNELS (2 Stereo)
9. Tick “SOFTWARE PLAYTHROUGH” box
10. Click the INTERFACE tab and check if your preferred

language exists in the drop down menu.

11. Click OK

RECORDING A TRACK:

1. Play the track you want to record on the turntable.
2. Put the arrow over the VU meters and click the right mouse button. In the small menu you must click on

“Start monitoring”. If everything’s OK you will hear the music of the track playing while the VU meters
start moving.

ENGLISH

OPERATION MANUAL

JB SYSTEMS

®

6/44

Q3-USB

3. Restart your track and click on the record button. The recording

starts: you will notice a screen with waveforms appearing on the
screen.

4. To stop the recording simply click on the stop button.
5. Press Ctrl+A to select the complete file
6. Open the EFFECT menu and choose the NORMALIZE effect
7. Use the same settings as on the picture and click OK.
8. click on the PLAY button to hear and check the recording.
9. Done! If you want you can perform all kinds of extra effects on the

recorded track. For these tasks however you have to consult the Audacity manuals and tutorials.

SAVING A TRACK:

You can save a file in different ways. Here we explain the basic save option.
1. Click on FILE to open the drop down menu
2. Select “EXPORT AS”
3. You can choose in which format you want to save your file.

Important remark:

To be able to save your recording as an MP3 file you

have to install the optional encoder first. Please refer to the Audacity website
for more information on how to do this.

ADJUSTING THE USB INPUT LEVEL + RECORDING CHANNELS IN WINDOWS:

In some cases you will have to adjust the input level for the USB-recording in Windows (see drawing below):
A. Input level too small: recording will have a poor signal/noise ratio.
B. Input level too high: recording will be distorted.
C. Input level is OK: well balanced recording.

In cases A and B you should adapt the recording level via Windows setup:

In Windows, open the configuration window and select “SOUND”

In the new window, select the “recording” tab

Choose the USB audio device (mostly indicated as “microphone”) and press the “properties” button.

In the new window, select the “levels” tab

you can adapt the input level and press “apply” to confirm.

Select the “advanced” tab

from the dropdown list, select “2channel, 16bit, 44100Hz (CD Quality)”

Press the “OK” button to confirm and save.

SOME NICE EFFECTS AND TOOLS TO LOOK AT:

NOISE REMOVAL:

tool to remove the noise from your recordings.

NORMALIZE:

tool to put all recordings at the same recording level (preferable at 0dB)

CLICK REMOVAL:

tool to remove small clicks and popping noises.

EQUALIZATION:

31-bands equalizer with a lot of presets.

CHANGE SPEED:

tool to change the speed and pitch of a recording. You can use this tool to record a

33

1/3

RPM vinyl at 78 RPM and reduce the speed back to normal. The recording time will be reduced a lot!

Remark:

refer to the Audacity website, manuals and tutorials for information on how to use these tools!

Содержание q3 usb

Страница 1: ...sanleitung Manual de instrucciones Manual do utilizador EN FR NL DE ES PT The Power Source for DJ s Copyright 2010 by BEGLEC NV t Hofveld 2C B1702 Groot Bijgaarden Belgium Reproduction or publication...

Страница 2: ...t toestel en de gebruikte batterijen op een milieuvriendelijke manier conform de in uw land geldende voorschriften DU ENTSORGUNG DES GER TS Entsorgen Sie das Ger t und die Batterien auf umweltfreundli...

Страница 3: ...t from working at full performance or may even cause damages This unit is for indoor use only Don t place metal objects or spill liquid inside the unit No objects filled with liquids such as vases sha...

Страница 4: ...ITCH Used to turn the turntable on off 11 POWER CORD CONNECTOR Used to connect to the mains using the supplied power cord 12 PHONO LINE SWITCH Depending on the position of the phono line switch you ca...

Страница 5: ...the screen 4 To stop the recording simply click on the stop button 5 Press Ctrl A to select the complete file 6 Open the EFFECT menu and choose the NORMALIZE effect 7 Use the same settings as on the p...

Страница 6: ...pos s par le fabricant Moteur entra nement direct sur couple haut D marrage arr t rapide 3 vitesses 33 45 78 rpm avec verrou quartz 2 gammes de vitesse possibles 10 20 Lecture des disques invers e So...

Страница 7: ...le manuel fourni avec l appareil Ce symbole signifie uniquement pour usage l int rieur Ce symbole signifie Lire le mode d emploi Ce symbole signifie appareil construit selon les normes de s curit cla...

Страница 8: ...a cellule Installation de la cellule S assurer que la cellule est bien install e dans le bras Mettre un disque et positionner l anti skating sur z ro Abaisser le l ve bras Tourner le contrepoids jusqu...

Страница 9: ...il n est pas n cessaire de r gler le niveau d enregistrement la fonction normalize galisera tous les niveaux des enregistrements 0 dB METTRE UNE PLAGE EN MEMOIRE Vous pouvez sauver un fichier de diff...

Страница 10: ...Dit product voldoet aan de gangbare Europese en nationale voorschriften Het is vastgesteld dat het apparaat er zich aan houdt en de desbetreffende verklaringen en documenten zijn door de fabrikant afg...

Страница 11: ...ratuur belangrijke gebruik en onderhoudsinstructies vermeld staan betreffende dit onderdeel Dit symbool betekent het apparaat mag enkel binnenhuis worden gebruikt Dit symbool betekent Lees de handleid...

Страница 12: ...igen 15 TEGENGEWICHT Gebruik het tegengewicht om de neerwaartse naalddruk in te stellen Raadpleeg hiervoor de gebruiksaanwijzing van de naaldconstructeur Instellen van de naalddruk Controleer of de ce...

Страница 13: ...e Audacity handleidingen en lessen te raadplegen EEN NUMMER OPSLAAN U kan een bestand op verschillende wijzen opslaan Hieronder wordt de basis methode van opslaan uit de doeken gedaan 1 Klik op BESTAN...

Страница 14: ...Ausgang zur direkten Aufnahme auf jeden PC Kostenlos mehrsprachige Audacity als Download verf gbar Endlose M glichkeiten mit kostenlosen herunterladbaren Effekt plug ins Import Export und Bearbeiten v...

Страница 15: ...s reparieren oder berbr cken sondern immer mit gleichartiger Sicherung ersetzen Bei Fehlfunktion Ger t nicht benutzen und sich mit dem H ndler in Verbindung setzen Bei Transport bitte Originalverpacku...

Страница 16: ...nen Sie das Gewicht des Systems nach Herstellerangabe einstellen Vergessen Sie nicht den Anti Skate wieder dementsprechend einzustellen 16 ANTI SKATE RAD Wenn eine Schallplatte spielt wirken verschied...

Страница 17: ...em neuen Fenster w hlen Sie Aufnahme W hlen Sie den USB Audio Ger t meist als Mikrofon angegeben und dr cken Sie Eigenschaften In dem neuen Fenster w hlen Sie Lautst rke Justieren Sie das Input level...

Страница 18: ...ador Adaptador 45 rpm Contrapeso Porta capsula Capsula Cable de enchufe protecci n contra el polvo Cable USB PRECAUCIONES DE USO Af n de evitar todo riesgo de incendio o electrocuci n no exponer el ap...

Страница 19: ...mult neamente los botones 33 y 45 para seleccionar la velocidad de 78rpm 7 BOT N QUARTZ Pulsando el bot n QUARTZ la platina se pone en velocidad exacta mismo si el deslizante no est centrado 8 DESLIZA...

Страница 20: ...EPRODUCCI N HARDWARE SOFTWARE PLAYTHROUGH 10 haga clic en la etiqueta ENTORNO INTERFACE y compruebe si su idioma est en la lista desplegable 11 Haga clic en OK ESPA OL MANUAL DE INSTRUCCIONES JB SYSTE...

Страница 21: ...l de usuario en nuestro sitio web www beglec com PORTUGU S MANUAL DO UTILIZADOR JB SYSTEMS 38 44 Q3 USB MANUAL DO UTILIZADOR Parab ns e obrigado por ter adquirido este produto JB SYSTEMS Por favor lei...

Страница 22: ...onectada completamente dos canos principais De forma a n o correr risco de choque el ctrico n o abra a cobertura da unidade excep o do fus vel n o existem pe as que possam ser substitu das pelo utiliz...

Страница 23: ...e assegurando se que o contrapeso n o se move Em seguida gire o contrapeso na sua totalidade no sentido dos ponteiros do rel gio at que o anel indique a press o certa da agulha N o se esque a de volt...

Страница 24: ...s abra a janela de configura o e seleccione SOUND Na nova janela seleccione o separador recording Escolha o dispositivo de udio USB geralmente indicado como microfone e pressione o bot o propriedades...

Отзывы: