background image

ENGLISH

OPERATION MANUAL

JB SYSTEMS

®

5/45

CYCLOPE

Show Mode

Used to choose to select one of the preprogrammed shows when used in standalone or master/slave
mode. This menu option is not available when the unit is set to slave mode (“

S L 1

” or “

S L 2

”)!

Press the MENU button until

is showing on the display.

Press the ENTER button, the current show starts blinking in the display.

Use DOWN and UP buttons to select one of the 12 preprogrammed shows (

(show 0) to

(show 12)

Once the right show blinks on the display, press the ENTER button to save it.
(or automatically return to the main functions without any change after 8 seconds)

To go back to the functions without any change press the MENU button again.

Blackout Mode

Blackout mode: when no DMX-signal is detected, the unit goes in blackout.
No blackout mode: when no DMX-signal is detected, the unit automatically switches to master mode.
This menu option is not available when the unit is set to slave mode (“

S L 1

” or “

S L 2

”)!

Press the MENU button until

is shown on the display.

Press the ENTER button, the current selection starts blinking in the display.

Use DOWN and UP button to select

Y E S

(blackout) or

n o

(no blackout) mode.

Once the mode is selected, press the ENTER button to save it.
(or automatically return to the main functions without any change after 8 seconds)

To go back to the functions without any change press the MENU button again.

Led Display

Display on: display is always on.
Display off: display is off when not used.

Press the MENU button until the display shows

.

Press the ENTER button, the display starts blinking.

Use DOWN and UP buttons to select

(display always on) or

(display off when not used).

Once the mode is selected, press the ENTER button to save it.
(or automatically return to the main functions without any change after 8 seconds)

To go back to the functions without any change press the MENU button again.

Display Inversion

Display normal: display is readable when the unit is on the floor.
Display inversion: display is readable when the unit is mounted upside down.

Press the MENU button until

is blinking on the display. (normal display)

Use the ENTER button to change to the mode

(display inversion), the option will be automatically

stored after 8 seconds. Or press the ENTER button again return to the mode

(normal display).

To go back to the functions press the MENU button.

Fixture Hours

Used to show the number of working hours of the unit.

Press the MENU button until

is blinking on the display.

Press the ENTER button to show the number of working hours in the display.

To go back to the functions press the MENU button.

Software version:

Used to show the software version of the unit.

Press the MENU button until

blinks on the display.

Press the ENTER button to show the software version of the unit.

To go back to the functions press the MENU button.

ENGLISH

OPERATION MANUAL

JB SYSTEMS

®

6/45

CYCLOPE

ELECTRICAL INSTAL ADDRESSING

Important: The electrical installation should be carried out by qualified personal only,
according to the regulations for electrical and mechanical safety in your country.

Electrical installation for 1 standalone unit:

Just insert the mains cable. The unit starts working immediately in stand-alone mode.

Remark1:

You can connect a CA-8 remote controller to the unit if you want to have more control. Refer to

“how to operate the unit” to learn how to do this.

Remark2:

if there’s no output, please make sure to set the unit in master mode (see previous chapter)

Electrical installation for two or more units in master/slave:

Connect 2 to maximum 16 units together using good quality balanced microphone cables. Put the first
unit of the chain in master mode, the rest must be set to slave mode (SL1 or SL2). See the previous
chapter for more information.

Make sure that all units are connected to the mains.

Done!

Remark:

You can connect a CA-8 remote controller to the master unit if you want to have more control

over the master/slave operation

Electrical installation in DMX-mode:

The DMX-protocol is a widely used high speed signal to control intelligent light equipment. You need to
“daisy chain” your DMX controller and all the connected units with a good quality balanced cable.

Both XLR-3pin and XLR-5pin connectors are used, however XLR-3pin is more popular because these
cables are compatible with balanced audio cables.
Pin layout XLR-3pin:

Pin1 = GND ~ Pin2 = Negative signal (-) ~ Pin3 = Positive signal (+)

Pin layout XLR-5pin:

Pin1 = GND ~ Pin2 = Negative signal (-) ~ Pin3 = Positive signal

(+) ~ Pins4+5 not used.

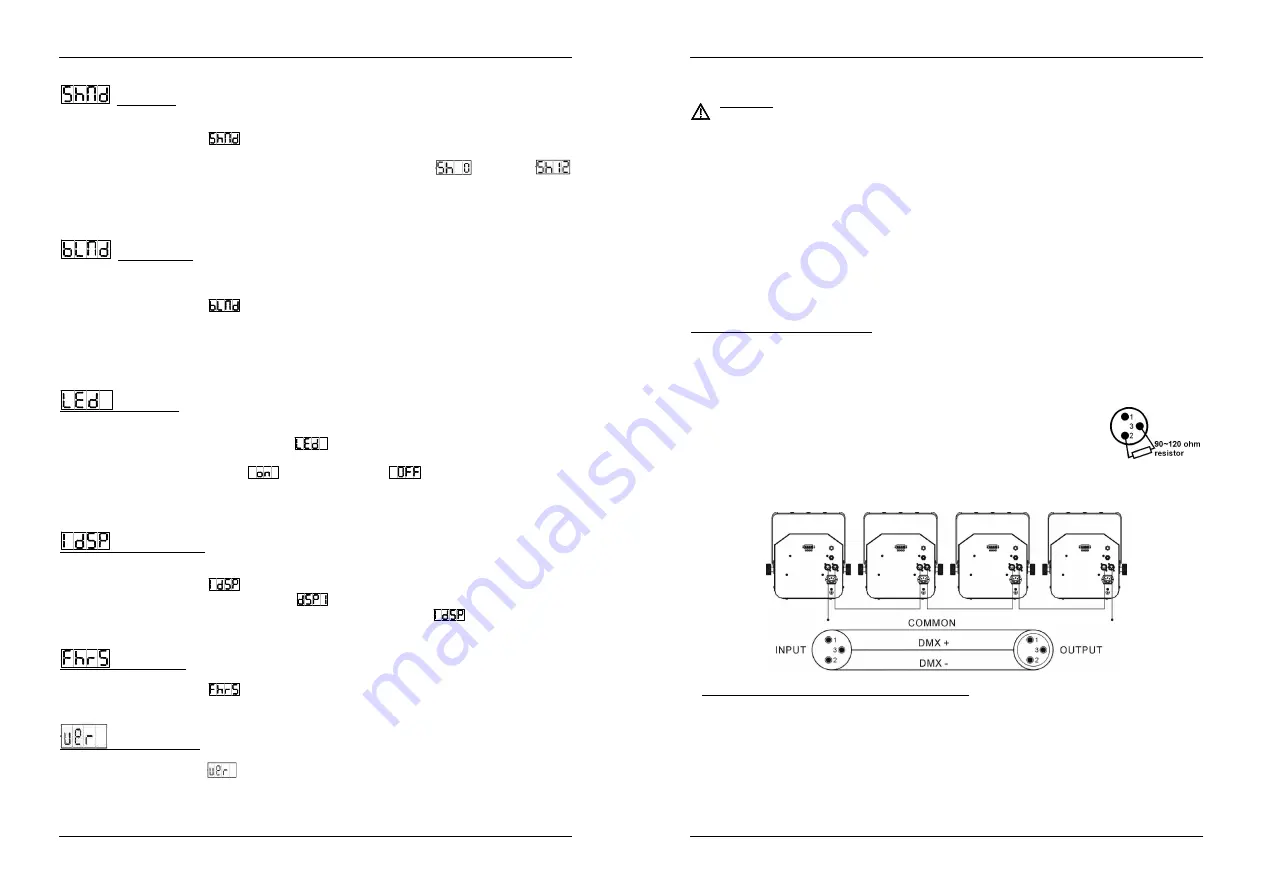
To prevent strange behavior of the light effects, due to interferences, you must use
a 90

Ω

to 120

Ω

terminator at the end of the chain. Never use Y-splitter cables, this

simply won’t work!

Make sure that all units are connected to the mains.

Each light effect in the chain needs to have its proper starting address so it knows which commands
from the controller it has to decode. In the next section you will learn how to set the DMX addresses.

HOW TO SET THE THE RIGHT STARTING ADDRESS:

Refer to the previous chapter (DMX-512 address setting) to learn how to set the starting address on this unit.
The starting address of each unit is very important. Unfortunately it is impossible to tell you in this user
manual which starting addresses you have to set because this completely depends on the controller you will
use… So please refer to the user manual of your DMX-controller to find out which starting addresses you
must set.

Содержание Cyclope

Страница 1: ...y BEGLEC cva Reproduction or publication of the content in any manner without express permission of the publisher is prohibited CYCLOPE Operation Manual Mode d emploi Gebruiksaanwijzing Bedienungsanleitung Manual de instrucciones EN FR NL DU ES ...

Страница 2: ...t toestel en de gebruikte batterijen op een milieuvriendelijke manier conform de in uw land geldende voorschriften DU ENTSORGUNG DES GERÄTS Entsorgen Sie das Gerät und die Batterien auf umweltfreundliche Art und Weise gemäß den Vorschriften Ihres Landes ES DESHACERSE DEL APARATO Reciclar el aparato y pilas usadas de forma ecologica conforme a las disposiciones legales de su pais PT COMO DESFAZER S...

Страница 3: ...en cause damages This unit is for indoor use only Don t place metal objects or spill liquid inside the unit Electric shock or malfunction may result If a foreign object enters the unit immediately disconnect the mains power Locate the fixture in a well ventilated spot away from any flammable materials and or liquids The fixture must be fixed at least 50cm from surrounding walls Don t cover any ven...

Страница 4: ...aster ENGLISH OPERATION MANUAL JB SYSTEMS 4 45 CYCLOPE 11 MENU button used to select the different menu items 12 DOWN button to go back in the menu and to lower the values shown on the display 13 UP button to go up in the menu and to increase the values shown on the display 14 ENTER button used to confirm your choice 15 DISPLAY shows the various menus and the selected functions HOW TO SETUP MAIN M...

Страница 5: ...on Used to show the softwareversion of the unit Press the MENU button until blinks on the display Press the ENTER button to show the software version of the unit To go back to the functions press the MENU button ENGLISH OPERATION MANUAL JB SYSTEMS 6 45 CYCLOPE ELECTRICAL INSTALLATION ADDRESSING Important The electrical installation should be carried out by qualified personal only according to the ...

Страница 6: ... happen Read more about this option in the How to setup paragraph MASTER has 12 built in shows You can select show 0 to show 12 directly in the menu of the master SLAVES have 2 working options These units are set to slave mode slave LED is constantly on In order to create a great light show you can introduce contrast movements In the menu of the slave units you can go to option and select o Normal...

Страница 7: ...es Faisceaux blancs bleus rouges et verts extrêmement denses un peu comme des rayons lasers Pas de lampes à remplacer Utilise des LED ayant une durée de vie très longue Pratiquement aucune production de chaleur Consommation de courant très faible Poids plume aucun transfo pour lampes n est nécessaire Fonction gradateur allant de 0 à 100 et fonction stroboscope ultrarapide Excellent programmes inté...

Страница 8: ... à l intérieur Ne jamais réparer ou court circuiter un fusible Remplacez systématiquement un fusible endommagé par un fusible de même type et ayant les mêmes spécifications électriques CAUTION ATTENTION afin de réduire le risque d électrocution n enlevez jamais le couvercle de l appareil Il n y a aucune pièce à l intérieur de l appareil que vous puissiez remplacer vous même Confiez l entretien uni...

Страница 9: ...ettre l appareil en mode master maître ou slave esclave Appuyez sur la touche MENU jusqu à ce que est affiché à l écran Appuyez sur la touche ENTER le mode de fonctionnement en cours commence à clignoter à l écran Utilisez les touches DOWN et UP pour sélectionner master esclave synchronisé au master ou esclave synchronisé en opposition par rapport au master Dès que le mode de fonctionnement est af...

Страница 10: ...riques pour micro de bonne qualité Mettez le premier appareil de la chaîne en mode master les autres doivent être mis en mode esclave SL 1 ou SL 2 Se reporter au chapitre précédent pour de plus amples informations Assurez vous que les appareils sont tous branchés sur le secteur Et c est terminé Remarque vous pouvez brancher une commande à distance CA 8 sur l appareil maître master si vous souhaite...

Страница 11: ...lumée Afin de créer un magnifique show vous pouvez introduire des mouvements contrastés dans le menu des appareils esclaves vous pouvez aller à l option et sélectionner FRANÇAIS MODE D EMPLOI JB SYSTEMS 18 45 CYCLOPE o Normal slave l appareil esclave fonctionne de façon synchronisée par rapport à l appareil maître o 2 light show l appareil esclave fonctionne de façon synchronisée mais en oppositio...

Страница 12: ...rm vertrek is overgebracht Condensatie kan het toestel soms verhinderen perfect te functioneren Het kan soms zelfs het apparaat beschadigen Gebruik dit apparaat uitsluitend binnenshuis Plaats geen stukken metaal en mors geen vocht binnen in het toestel om elektrische schokken of storing te vermijden Indien een vreemd voorwerp in het apparaat geraakt moet U het direct van het lichtnet afkoppelen Pl...

Страница 13: ...ker en geïntegreerde zekeringhouder Sluit hier de meegeleverde stroomkabel aan NEDERLANDS HANDLEIDING JB SYSTEMS 22 45 CYCLOPE 2 DMXingang 3 DMXuitgang 4 Jack ingang voor de optionele CA 8 hand controller 5 Ingebouwde microfoon 6 ophangbeugel met 2 schroefknoppen om het toestel vast te zetten 7 Slave LED is aan wanneer het toestel in slave modus staat 8 Sound LED knippert op het ritme van de muzie...

Страница 14: ... op de MENU toets te drukken Display Inversion Display normal display is leesbaar wanneer het toestel op de grond staat Display inversion display is leesbaar wanneer het toestel ondersteboven hangt Druk op de MENU toets tot knippert op de dislpay normal display NEDERLANDS HANDLEIDING JB SYSTEMS 24 45 CYCLOPE Druk op de ENTER toets om over te schakelen op display inversion de handeling wordt automa...

Страница 15: ...ase voor elk van de 7 LED clusters o Kanaal 2 LED cluster 1 o Kanaal 3 LED cluster 2 o o Kanaal 8 LED cluster 7 Kanaal 9 strobe speed pattern mode of chase speed chase mode Kanaal 10 algemene dimmer BEDIENING VAN HET TOESTEL Elke keer dat het toestel wordt aangezet verschijnt er L777 op het display U KUNT HET TOESTEL OP 3 MANIEREN GEBRUIKEN o Via de master slave functie en ingebouwde programma s o...

Страница 16: ...STEMS 28 45 CYCLOPE Vielen Dank dass Sie sich für den Erwerb dieses JBSystems Produkt entschieden haben Bitte lesen Sie diese Bedienungsanleitung sorgfältig vor der Inbetriebnahme durch zur vollen Ausschöpfung der Möglichkeiten die dieses Gerät bietet sowie zu Ihrer eigenen Sicherheit EIGENSCHAFTEN Das Gerät ist funkentstört und erfüllt die Anforderungen der europäischen und nationalen Bestimmunge...

Страница 17: ...n CAUTION ACHTUNG Um sich nicht der Gefahr eines elektrischen Schlags auszusetzen entfernen Sie keines der Gehäuseteile Im Geräteinneren befinden sich keine vom Benutzer reparierbaren Teile Überlassen Sie Reparaturen dem qualifiziertenKundendienst Das Blitzsymbol im Dreieck weist den Benutzer darauf hin dass eine Berührungsgefahr mit nicht isolierten Teilen im Geräteinneren die eine gefährliche Sp...

Страница 18: ...auptfunktionen ohne Änderung Zur Rückkehr zu den Funktionen ohne Veränderung MENÜ Taste erneut drücken Anmerkungen wenn SL 1 oder SL 2 gewählt wurde sind bestimmte Menüoptionen nicht verfügbar Ist nur ein Gerät im Einsatz wählen Sie immer den Master Modus Showbetrieb Zum Auswählen eines der vorprogrammierten Shows bei Benutzung im Standalone oder Master Slave Modus Diese Menüoption ist nicht verfü...

Страница 19: ...chgeschwindigkeitssignal um intelligente Lichtsysteme zu steuern Sie müssen Ihren DMX Controller und alle angeschlossenen Geräte mit einem hochwertigen symmetrischen Kabel hintereinander schalten daisy chain Es werden sowohl XLR 3pin als auch XLR 5pin Stecker benutzt allerdings ist der XLR 3pin gängiger da diese Kabel mit symmetrischen Audiokabel kompatibel sind StiftanordnungXLR 3pin Pin1 GND Pin...

Страница 20: ...ASY CONTROLLER Bei Verwendung in Betriebsart Haupt Untergerät empfehlen wir dringend die Verwendung unseres CA 8 Easy Controller Diesen kleinen Controller einfach an der 1 4 Buchse des Hauptgeräts anschließen und dann folgende Funktionen steuern Stand by Blackout des Geräts Funktion Musik Strobe Wählen Sie einen der 12 Chase Modus Strobe Musik LED off Chase LED ON DEUTSCH BEDIENUNGSANLEITUNG JB SY...

Страница 21: ...ior cuando la lleve a una habitación cálida después del transporte A veces la condensación impide que la unidad funcione a pleno rendimiento y puede incluso provocar daños Esta unidad sólo se puede usar en el interior No coloque objetos metálicos ni derrame líquidos dentro del reproductor de la unidad Se pueden producir descargas eléctricas o fallos de funcionamiento Si algún objeto extraño entra ...

Страница 22: ...ntaje para instalar el gancho de montaje 7 LED esclavo se enciende cuando la unidad está en modo esclavo 8 LED de sonido parpadea al ritmo de la música mientras la unidad está en modo audio 9 LED DE DMX se enciende cuando la unidad recibe una señal DMX 10 LED maestro se enciende cuando la unidad está en modo maestro 11 Botón MENU se utiliza para seleccionar los diferentes elementos del menú 12 BOT...

Страница 23: ... ENTER para cambiar a la modalidad inversión de pantalla la opción se almacenará automáticamente después de 8 segundos O pulse el botón ENTER de nuevo para volver a la modalidad pantalla normal Para volver a las funciones pulse el botón MENU ESPAÑOL MANUAL DE INSTRUCCIONES JB SYSTEMS 42 45 CYCLOPE Horas del aparato Se utiliza para mostrar el número de horas de funcionamiento de la unidad Pulse el ...

Страница 24: ...e LEDs 2 o o Canal 8 Grupo de LEDs 7 Canal 9 velocidad estroboscópica modo patrón o velocidad de oruga modo de oruga Canal 10 regulador de intensidad luminosa general MANEJO DE LA UNIDAD Cada vez que encienda la unidad se mostrará L777 en la pantalla PUEDEMANEJAR LA UNIDAD DE TRES FORMAS o Mediante la función preprogramada incorporada maestra esclava o Mediante el controlador fácil CA 8 o Mediante...

Страница 25: ...almente mediante una aspiradora o chorro de aire La limpieza de las lentes internas y externas y o espejos deberá llevarse a cabo periódicamente para optimizar la emisión luminosa La frecuencia de limpieza depende del entorno en el que funcione el aparato los ambientes húmedos con humo o especialmente sucios pueden provocar una mayor acumulación de suciedad en los elementos ópticos del aparato Lim...

Отзывы: