


11
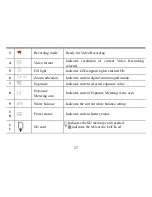
OK Button
Press to confirm MENU/ option settings
Press to START / STOP playing a video clip when Playback
mode has been selected.
Delete Button
With Playback mode selected; press DELETE Button to access
YES / NO delete options for selected Video clip or Still Photo.
Self-Timer
Indicator
Indicator blinks when the Self-Timer is activated and count
down is in process
Display Button
Pressing this button will sequentially change LCD display view
BASIC OPERATION - GETTING STARTED
Note:
Your recorder requires batteries and SD/SDHC Memory Card inserted to operate. These
are not supplied and should be obtained separately. SD/SDHC memory card with capacity up
to 8GB may be used in your recorder.
1.
Battery Installation
- The video recorder uses four AAA size alkaline batteries as power supply
- Slide / open the Battery Cover
- Insert batteries into the batteries compartment correctly, following the polarity markings
indicated next to the Battery compartment.
Before changing installed but exhausted batteries, first turn OFF the recorder.
2.
SD/ SDHC Memory Card Installation
- With the Battery Cover opened, insert the SD/SDHC memory card into the Card Slot, press
card fully down until card is latched.
- Orient the card following the SD Card mark
Содержание HDV102
Страница 1: ...1 ...
Страница 7: ...7 Know your Video Recorder ...
Страница 8: ...8 ...
Страница 9: ...9 ...
Страница 35: ...35 Programs to open MediaImpression After starting MediaImpression click Import to import the media ...