Jason International, Inc. •
501.771.4477
Page 2 of 2
Customer Service : 800.255.5766
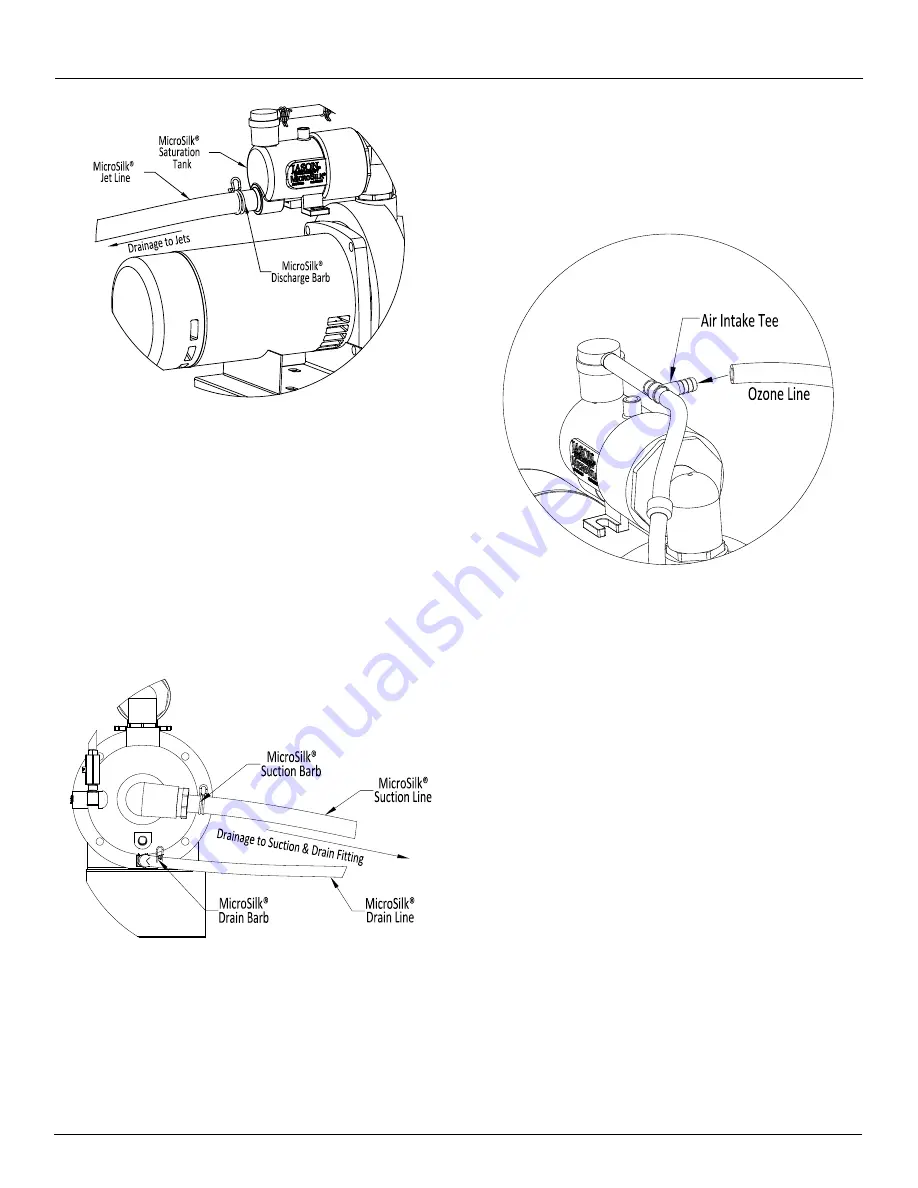
FIELD InstaLLatIon InstructIons (cont.)
Figure 3
7. For a MicroSilk
®
only or MicroSilk
®
-Air bath (not
MicroSilk
®
-Whirlpool), if an Automatic Ozone Sanitation
System is installed, connect the ozone system tubing to
the tee above the MicroSilk
®
Saturation Tank with the
included clamps
(figure 5)
.
Figure 5
8. The bottom of the Pump Mount must be secured and
level with the bottom of the bath. It is recommended
that removable fasteners be used in case any future
servicing is required.
9. Continue bath installation per the Jason Owner’s Manual
Installation, Operation, and Maintenance guide.
4. Clamp the MicroSilk
®
Jet Line to the MicroSilk
®
Discharge Barb using the clamp provided on the tubing.
Assure the MicroSilk
®
Jet Line will allow proper drainage
to the Jets
(figure 3).
The discharge hose must have a
continuous drop from the discharge barb to the jet fitting.
5. Clamp the MicroSilk
®
Suction Line to the MicroSilk
®
Suction Barb using the clamp provided on the tubing.
Assure the MicroSilk
®
Suction Line will allow proper
drainage to the suction
(figure 4)
. The suction hose
must have a continuous drop from the suction barb to
the suction fitting.
Figure 4
6. Clamp the MicroSilk
®
Drain Line to the MicroSilk
®
Drain
Barb using the clamp provided on the tubing. Assure
the MicroSilk
®
Drain Line will allow proper drainage to
the drain fitting
(figure 4)
. The drain hose must have a
continuous drop from the drain barb to the drain fitting.
caution: confirm all tubing is fully engaged on its
respective barb and its clamp has secured the tubing
to the barb.


