background image

Copyright©2022 Shenzhen JASIC Technology Co., Ltd.

ARC200PFC/ARC160PFC
ARC200/ARC160
IGBT INVERTER WELDER

Содержание Arc 200 PFC

Страница 1: ...Copyright 2022 Shenzhen JASIC Technology Co Ltd ARC200PFC ARC160PFC ARC200 ARC160 IGBT INVERTER WELDER...

Страница 2: ...evant domestic and international standards and that this product conforms to EN60974 1 International Safety Standard Patents protect the relevant design scheme and manufacturing technology adopted in...

Страница 3: ...of working mode 21 6 5 Selection of welding electrode diameter for MMA 22 6 6 Selection of MMA parameters 22 6 7 LIFT TIG mode parameter setting 23 6 8 Protection indicators 23 6 9 VRD Voltage reduct...

Страница 4: ...Page 4 Appendix 3 Exploded view of ARC160PFC and ARC200PFC 43...

Страница 5: ...afety please read this manual carefully before installing and operating this JASIC equipment Pay extra attention to all content marked with All operations must be carried out by professional suitably...

Страница 6: ...er on the machine Electric shock May cause serious injury or even death The equipment should be installed by a qualified person and in accordance with current standards in operation It is the users re...

Страница 7: ...hese must be carefully cleaned before they can be welded or cut Always allow the welded or cut material to cool before touching it or placing it in contact with combustible or flammable material Do no...

Страница 8: ...ections and coverings may be removed for maintenance and controls only by qualified personnel after first disconnecting the power supply cable Replace the coverings and protections and close all doors...

Страница 9: ...ed 1 When the operator s movement is limited by the surroundings for example the operator can only bend his knees barefoot or lie down during operation the operator shall practice proper insulation an...

Страница 10: ...duration time the full cycle time Note1 This ratio shall be within 0 1 and can be indicated by percentage Note2 In this standard the full cycle time is 10 min For example if the duty cycle is 60 the...

Страница 11: ...achine with a wide range of applications With DC MMA and LIFT TIG processes it can be widely used in precise welding of an extensive range of materials The unique electrical structure and air passage...

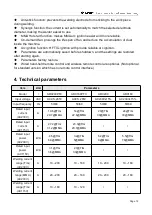
Страница 12: ...d hand held remote control and wireless remote control are optional Not optional for standard version which has no remote control interface 4 Technical parameters Item Unit Parameters Model ARC200PFC...

Страница 13: ...VRD voltage V 11 11 11 11 Arc start mode Contact arc start Contact arc start Contact arc start Contact arc start Duty cycle TIG 200 25 MMA 200 25 TIG 160 25 MMA 160 25 TIG 200 25 MMA 200 25 TIG 160 2...

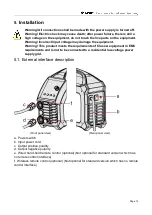
Страница 14: ...oduct meets the requirements of Class A equipment in EMC requirements and is not to be connected to a residential low voltage power supply grid 5 1 External interface description Front panel view Rear...

Страница 15: ...ed input voltage range 2 Ensure that the power switch of the welder is turned off 3 Connect the input power cord to the input terminal or plug the power cord into the corresponding socket if any and e...

Страница 16: ...trode Generally speaking DCEP is recommended for basic electrodes i e electrode connected to the positive polarity while no special provisions are made for acid electrodes 1 Ensure that the power swit...

Страница 17: ...of the welder and tighten it clockwise Note The positive and negative polarities should not be reversed as this will prevent normal welding operation 4 Connect the shield gas pipe input end of the we...

Страница 18: ...Insert the 3 pin aviation plug of the hand held remote controller directly into the corresponding remote socket of the machine NOTE Please check that the machine supports wired hand held remote contr...

Страница 19: ...crews on the left side cover of the machine 3 Remove the buckle inside the front panel of the machine and pull out the plug 4 Insert the wireless receiver module to the front panel and then connect th...

Страница 20: ...tection indicator c Operation mode selector d electrode diameter selector e VRD function indicator f Parameter adjustment knob g MMA parameter selection h Remote control enable optional The standard v...

Страница 21: ...Rotate the adjusting knob to adjust the parameters 2 Rotating the adjusting knob clockwise increases the parameter value and rotating the adjusting knob counterclockwise decreases the parameter value...

Страница 22: ...rs are not adjustable 6 6 Selection of MMA parameters 1 In MMA mode and Manual mode the parameters of welding current Hot start current and Arc force can be selected by pressing the button of MMA para...

Страница 23: ...ng is performed the VRD indicator light displays red indicating that the VRD function is abnormal 4 When the VRD function is enabled the VRD indicator is not on during welding 6 10 Barcode display Bef...

Страница 24: ...ote control optional Not optional for standard version without remote control interface 1 Wireless pairing connection Before welding press and hold the panel remote control function button and the pai...

Страница 25: ...ing Be sure to wear appropriate protective equipment during welding or cutting operation Arcs spatter smoke and high temperatures produced in the process may cause injury to personnel Warning After th...

Страница 26: ...tate the adjuster knob according to the welding requirements to fine tune the welding current parameters The table below gives a guide to set up for various material thicknesses and welding electrode...

Страница 27: ...Page 27 6 0 220 300...

Страница 28: ...positive and negative electrodes of the welding arc is different When welding using DC power supply there are DCEN DC electrode negative and DCEP DC electrode positive connections The DCEN connection...

Страница 29: ...b Choose the appropriate welding current tungsten electrode and shielding gas flow based on the welding requirements As a guide please refer to the following data Stainless steel plate selection of pa...

Страница 30: ...eration mode I I U U0 UVRD LIFT TIG process NOTE When starting the arc if the short circuit time exceeds 2 seconds the welder turns off the output current Lift the welding torch Restart the process as...

Страница 31: ...rate and repair times of the machine so as to lengthen service life of the machines Period Maintenance item Daily examination Check the condition of the machine mains cables welding or cutting cables...

Страница 32: ...g pipe with compressed air to clear the blockage The collet fails to clamp the tungsten electrode Replace the collet or back cap Water leakage The sealing ring is aged Replace the sealing ring The wat...

Страница 33: ...ll Adjust the gas flow properly Arcing and burning of metal nozzle The insulation gasket burns out and losses its insulation function Replace the insulation gasket The insulation gasket is broken down...

Страница 34: ...aken by users After startup the fan does not run or the speed is abnormal The air temperature is too low or the fan is damaged When the temperature is too low you should leave the machine work for a w...

Страница 35: ...ckening of weld joints Welds are not effectively protected and oxidized 1 Make sure that the valve of argon cylinder has been opened and there is enough pressure Generally if the pressure in the cylin...

Страница 36: ...grid is poor Serious interference from other electrical equipment 1 Check whether the power grid is normal and well connect the power connector Use different power cords to connect equipment that cou...

Страница 37: ...age continues to be too high please check the power grid voltage and wait for the grid voltage to return to normal before welding If the grid voltage is normal and there is still under voltage alarm p...

Страница 38: ...omponents according to the type of materials Do not dispose of the equipment with normal waste The European Directive 2002 96 EC on Waste Electrical and Electronic Equipment states the electrical equi...

Страница 39: ...Page 39 Appendix 1 Wiring diagram...

Страница 40: ...Page 40 Appendix 2 Exploded view of ARC160 and ARC200 1 2 3 4 5 6 7 8 9 10 11 12 13 14 15 16 17 18 19 20 22 21 23 38 39 40 24 25 26 27 28 29 30 32 33 34 31 35 36 37...

Страница 41: ...002054 Display panel standard 1 29 51000700 EMC inductor 2 9 10083453 Silicone key 1 30 51000602 IGBT 4 10 10083474 Iron plate of display panel 1 31 51000703 Thermocouple 2 11 51000401 Display panel P...

Страница 42: ...2053 Display panel standard 1 29 51000700 EMC inductor 2 9 10083453 Silicone key 1 30 51000601 IGBT 4 10 10083474 Iron plate of display panel 1 31 51000703 Thermistor 2 11 51000401 Display panel PCBA...

Страница 43: ...Page 43 Appendix 3 Exploded view of ARC160PFC and ARC200PFC...

Страница 44: ...Page 44 List of common spare parts for ARC160PFC SN Material code Name Quantity SN Material code Name Quantity 1 10083652 Iron plate of 1 19 10083671 Louver 1...

Страница 45: ...28 Diode heat sink 2 10083670 Front panel 1 29 51000937 Electrolytic capacitor 2 10 10083646 Fan mounting plate 1 30 10083647 Chassis plus 1 11 10083654 Rear panel bracket 1 51002018 Chassis standard...

Страница 46: ...ket plus 1 27 10083490 Main transformer 1 9 10083669 Rear panel 4 28 10083628 Diode heat sink 2 10083670 Front panel 4 29 51000937 Electrolytic capacitor 2 10 10083646 Fan mounting plate 1 30 10083647...

Отзывы: