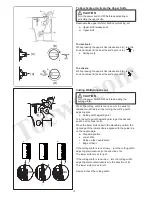
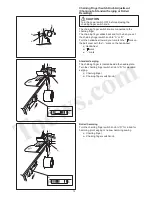
background image

GETTING READY TO SEW


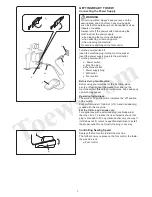
Connecting the Power Supply


WARNING


While in operation, always keep your eyes on the


sewing area, and do not touch any moving parts  
such as the thread take-up lever, handwheel, knives,  
loopers or needles.


Always turn off the power switch and unplug the  
machine from the power supply:


- when leaving the machine unattended.


- when attaching or removing parts.


- when cleaning the machine.


Do not place anything on the foot control.


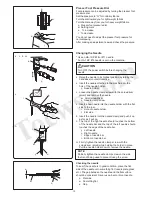
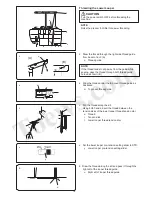
Turn the power switch off.


Insert the machine plug into the machine socket.  
Insert the power supply plug into the wall outlet.  
Turn the power switch on.


q  

Power switch  

w  

Machine plug  

e  

Machine socket


r  

Power supply plug


t  

Wall outlet


y  

Foot control


Before Using Your Machine


Before using your machine for the first time, place


a scrap of fabric under the presser foot and run the  
machine without thread for a few minutes. Wipe away any  
oil which may appear.


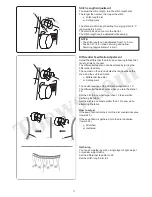
Operating Instructions:


The symbol 

“O” on the switch indicates the “off” position


of the switch.


Foot control model YC-482-J-1 (U.S.A and Canada only)  
is used with this machine.


For the U.S.A. and Canada only:


For appliances with a polarized plug (one blade wider


than the other): To reduce the risk of electric shock, this  
plug is intended to fit in a polarized outlet only one way. If  
it still does not fit, contact a qualified electrician to install  
the proper outlet. Do not modify the plug in any way.


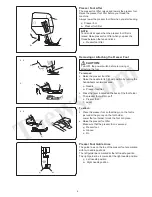
Controlling Sewing Speed


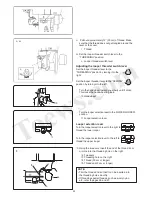
Depress the foot control to start the machine.


The further down you press on the foot control, the faster  
the machine runs.


q  

Foot control


q


q


t


r


w


e


y


7


Содержание Air Thread 2000D Professional

Страница 1: ...Instruction Book AirThread 2000D Professional Janome 2000D Air Threading Serger Owners Manual Janome Air Thread Instruction Book...

Страница 2: ...et 9 Do not unplug by pulling on cord Tounplug grasp the plug not the cord 10 Keep fingers away from all moving parts Special care is required around the Serger Overlocker Overlock machine needle and...

Страница 3: ...der 18 Lowering the spreader 18 Threading the Lower Looper 19 21 Threading the Upper Looper 22 25 Adjusting the looper threader switch lever 23 Threading Loopers with the Looper Threading Wire or Stan...

Страница 4: ...idecover 4 Presser foot pressuredial 5 Threadguide 6 Thread guidebar 7 Spoolholder 8 Ventilation openings 9 Spoolpin 0 Hole of rear arm 1 Top cover thread guide 2 Needle threader lever 3 Face plate 4...

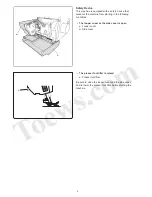
Страница 5: ...starting in the following conditions The looper cover or the side cover is open q Looper cover w Side cover q 4 w e The presser foot lifter is raised e Presser foot lifter Be sure to close the looper...

Страница 6: ...P 11 x 2 HAx1 SP 14 x 3 784860100 6 Net 624806006 7 Spool holder cap Large 822020503 8 Lint brush 802424004 9 Oil 741814003 10 Needle holder spreader pin 799802007 11 Upper knife 799096000 12 Looper t...

Страница 7: ...e trimmings after sewing To attach Sliding the waste chip box along the looper cover guide insert the tabs into the slit under the looper cover q Looper cover w Waste chip box e Looper cover guide r S...

Страница 8: ...trol Before Using Your Machine Before using your machine for the first time place a scrap of fabric under the presser foot and run the machine without thread for a few minutes Wipe away any oil which...

Страница 9: ...it to the right as far as it will go Pull the looper cover toward you to open it q Looper cover To close Push the looper cover back up The looper cover snaps into position automatically Side Cover To...

Страница 10: ...sure that the presser foot is secured q Presser foot w Groove e Pin Presser Foot Guide Lines The guide lines on the toe of the presser foot are marked with two needle positions The left guide line is...

Страница 11: ...olding the holder in place Pull the needle holder down to remove the needle Checking the needle To see if the needle is in good condition place the flat side of the needle onto something flat needle p...

Страница 12: ...feed motion q Differential feed dial w Settingmark The neutral position of the differential feed dial is 1 0 The differential feed dial clicks when you turn the dial at 1 0 Set the dial to a number la...

Страница 13: ...n the needle plate t Edge of fabric If the cutting width is too narrow y turn the cutting width adjusting dial clockwise to the direction of A The lower knife moves to right If the cutting width is to...

Страница 14: ...itch knob to R for rolled for hemming picot edging or narrow hemming sewing q Chaining finger w Chaining finger switchknob CAUTION Turn the power switch OFF before adjusting the chaining finger switch...

Страница 15: ...r Spool pin Attaching the Spool Holder Cap and Net When you use a small thread spool pull out the spool holder from the spool pin Place the spool with its slit side up and put the spool holder cap on...

Страница 16: ...s refer to page 14 Raise the presser foot lifter refer to page 9 Open the looper cover refer to page 8 Lower looper pre tension setting slider The lower looper pre tension setting slider adjusts the l...

Страница 17: ...efer to pages 28 29 for details on how to thread the right needle and page 30 for details on how to use the needle threader CAUTION Turn the power switch OFF before threading the machine 16 Using the...

Страница 18: ...30 for details on how to use the needle threader CAUTION Turn the power switch OFF before threading the machine 17 Using the needle on the left only for wide two thread serging When you use the left...

Страница 19: ...e spreader pin so that the hook goes behind the bulge of the upper looper and into the hole in the upper looper 0 Bulge v Remove the spreader pin from the spreader 1 Hole of upper looper Upper view of...

Страница 20: ...hreadguide c Pull the thread along the slit Using both hands insert the thread between the tension disks of the lower looper thread tension dial e Thread r Tension disk t Lower looper thread tension d...

Страница 21: ...cover i Thread m Set the looper threader switch lever to the THREADING position o Looper threader switch lever Adjusting the looper threader switch lever Set the looper threader lever to the THREADING...

Страница 22: ...ot come out from the hole follow the procedure from step 1 again If the thread comes out behind the pipe use the tweezers to draw the thread toward you between the lower looper and the pipe 9 Thread b...

Страница 23: ...etween the tension disks of the upper looper thread tension dial e Thread r Tension disk t Upper looper thread tension dial v Draw the thread along the slit and pass it through the left slit of the lo...

Страница 24: ...h lever Adjusting the looper threader switch lever Set the looper threader lever to the THREADING position by turning it to the right Set the looper threader lever to the SEWING position by turning it...

Страница 25: ...e upper looper tip 6 Thread end 7 Hole of lower looper tip 3 Draw 4 10 cm of the thread under the toe of the foot and pull it to the rear between the foot and the upper knife 8 Upper knife 4 Return th...

Страница 26: ...thread from the holes Rethread both of the threads 2 When the looper threader switch lever is in the THREADING position the handwheel is locked Even if the foot control is depressed the handwheel doe...

Страница 27: ...switch lever to the THREADING position q Looper threader switch lever c Turn the handwheel toward you slowly until it clicks This locks the handwheel in place w Handwheel v Pass the straight end not...

Страница 28: ...weezers i Looper threader hole n Raise the looper threader lever until it clicks into place Lower the looper threader lever until it knocks into place o Looper threader lever m Pull out approximately...

Страница 29: ...the thread along the slit Using both hands insert the thread between the tension disks of the right needle thread tension dial e Thread r Tension disk t Right needle thread tension dial NOTE Raise the...

Страница 30: ...ad through the right slit of the needle thread guide 0 Needle thread guide m Pass the thread through the needle bar thread guide from left to right 1 Needle bar thread guide Thread the right needle fr...

Страница 31: ...when threading the right needle Set the needle threader switch lever to L when threading the left needle e Needle threader switch lever v Pull down the needle threader lever as far as it will go r Nee...

Страница 32: ...the thread along the slit Using both hands insert the thread between the tension disks of the left needle thread tension dial e Thread r Tension disk t Left needle thread tension dial NOTE Raise the p...

Страница 33: ...s the thread through the left slit of the needle thread guide 0 Needle thread guide m Pass the thread through the needle bar thread guide from left to right 1 Needle bar thread guide Thread the left n...

Страница 34: ...otton Linen Satin Ordinary fabric Synthetic 60 100 HAx1SP 14 2 5 3 5 1 0 Heavy weight Tweed Coating Denim Doeskin Thick fabric Synthetic 50 100 HAx1SP 14 3 0 5 0 1 0 Knits Knitted fabric Synthetic 60...

Страница 35: ...the foot You do not need to raise the foot Start sewing slowly The fabric will automatically be fed Guide the fabric in the desired direction For heavyweight fabric raise the presser foot and insert...

Страница 36: ...and start sewing while guiding the fabric 35 q Using Guide Lines The guide lines on the top of the looper cover help you to measure the distance from the right needle drop position The numbers on the...

Страница 37: ...on the machine Serge a few stitches and stop c Raise the presser foot and bring the thread chain to the left around and under the presser foot v Place the thread chain between the presser foot and upp...

Страница 38: ...needle thread tension is too loose Remedy Tighten the left needle thread tension 1 Left needle tension dial Right needle thread tension is too loose The illustration to the left shows a seam sewn whe...

Страница 39: ...thread r Left needle thread t Upper looper thread y Lower looper thread 3 Upper looper thread tension dial 4 Lower looper thread tension dial Looper thread tension is out of balance 2 The illustration...

Страница 40: ...he illustration to the left shows a seam sewn when the left needle thread tension is too loose Remedy Tighten the needle thread tension 0 Left needle tension dial 1 Right needle tension dial Looper th...

Страница 41: ...Needle Lower looper thread tension is out of balance 1 The illustration to the left shows a seam sewn when the lower looper thread tension is too tight and or the needle thread tension is too loose R...

Страница 42: ...ic thread for the needle thread and woolly nylon thread for the lower looper thread Set the lower looper pre tension setting slider to STD Other settings are same as the 3 threads rolled hem refer to...

Страница 43: ...0 1 0 1 0 Chaining finger switch knob R R R Upper knife Activated Needle Using the right needle HA 1 SP No 11 Remove the left needle Needle thread Synthetic No 80 100 Fabric Lightweight fabric such a...

Страница 44: ...Gently pull the end of thread chain to the back at the beginning and end of sewing 43 Picot edging Gently pull the fabric to the back while sewing NOTE The sewing procedure of narrow hemming is the sa...

Страница 45: ...q Wrong side of fabric w Right side of fabric e Right needle thread r Upper looper thread t Lower looper thread Thread tension adjustment 1 Set the tension dials as shown on page 42 2 Sew and check th...

Страница 46: ...ight needle thread tension and or loosen the lower looper thread tension y Right needle thread tension dial i Lower looper thread tension dial q w e r t y i q w e r t u q 45 w e r t u i The upper loop...

Страница 47: ...ead tension dial r Lower looper thread tension dial t Chaining finger switch knob y Upper knife release knob u Stitch length dial i Differential feed dial o Lower looper pre tension setting slider Ref...

Страница 48: ...re tension setting slider Refer to page 10 for details on how to remove the needle Refer to page 11 for details on how to adjust the stitch length Refer to page 11 for details on how to adjust the dif...

Страница 49: ...adjust the thread tension depending on the type of fabric and thread being used If the tension balance on the test piece is not satisfactory you can adjust the thread tension with the thread tension d...

Страница 50: ...r t y u i o Machine Setting Lower looper pre tension setting slider STD Standard setting of tension dials 1 needle 3 threads Left needle Right needle Upper looper Lower looper 0 2 0 6 7 Standard setti...

Страница 51: ...test piece and check the tensions w Needlethread e Upper looper thread r Lower looper thread q q w e y u i o z x c v b v Deactivate the upper knife and sew b Open the fabric and iron the wrong side q...

Страница 52: ...r Cutting allowance z q w e r w t x c v q w e r z x w 51 c v x When you reach the next corner stop the machine Raise the needle and the presser foot Remove the threads from the chaining finger and tu...

Страница 53: ...b toward you to R refer to page 13 q Chaining finger w Chaining finger switchknob x Open the looper cover and the side cover c Remove the needle and the presser foot refer to pages 9 and 10 v Remove t...

Страница 54: ...toward you slowly until it clicks w Handwheel c Insert the straight end not the looped end of the looper threading wire into the hole of the looper threader until it comes out from the looper tip hol...

Страница 55: ...hten the hexagonal bolt q Upper knife w Hexagonalbolt r Upper knife supporter x Turn the handwheel toward you until the upper knife reaches its lowest position c Loosen the hexagonal bolt Adjust the p...

Страница 56: ...everal times c Close the looper cover and the side cover With the machine unthreaded place a scrap of fabric under the presser foot and run the machine for a few minutes v Wipe away any oil which appe...

Страница 57: ...Refer to pages 37 41 and 45 Refer to pages 19 32 Refer to page 13 Refer to pages 33 42 46 49 Seam puckering 1 The thread tension is too tight 2 The machine is not correctly threaded or the thread is...

Страница 58: ...attachment Use when sewing sleeves cuffs clooars etc 202036100 6 Elastic gathering attachment Use for elastic taping decorative taping etc 202037008 7 Cloth guide Use to help you create a constant wi...

Страница 59: ...g Machine Co Ltd Address 1463 Hazama cho Hachioji shi Tokyo 193 0941 Japan This machine complies with the following regulations EN 60335 1 2012 A11 EN 60335 2 28 2003 A1 EN 62233 2008 EN 55014 1 2006...

Отзывы: