background image

23

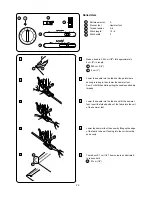
Rolled Hem

Pattern selector:

A

Presser foot:

Hemmer foot

Thread tension:

2–6

Stitch length:

1.5–4

Stitch width:

5

4

1

2

3

5

1

Make a double 0.25 cm (1/8") fold approximately

8 cm (3") in length.

       0.25 cm (1/8")

        8 cm (3")

2

Lower the needle into the fabric at the point where

sewing is to begin, then lower the hemmer foot.

Sew 3 or 4 stitches while pulling the needle and bobbin

threads.

3

Lower the needle into the fabric and lift the hemmer

foot. Insert the folded portion of the fabric into the curl

of the hemmer foot.

4

Lower the hemmer foot, then sew by lifting up the edge

of the fabric to keep it feeding into the curl smoothly

           and evenly.

5

Trim about 0.7 cm (1/4") from corners as illustrated,

to reduce bulk.

       0.7cm (1/4")

A

1

1

4

2

3

A

C

D

E

F

G

H

2

3

4

5

1

2

3

4

5

1

2

3

1

2

3

3

0

1

2

3

4

S.S.

0

1

2

3

4

5

Содержание 415

Страница 1: ...Model INSTRUCTION BOOK...

Страница 2: ...rs or service center for examination repair electrical or mechanical adjustment 4 Never operate the appliance with any air opening blocked Keep ventilation openings of this sewing machine and foot con...

Страница 3: ...nto water Return the appliance to the nearest authorized dealer or service center for examination repair electrical or mechanical adjustment 4 Never operate the appliance with any air opening blocked...

Страница 4: ...l 12 Stitch Width Control 12 Reverse Stitch Button 13 Dropping the Feed Dog 13 SECTION 3 BASIC SEWING Straight Stitch Sewing 14 To Change Sewing Direction 14 Seam Guides Line 15 Variable Needle Positi...

Страница 5: ...e up lever 11 Thread tension dial 12 Face plate 13 Thread cutter 14 Needle threader on specific models only 15 Needle plate 16 Presser foot holder 17 Needle clamp 18 Needle 19 Presser foot 20 Extensio...

Страница 6: ...hen bartacking to reinforce pockets plackets and waistlines For stitching sleeves waistbands pant legs or any circular garment area For darning socks or mending knees elbows or areas of wear in childr...

Страница 7: ...er supply plug Power switch Outlet Machine socket Machine plug Foot control 2 3 4 5 6 Caution Do not place anything on the foot contorol otherwise the machine will start advertently The symbol 0 on a...

Страница 8: ...attach Place the presser foot so the pin on the foot lies just under the groove of the foot holder Lower the foot holder to lock the foot in place Presser Foot Lifter The presser foot lifter raises an...

Страница 9: ...ch very fine fabrics and synthetics use a BLUE TIPPED needle The blue tipped needle effectively prevents skipped stitches When sewing very fine fabrics sew over a piece of paper to prevent seam pucker...

Страница 10: ...recess of the hook race Hook cover Latch Horn 1 2 3 3 2 1 Setting Spool Pins The spool pins are used for holding the spool of thread in order to feed thread to the machine To use pull up the spool pin...

Страница 11: ...read through the hole in the bobbin from the inside to the outside Put the bobbin on the bobbin winder spindle 3 Push it to the right 4 With the free end of the thread held in your hand depress the fo...

Страница 12: ...aw thread down into the tension area and then around the check spring holder 3 Firmly draw the thread up and through the take up lever from right to left 4 Then draw the thread down and slip it into t...

Страница 13: ...eedle to its highest position Press down the needle threader knob as far as it will go The hook comes out through the needle eye from behind 2 Pull the thread down around the thread guide then pass it...

Страница 14: ...shows slightly on the wrong side bottomside of the fabric 2 Needle thread tension is too tight The bobbin thread bottom thread will appear on the right side top side of the fabric Loosen the needle th...

Страница 15: ...l in the direction of to compress it or to expand it Stitch Width Control Note Raise the needle above the fabric when you turn the stitch width dial 1 1 1 S S Raise the needle and presser foot Turn th...

Страница 16: ...he Feed Dog 1 Remove the extension table Raise the presser foot 2 To drop the feed dog push the lever to the right 3 To raise the feed dog push the lever to the left The feed dog must be up for normal...

Страница 17: ...abric feed by itself 2 For fastening the end of seams press the reverse stitch button and sew several reverse stitches Raise the presser foot and remove the fabric drawing the threads to the back 3 Dr...

Страница 18: ...needle position and the line The numbers in front are millimeters The numbers in back are fractions of an inch Variable Needle Position 0 1 2 3 4 5 When the straight stitch pattern A is selected you c...

Страница 19: ...titch width 5 1 2 3 4 4 1 2 3 SECTION 4 UTILITY STITCHING Overcasting The zigzag stitch is used on the seam allowance to prevent fabric from fraying at raw edges Pattern selector C Presser foot Zigzag...

Страница 20: ...to pucker Place your fabric to allow a 1 6 cm 5 8 seam Trim the seam allowance after sewing 5 5 5 5 D F Note Be careful not to cut the stitches This knit stitch is ideal for sewing swimwear and stret...

Страница 21: ...Presser foot Zigzag foot Thread tension 2 6 Stitch length S S Stitch width 0 or 5 4 1 2 3 The stitch is sewn with two stitches forward and one stitch backward forming a seam that does not rip easily 5...

Страница 22: ...the needle into the left hole on the button Align the right hole on the button with the slot of the foot and lower the foot to hold the button in place 2 Raise the needle and adjust the stitch width s...

Страница 23: ...e the bartack Then cut the opening with a seam ripper Take care not to cut the stitches 1 3 4 5 6 Buttonhole 7 Pattern selector Presser foot Buttonhole foot Thread tension 1 5 Stitch length 0 5 1 Stit...

Страница 24: ...zipper guide the zipper teeth along the edge of the foot and stitch through the garment and zipper tape Turn the fabric and sew the other side of the zipper in the same way as you did the left side 1...

Страница 25: ...e wall of hem guide is placed between the toes of the presser foot A Heavy weight fabrics The raw edge should be overcast B Fine or medium weight fabrics 3 Raise the presser foot and place the fabric...

Страница 26: ...hemmer foot Sew 3 or 4 stitches while pulling the needle and bobbin threads 3 Lower the needle into the fabric and lift the hemmer foot Insert the folded portion of the fabric into the curl of the hem...

Страница 27: ...lace the folded edge along the slot of foot The needle should fall off the edge of the fabric on the right forming tucks If forward and reverse feeds become unbalanced due to the type of fabric adjust...

Страница 28: ...nd distribute the gathers evenly Secure the threads at the other end Sew the decorative stitch pattern between the gathering stitches Pull out the gathering stitches 4 1 2 3 Box Stitching Pattern sele...

Страница 29: ...wn into the fabric Raise the presser foot and pivot fabric to the right or left 1 4 5 C 1 4 2 3 A C D E F G H Fagoting Pattern selector H Presser foot Zigzag foot Thread tension 2 5 Stitch length 1 St...

Страница 30: ...and open the hook cover Open the hinged latch of bobbin case and take it out of the machine Open the hook race ring holders and remove the hook race ring Remove the hook Clean the hook race with a bru...

Страница 31: ...tration Cap Screw Face plate Oiling the shuttle hook area Open the hook cover Oil the point indicated in the illustration Hook cover 1 2 3 4 1 2 3 4 Sewing Light The sewing light is located behind the...

Страница 32: ...needle is too fine for the fabric being sewn 7 The pattern selector dial had been turned while the needle was in the material 1 The needle is incorrectly inserted 2 The needle is bent or blunt 3 The n...

Отзывы: