JANE KIDS ZONE LIKE Скачать руководство пользователя страница 20

2

20

             In a few months you’ll see that your child is no longer a newborn baby and is starting to gain some control over his body, although he still won’t be able to support his head (this happens 

when the baby is about five or six months old), and your child may have grown so much that you do not need the leg insert any more. However, the neck support should still be used at this stage.

It is advisable to make sure that the neck protector always has the hood inside it so it is padded and firm enough to be used as a headrest. The hood is stored in the front inner pocket with the 

zip closed, as it should not be used until the child reaches the second stage.

SECOND STAGE: YOUR CHILD CAN NOW SUPPORT HIS HEAD UNAIDED AND DOES NOT NEED THE INSERT

At around five or six months old, your child will be able to support his head by himself and will be more interested than ever in exploring his surroundings. Now is the time to store the leg insert 

inside the Like. The baby’s bottom will fill the baby carrier better, you will be able to use all the positions offered by the LIKE and you will also be able to use the inner hood of the LIKE when 

your baby is sleeping or if it is cold... etc.

To use the hood, simply undo the zip of the baby carrier on the top front part and take the hood out. Remember that using the hood means the neck protector does not work.

Always make sure that your child can support his head unaided. To fit the hood fasten the strips to the buttons on your shoulder straps. There are three positions to choose from so your baby’s 

head is at the right height.

If you are carrying your child on your back, you can open the hood by reaching round and undoing the zip, taking the hood out and fastening it to your shoulder straps. The side strips on the 

hood are fastened to one of the three press studs on your shoulders.

At this stage, you can carry your child in any of the three positions.

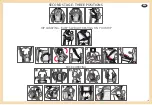
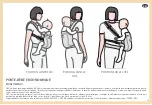
WHAT POSITION SHOULD I CARRY MY BABY IN TODAY??
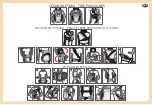
1.- ON YOUR CHEST

Remember that your baby should be carried in the frontal position (on your chest) mainly when he is newborn or under three months old. And you will need to check whether you still need to 

use the leg insert and/or the neck protector or support that the baby carrier has, so it is not possible to use the hood during this first stage.

2.- ON YOUR HIP

Remember that for this position your child needs to be able to support his head unaided and must not need the leg insert any more. So, the child will be at least five or six months old.

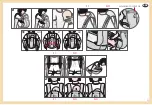
STEP 1.-Fasten the abdominal belt and unfasten all he vertical opening and closing buckles and leave the baby carrier hanging from your waist.

STEP 2.-Now connect the opening buckle part to the closing buckle on the opposite side. For example, if you want to carry the child on your left hip, connect the right strap to the left side.

STEP 3.-Move the baby carrier turning it slightly towards the hip where you want to carry the child, and pass the strap over your head and shoulders.

STEP 3. Position your child so he is facing you and lift him high up onto your chest so he is in the middle of the baby carrier. The child’s forehead should be level with your chin.

STEP 4. Raise the back part of the baby carrier and hold it snugly against your child’s back.

Warning: Do not let go of your child and make sure he is always held securely in your arms.

STEP 5. Hold your child with one hand and put your other arm through the strap.

STEP 6. Hold the strap you have put on with one hand while supporting your baby’s body with your other hand.

STEP 7. Move the child and the baby carrier to your back while using your other hand to gently turn the abdominal belt in the same direction until the baby is positioned on the middle of your back.

IMPORTANT: Keep hold of the baby firmly at all times during this step.

STEP 8. While holding the baby with the arm that has the strap on, put your other arm through the other strap and hold it firmly on your shoulder so the weight does not make it slip down your 

arm. Keep holding the baby securely with your other hand.

STEP 9. Lastly, fasten the back straps that should now be on the middle of your chest.

STEP 10. If you want to use the hood undo the zip and take the hood out by reaching behind you and then fasten it to the most suitable press stud on the shoulder straps.
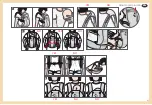
3.- ON YOUR BACK

Remember that for this position your child needs to be able to support his head unaided and must not need the leg insert any more. So, the child will be at least five or six months old.

Steps to follow:

STEP 1. Fasten the abdominal belt (this is always the first step for all the positions).

STEP 2. Check that all the strap buckles of the baby carrier are fastened and are vertical, parallel to your arms.

STEP 4.-Pick the child up and start to place him in the baby carrier. Support your child’s head on your free shoulder and gently slide his body down into the carrier until the child’s bottom 

is firmly supported by the bottom of the baby carrier. Make sure there is no gap between the baby carrier and your child’s bottom.

STEP 5.-Next, take hold of the strap that is loose on your back and bring it forward while turning your baby’s bottom to position him comfortably on your hip. Fasten the buckle on the 

other side. The straps should be gently crossed over your kidneys.

STEP 6.-Lastly, adjust the strap to the required length. Now you can let go of your child.

EN

Содержание KIDS ZONE LIKE

Страница 1: ...umpre com o documento de Seguran a do Pano porta beb s CEN TR 16512 EN FR IT PT ESP Este producto cumple con la Normativa de Mochilas portabeb s This product complies with the Baby carrier regulations...

Страница 2: ...viaje Travel bag Max 9 Kilos Opci n Reductor 3 5 18 kg Posici n obertura piernas Ergon mica Opening legs position Ergonomic design 2 ETAPAS 9 Kg SIN REDUCTOR WITHOUT REDUCER HASTA 9 Kg CON REDUCTOR WI...

Страница 3: ...ALDA BACK CARRYING POSICI N EN COSTADO HIP CARRYING Armaz n y forro 100 algod n Correaje 80 poliester 20 poliamida Shell and linning 100 cotton Webbing 80 polyester 20 poliamida COMPOSICI N COMPOSITIO...

Страница 4: ...asca frontale portaoggetti Bottoni a pressione per fissare il riduttore per le gambe interno Cinghia di unione centrale posteriore che equilibra e unisce i tiranti Riduttore per le gambe pezzo interno...

Страница 5: ...ponen un confortable vientre nido para el beb fomentando el v nculo afectivo madre hijo Like te permitir llevar a tu hijo en uso como mochila y como portabeb porque dispone de todos los elementos nece...

Страница 6: ...osible el cambio de posici n r pido y seguro 5 LIKE LIBRE EN POSICIONES Puedo llevar a mi beb en la espalda Y de costado Tu mochila Like ha sido dise ada y confeccionada para que puedas llevar a tu hi...

Страница 7: ...7 TIRANTES PARALELOS PRIMERA ETAPA CON REDUCTOR PROTECTOR CERVICAL TIRANTES CRUZADOS 7 8 9 6 1 2 3 4 5 6 8 9 7 1 2 3 4 5 ESP ESP...

Страница 8: ...ASO 8 Finalmente cierra la hebilla de uni n en la espalda para que los tirantes no se resbalen de los hombros y queden perfectamente equilibrados PASO 9 Comprueba que tus hombros est n a la misma altu...

Страница 9: ...9 ESP SEGUNDA ETAPA TRES POSICIONES POSICI N EN COSTADO PESO DEL BEB APOYADO EN TU CADERA POSICI N EN ESPALDA 6 7 8 9 10 1 2 3 4 5 1 2 3 4 5 6...

Страница 10: ...SO 1 Coloca el cintur n abdominal y suelta todas las hebillas de apertura y cierre verticales y dejas tu mochila colgando de tu cintura PASO 2 Ahora une la parte de la hebilla de apertura con la hebil...

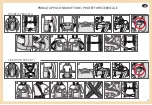
Страница 11: ...11 ESP 1 5 6 4 2 3 NO NO SI NO ALOJAMIENTO CAPUCHA SI NO NO SI NO SI...

Страница 12: ...tu bebe para que queden totalmente abiertas La postura ergon mica que proporciona esta mochila es la postura en M en la que debes posicionar a tu beb Recuerda que cuando el ni o es peque o las pierna...

Страница 13: ...ede derivar en asfixia INFORMACI N IMPORTANTE DE SEGURIDAD NO utilice la mochila porta beb como fijaci n para el ni o en un veh culo de motor o como asiento de autom vil NO utilice la mochila porta be...

Страница 14: ...cara del beb lejos de la mam despu s de que el lactante lleve a cabo la alimentaci n 10 Si el ni o pesa menos de 4 5 Kg debe ajustar el reductor de piernas J de la pagina 6 de los componentes a uno de...

Страница 15: ...e wearer s body like a second skin and creates a comfortable cosy nest for the baby strengthening the bond between mother and baby Like lets you carry your child and can be used as a baby backpack and...

Страница 16: ...an you can change the position quickly and safely 5 LIKE CHOICE OF POSITION Can I carry my baby on my back Or on my hip You Like baby carrier has been designed and made so that you can carry your chil...

Страница 17: ...17 EN FIRST STAGE WITH INSERT CERVICAL PROTECTOR STRAPS PARALLEL STRAPS CROSSED 7 8 9 6 1 2 3 4 5 6 8 9 7 1 2 3 4 5...

Страница 18: ...y fasten the buckle on your back to join the straps together to make sure they don t slip down your shoulders and to keep them perfectly balanced STEP 9 Check that your shoulders are at the same heigh...

Страница 19: ...19 EN SECOND STAGE THREE POSITIONS HIP CARRYING BABY S WEIGHT RESTING ON YOUR HIP BACK CARRYING 6 7 8 9 10 1 2 3 4 5 1 2 3 4 5 6...

Страница 20: ...s and leave the baby carrier hanging from your waist STEP 2 Now connect the opening buckle part to the closing buckle on the opposite side For example if you want to carry the child on your left hip c...

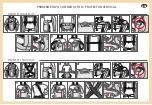
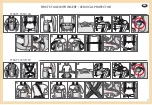
Страница 21: ...21 EN 1 5 6 4 2 3 NO NO YES NO FRONT POCKET OR HOOD YES NO NO YES NO YES...

Страница 22: ...ouldn t force them to be fully open either The ergonomic position of this baby carrier is for the baby s legs to be in the M position Remember that when the child is small his legs will be inside the...

Страница 23: ...de his breathing and cause suffocation IMPORTANT SAFETY INFORMATION DO NOT use the baby carrier as a fastening device for the child in a motor vehicle or as a car seat DO NOT use the baby carrier whil...

Страница 24: ...event any falls or strangulation ALWAYS adjust the leg openings to the smallest size to fit the child Check that the baby s extremities are not trapped and that his arms and legs are free DO NOT use t...

Страница 25: ...ainetti abbraccia il corpo come una seconda pelle e crea un confortevole ventre nido per il bambino favorendo il legame affettivo madre figlio LIKE ti permetter di portare tuo figlio come zainetto e c...

Страница 26: ...n qualsiasi momento in modo facile e sicuro 5 LIKE POSIZIONI IN LIBERT Posso portare il mio bambino sulla schiena E su un fianco Il tuo zainetto Like stato disegnato e realizzato perch tu possa traspo...

Страница 27: ...27 IT PRIMA TAPPA CON RIDUTTORE PROTETTORE CERVICALE TIRANTI PARALLELLI TIRANTI INCROACIATI 7 8 9 6 1 2 3 4 5 6 8 9 7 1 2 3 4 5...

Страница 28: ...ntro il tuo petto PASSO 8 Infine chiudi la fibbia di unione sulla schiena in modo che i tiranti non ti scivolino dalle spalle e siano perfettamente equilibrati PASSO 9 Verifica che gli spallacci siano...

Страница 29: ...29 IT SECONDA TAPPA TRE POSIZIONI POSIZIONE SU UN FIANCO PESO DEL BAMBINO SOSTENUTO SU UN FIANCO POSIZIONE SULLA SCHIENA 6 7 8 9 10 1 2 3 4 5 1 2 3 4 5 6...

Страница 30: ...tutte le fibbie di apertura e chiusura verticali lasciando che lo zainetto ti penda dalla vita PASSO 2 Ora unisci la parte della fibbia di apertura con la fibbia di chiusura sul lato opposto Ad esempi...

Страница 31: ...31 IT 1 5 6 4 2 3 NO NO SI NO TASCA FRONTALE PER CAPUCCIO SI NO NO SI NO SI...

Страница 32: ...ambe del tuo bambino perch rimangano completamente aperte La postura ergonomica che offre questo zainetto la postura a M in cui devi posizionare il tuo bambino Ricorda che quando il bambino piccolo le...

Страница 33: ...N utilizzare lo zainetto portabeb come sistema di trattenuta per il bambino in un veicolo a motore o come sedile in auto NON utilizzare lo zainetto portabeb mentre si praticano attivit complesse come...

Страница 34: ...b durante l allattamento spostare sempre il viso del bambino dalla mamma quando finisce di alimentarsi 10 Se il bambino pesa meno di 4 5 chili bisogna regolare il riduttore per le gambe J Vedi pagina...

Страница 35: ...une seconde peau et cr er un nid douillet pour le b b ce qui renforce le lien affectif m re enfant LIKE vous permettra de porter votre enfant dans le dos ou devant car il dispose de tous les l ments...

Страница 36: ...sangles permettent de changer rapidement de position et en toute s curit 5 LIKE LE CHOIX DES POSITIONS Est ce que je peux porter mon enfant dans le dos Sur le c t Votre porte b b LIKE a t con u et fab...

Страница 37: ...37 FR BRETELLES PARALL LES PREMI RE ETAP AVEC LE R DUCTEUR PROTECTEUR CERVICAL BRETELLES CROIS ES 7 8 9 6 1 2 3 4 5 6 8 9 7 1 2 3 4 5...

Страница 38: ...a boucle dans le dos afin que les bretelles ne glissent pas sur les paules et soient bien quilibr es TAPE 9 v rifiez si vos paules sont la m me hauteur et que les sangles centrales ne soient pas contr...

Страница 39: ...39 FR DEUXI ME TAPE TROIS POSITIONS POSITION SUR LE C T POIDS DE B B SUPPORT SUR LE C TE POSITION DANS LE DOS 6 7 8 9 10 1 2 3 4 5 1 2 3 4 5 6...

Страница 40: ...is TAPE 1 Attachez la ceinture abdominale et d tachez toutes les boucles d ouverture et de fermeture verticales Laissez pendre le porte b b de votre ceinture TAPE 2 Attachez la boucle d ouverture la b...

Страница 41: ...41 FR 1 5 6 4 2 3 NON NON OUI NON POCHE AVANT POUR CAPUCHE OUI NON NON OUI NON OUI...

Страница 42: ...es ouvrir compl tement La position ergonomique offerte par ce porte b b est la position en M dans laquelle vous devez installer votre b b Les premiers mois lorsque votre b b est petit ses jambes devro...

Страница 43: ...r sa respiration et provoquer son asphyxie INFORMATIONS IMPORTANTES RELATIVES LA S CURIT N utilisez pas le porte b b comme accessoire de retenue pour l enfant dans un v hicule moteur ou comme si ge au...

Страница 44: ...t utilis lors de l allaitement maternel il faut toujours retirer la t te du b b du sein une fois que le b b a fini de t ter 10 Si l enfant p se moins de 4 5 kg il convient de r gler le r ducteur J pag...

Страница 45: ...segunda pele e representam um confort vel ventre ninho para o beb fomentando o v nculo afetivo m e filho A Like permitir lhe levar o seu filho utilizando a como mochila e como porta beb s porque disp...

Страница 46: ...r pida e segura 5 LIKE LIVRE EM POSI ES Posso levar o meu beb s costas E de costas A sua mochila Like foi desenhada e confecionada para que possa levar o seu filho em todas as suas etapas e nas tr s...

Страница 47: ...47 PT FITAS PARALELOS PRIMEIRA ETAPA COM REDUTOR PROTECTOR CERVICAL FITAS CRUZADAS 7 8 9 6 1 2 3 4 5 6 8 9 7 1 2 3 4 5...

Страница 48: ...peito PASSO 8 Finalmente feche a fivela de uni o nas costas para que as fitas n o resvalem dos ombros e fiquem perfeitamente equilibradas PASSO 9 Comprove que os seus ombros est o mesma altura e que a...

Страница 49: ...49 PT SEGUNDA ETAPA TR S POSI ES POSI O DE LADO PESO DO BEB SUPORTADO EM LADO POSI O NAS COSTAS 6 7 8 9 10 1 2 3 4 5 1 2 3 4 5 6...

Страница 50: ...eses PASSO 1 Coloque o cinto abdominal e solte todas as fivelas de abertura e fecho verticais e deixe a sua mochila pendurada da sua cintura PASSO 2 Agora una a parte da fivela de abertura com a fivel...

Страница 51: ...51 PT 1 5 6 4 2 3 N O N O SIM N O ALOJAMIENTO CAPUCHA SIM N O N O SIM N O SIM...

Страница 52: ...u beb para que fiquem totalmente abertas A postura ergon mica que proporciona esta mochila a postura em M na qual deve posicionar o seu beb Lembre se que quando a crian a pequena as pernas ficam dentr...

Страница 53: ...rivar em asfixia INFORMA O IMPORTANTE DE SEGURAN A N O utilize a mochila porta beb s como fixa o para a crian a num ve culo a motor ou como assento de autom vel N O utilize a mochila porta beb s enqua...

Страница 54: ...ue o lactante leve a cabo a alimenta o 10 Se a crian a pesa menos de 4 5 Kg dever ajustar o redutor de pernas J da p gina 6 dos componentes a um dos dois bot es previstos para isso e que figuram na p...

Страница 55: ...asca frontale portaoggetti Bottoni a pressione per fissare il riduttore per le gambe interno Cinghia di unione centrale posteriore che equilibra e unisce i tiranti Riduttore per le gambe pezzo interno...

Отзывы: